

Making salami at home means grinding meat and fat to a defined fat ratio, mixing with salt, cure (sodium nitrite), spices, and a starter culture, stuffing into casings, fermenting at warm temperature for 24-48 hours to drop pH below 5.0, then drying at 55°F and 75% RH until 30-40% weight loss is reached.
The total timeline runs 4 to 12 weeks depending on diameter and style.
The technique sounds simple. The reality is that salami fails for predictable reasons that beginners discover one batch at a time: salt percentage off by half a point, fermentation that never drops pH, casings that release because they were not bound at the right temperature, dry rings around the outside of a wet core. This guide walks the equipment, the salt math, the starter culture choices, the fermentation phase, and the drying schedule that produces salami you can sell instead of throw out. My second batch ever, I added the Bactoferm T-SPX (Christian Hansen, 25 g sachet — what I run, dosed at 0.25 g per kilo of meat) starter to a meat mix that was still 38°F from the freezer; the LAB never woke up and pH was still 5.6 at 60 hours. I had to add a fresh dose rehydrated in 90°F water and re-ferment for another 36 hours. Every recipe stage below has a similar this-is-how-it-actually-fails note.
What Salami Is and the 5 Stages of Production
Salami is a fermented dry-cured sausage made from ground meat and fat stuffed into casings, fermented to drop pH, then dried until water activity (aw) drops below 0.92 — the shelf-stable threshold documented in dry and semi-dry sausage validation guidance, alongside the matching pH-5.0 ceiling. The five stages run sequentially: meat preparation, mixing and stuffing, fermentation, drying, and finishing. Each stage has go/no-go criteria. Skip a check at any stage and the next stage compounds the problem.
Cured-and-fermented salami is shelf-stable at room temperature once dried because the combination of low water activity, low pH (acidified during fermentation), and salt creates an environment where pathogens cannot reproduce. The cure (sodium nitrite or potassium nitrate) provides additional protection against Clostridium botulinum during the warm fermentation phase. This is why home salami is an exercise in following recipes precisely — the ingredients in the recipe are the safety system.
Equipment You Need for Home Salami
The equipment list is short but specific. Each item has substitutes that look workable and produce poor results. Buy the right tool once.
- Meat grinder: 1/2 HP minimum motor, ability to handle a 6mm or 8mm plate. KitchenAid attachments work for under 5 lb batches but slow and warm the meat for larger ones. Dedicated grinders (Weston, LEM) handle 8-10 lb without warming.
- Sausage stuffer: Vertical hand-crank stuffer (5-15 lb capacity). Horizontal designs are slow and force-warm the meat. The stuffer’s tubes determine maximum casing diameter.
- Digital scale: Reads to 0.1 g for spice and culture, and to 1 g for meat. Salt and cure are weighed by percentage of meat-plus-fat weight, so accurate scales are non-negotiable.
- pH meter or strips: Non-negotiable. You confirm pH dropped below 5.0 at end of fermentation. pH strips covering 4.0-7.0 work; a digital meter is more precise.
- Casings: Hog (32-38 mm for medium salami), beef (40-60 mm for larger styles), or synthetic fibrous (40-65 mm for bologna-style and large salami).
- Curing chamber: Holds 50-60°F and 75% RH (see the complete curing chamber build guide).
- Fermentation cabinet or warm spot: 75-85°F for 24-48 hours during fermentation phase.
As an Amazon Associate I earn from qualifying purchases.
Meat and Fat: Sourcing and Ratios
Salami is typically 70-80% lean meat and 20-30% fat by weight. Pork shoulder (Boston butt) at 75% lean / 25% fat is the standard salami meat — buy it whole and grind your own rather than rely on pre-ground retail. Source the back fat separately if your shoulder runs lean; back fat from a butcher (the firm fat from above the loin) is what produces visible white inclusions in the cut salami face.
Beef-only salami runs 80% beef + 20% added fat. Game meat salami follows the same logic with venison, wild boar, or duck — add 25-30% pork fat to compensate for lean game meat. Avoid water-injected supermarket meats; the added moisture upsets your salt and water-activity math.
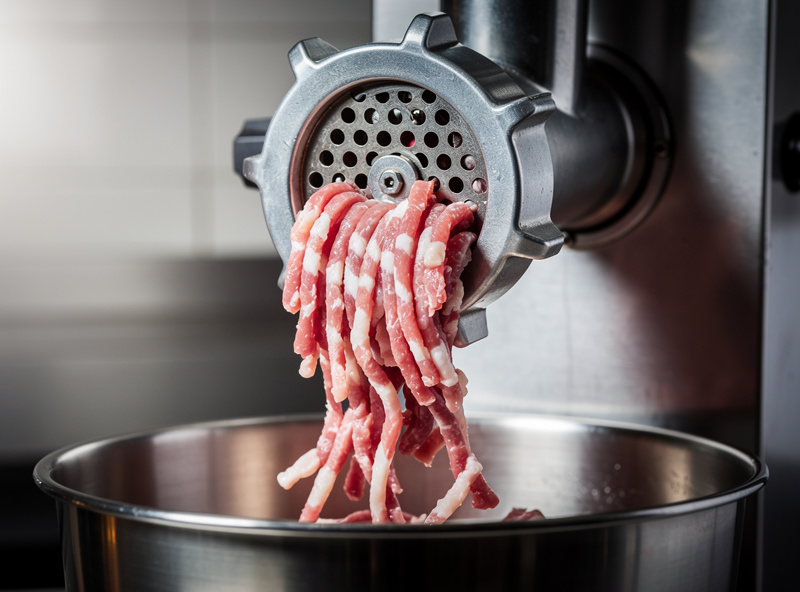
Keep all meat and fat at 32-34°F (just above freezing) through grinding. Warm meat smears the fat through the lean during grinding, destroying the visible-fat-fleck appearance that good salami shows on the cut. Many home salami makers grind directly from a half-frozen state for better fat definition. The plate sizes, temperatures, and fat ratios are detailed in grinding meat for salami.
Salt, Cure, and the 2.5% Rule
Salt is the foundation of salami safety and flavor. Most recipes target 2.5-3.0% salt by total weight (meat + fat + any water). Cure #2 (sodium nitrite + sodium nitrate) is added at 0.25% of weight for traditional dry-cured salami, providing nitrite for short-term pathogen suppression and nitrate for the long ripening phase. Cure #1 (sodium nitrite only) is used for shorter-aged products like fresh sausage or hot-smoked styles, not traditional dry salami.
The salt percentage method that produces consistent results is equilibrium curing — calculate exact salt grams as a percentage of meat weight rather than pinch-and-eyeball. The math and worked examples are in how to calculate salt percentage for equilibrium curing. For a 10 lb (4536 g) batch at 2.7% salt, that is 122 g salt; at 0.25% Cure #2, that is 11.3 g cure. A scale reading to 0.1 g matters here.
Starter Cultures: Bactoferm Options Compared
Starter cultures are freeze-dried lactic acid bacteria (and sometimes mold spores) that drop pH during fermentation and produce the characteristic flavor of cured salami. Without a starter, you depend on whatever wild bacteria happen to be present, with unpredictable results. Bactoferm and similar commercial cultures are inexpensive insurance and the difference between hobby salami and reliable salami.
| Culture | Type | Ferment Temp | Best For | Flavor Profile |
|---|---|---|---|---|
| Bactoferm T-SPX | Slow LAB | 72-78F | Traditional dry salami, prosciutto-style | Mild, classic Italian; slow lactic notes |
| Bactoferm F-RM-52 | Medium LAB | 72-85F | Genoa, soppressata, milano salami | Balanced tangy, recognizable salami |
| Bactoferm F-LC | Fast LAB + Listeria-control | 78-85F | Higher-temp fermentation; safety margin | More tang, faster pH drop |
| Bactoferm Mold-600 | White surface mold (Penicillium nalgiovense) | 55-60F drying | Surface coverage of casings | Earthy, mushroomy white-mold rind |
| Bactoferm LHP | Extra-fast LAB | 80-110F | Quick-fermented summer sausage, pepperoni | Sharp tang; not classic dry salami flavor |
For traditional Italian-style salami (Genoa, soppressata, milano), F-RM-52 is the workhorse. For longer-aged styles where mild flavor is the goal, T-SPX. A side-by-side of the cultures I reach for, T-SPX vs F-LC vs B-LC-007, is in the dedicated starter culture guide. For surface mold coverage that produces the white powdery rind on traditional salami, dust casings with a solution of Bactoferm Mold-600 immediately after stuffing — full method in Penicillium cultures for salami casings.
Casings: Hog, Beef, Collagen, Synthetic
Casings determine diameter, look, and bind. Natural casings (hog or beef) breathe with the meat as it dries, allowing moisture out and beneficial mold to colonize. Collagen casings are uniform but less breathable. Synthetic fibrous casings (used for large salami like mortadella or bologna) are vapor-permeable plastic and require a beneficial mold dust to look traditional. The full breakdown of hog vs beef middle vs collagen casings covers diameter, drying time, and prep.
- Hog casings (32-38mm): Standard for most home salami. Soak in warm water 30 minutes before stuffing. Available salt-packed at most butcher shops.
- Beef middles (40-60mm): For larger salami like soppressata or capocollo. Tougher than hog; soak longer (1 hour).
- Beef rounds (38-46mm): Curved casings traditional for Italian salami; produce the bent-rod shape.
- Collagen casings (any size): Uniform, easy to handle, no soaking needed. Less traditional appearance and slightly less breathability.
- Synthetic fibrous (40-65mm+): For bologna, mortadella, large salami styles. Easier to handle; outer surface needs Bactoferm Mold-600 dust if traditional appearance is wanted.
The good vs bad mold conversation when natural casings start to colonize is in salami casing mold: good white mold vs dangerous black/green.
Stuffing and Tying
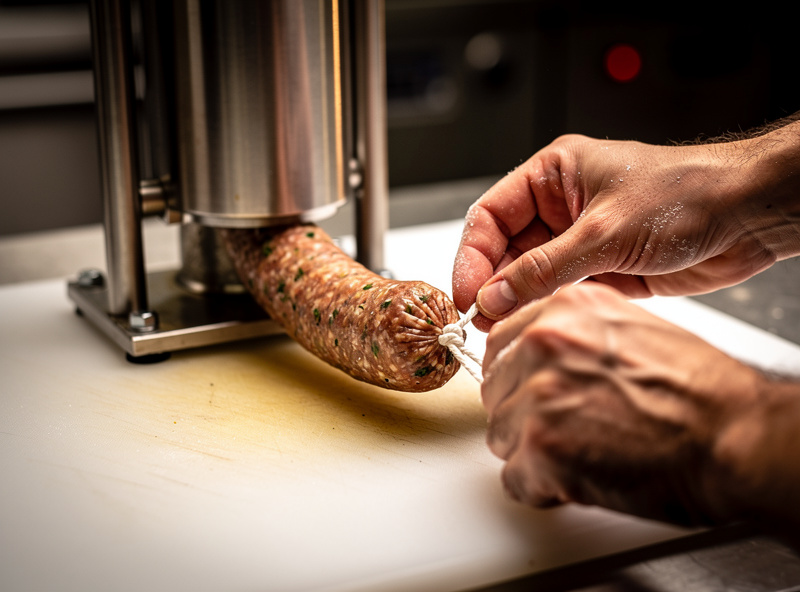
Mix ground meat, fat, salt, cure, spices, and rehydrated starter culture (in water per the culture instructions) at near-freezing temperature. Mix until the meat develops “primary bind” — the texture turns sticky and tacky and pulls away from the bowl in stretchy threads. Without proper bind, the salami crumbles when sliced.
Stuff cold meat into pre-soaked casings using the vertical stuffer, eliminating air pockets as you go. Tie off in 8-12 inch sections with butcher twine. Prick any visible air bubbles with a sterile pin (sanitized by passing through a flame and cooling). The detailed stuff-and-tie sequence with photos is in how to make Genoa salami step by step.
The Fermentation Stage (24-48 Hours)
Fermentation happens at 75-85°F (24-30°C) at 90% RH for 24-48 hours, depending on culture. The lactic acid bacteria multiply rapidly, ferment glucose (added as part of the recipe) into lactic acid, and drop pH from 5.8-6.0 (raw meat) to below 5.0 (target). The pH drop is what makes the meat safe through the rest of the drying process.
A small temperature-controlled cabinet, an oven with the light on, or a dedicated fermentation enclosure all work. Hold humidity high (90% RH) to prevent the surface from drying before the pH drops. Test pH at 24 hours and 48 hours; do not move to drying until pH is below 5.0. If you do not own a meter, the input-control and sensory method is in how to ferment salami without a pH meter. The interaction between temperature, time, and starter culture determines pH speed — F-LC drops fastest; T-SPX is slowest.
If pH does not drop below 5.0 after 48 hours, the culture failed (rare but possible — usually old culture or temperature out of range). The salami is unsafe and must be discarded. This is one reason cure #2 is in the recipe: it provides nitrite protection during the warm phase even if fermentation is slower than ideal.
The Drying Stage (4-12 Weeks)
After fermentation, move salami to the curing chamber at 55°F (13°C) and 75% RH, hung with air on every side on a DIY salami drying rack so the pieces dry evenly. Drying continues until 30-40% weight loss from the post-stuffing weight. Weigh each salami after stuffing, mark the target weight (start weight × 0.60 to 0.70), and pull when target reached. This is the only honest readiness indicator; calendar time is a rough guide that depends on diameter and humidity.
- Small salami (32-38mm casing, 8-10 inches): 3-5 weeks to 35% loss
- Medium salami (40-50mm casing, 10-14 inches): 5-8 weeks
- Large salami (50-65mm casing, 14-18 inches): 8-12 weeks
- Whole-hog soppressata (60mm+): 10-14 weeks
The chamber climate logic and humidity-management techniques are documented in detail in curing chamber humidity control, curing chamber too humid: how to fix oversaturation fast, and case hardening in curing chambers.

Spice Profiles for Common Salami Styles
Spice ratios are the difference between a generic dry-cured sausage and a recognizable named style. Quantities below are per kilogram of meat plus fat. Adjust within taste, but stay within historical ranges to avoid producing something that does not taste like the style on the label. Two full style recipes with weighed ratios are the homemade soppressata recipe and the finocchiona fennel salami recipe.
- Genoa: Black pepper 3 g, garlic powder 1.5 g, white wine 50 ml, sugar 4 g. Mild, traditional, Italian-recognizable.
- Soppressata (calabrese): Black pepper 4 g, sweet paprika 8 g, hot paprika 2-4 g, fennel 2 g, garlic 1 g. Spicy, southern-Italian profile.
- Milano: Black pepper 2 g, garlic 1 g, white wine 30 ml, sugar 3 g. Drier, finer cut than Genoa.
- Pepperoni: Paprika 12 g, cayenne 2 g, fennel 4 g, garlic 2 g, anise 1 g. American-style with sharper heat.
- Saucisson sec (French): Black pepper 3 g, white pepper 2 g, garlic 1 g, red wine 30 ml. Lean, peppery, characteristic French dry sausage.
- Chorizo (Spanish-style, dry-cured): Smoked sweet paprika (pimentón) 25 g, smoked hot paprika 5 g, garlic 4 g. The paprika is the entire identity; use real pimentón.
Toast whole spices lightly in a dry pan and grind them fresh before mixing. Pre-ground supermarket spices lose volatile aromatics within weeks of opening, and the salami you spend two months drying deserves spices that taste like spices.
Common Salami Mistakes
Mistake 1: Skipping the starter culture. Wild fermentation either fails entirely or produces unpredictable flavor and unsafe pH speed. Bactoferm or similar costs 20-30 dollars per packet and treats 50+ lb of meat. Use it.
Mistake 2: Wrong salt percentage. Under 2.0% and you risk pathogen growth; over 3.5% and the salami is inedibly salty and the texture is hard. The 2.5-3.0% target hits flavor and safety together.
Mistake 3: Warm meat through grinding. Smeared fat produces a pasty, uniform-looking cut face instead of distinct white fat flecks. Keep everything at 32-34°F through grinding, mixing, and stuffing.
Mistake 4: Pulling salami too soon. A salami at 25% weight loss is still wet inside the casing — it tastes raw, the pH-protection has not concentrated enough, and the texture is gummy. Wait for 30-40% loss confirmed by the scale.
Mistake 5: Mistaking case hardening for done. A salami with a hard outer ring and a wet core looks ready but is dangerously underdried. Squeeze the salami; the entire body should yield evenly. The case-hardening fix is in case hardening in curing chambers.
Equipment Sanitation Between Batches
Raw ground meat sitting in a grinder auger or a stuffer barrel for even a short window is exactly the kind of environment that lets whatever bacteria are present multiply before the cure and fermentation ever get a chance to work. I break the grinder down to its plate, knife, and auger after every batch — not just a rinse — and run everything through hot soapy water followed by a food-safe sanitizing rinse before it goes back in the cabinet. The stuffer barrel and horn get the same treatment; ground meat residue left in a stuffer tube between uses is a common source of the off, sour smell some beginners report on an otherwise correctly-cured first batch, and it has nothing to do with the fermentation or drying steps they usually blame first.
The other habit worth building early is calibrating your instruments on the same schedule as your equipment cleaning, not once at setup and never again. A pH meter drifts with electrode age and storage conditions — recalibrate with fresh buffer solution before each fermentation check, not just when a reading looks suspicious. A kitchen or postal scale that reads to 0.1 g should be checked periodically against a known reference weight (a set of calibration weights is cheap insurance). Salami safety runs on the accuracy of your salt, cure, and pH numbers; an instrument silently drifting out of calibration undermines every other correct step in the process.
If the same grinder and stuffer see poultry, seafood, or anything else outside a salami-only workflow, run those jobs before the salami batch, never after — or do a full teardown-and-sanitize between species regardless of order. Cross-species contamination on shared equipment is a separate risk from anything the cure or fermentation addresses, and it is entirely avoidable with a consistent order of operations.
Frequently Asked Questions
How long does salami take to make at home?
Total timeline runs 4 to 12 weeks. Mix and stuff takes one day. Fermentation runs 24 to 48 hours at 75 to 85F. Drying takes 3 to 5 weeks for small salami in 32-38mm casings, 5 to 8 weeks for medium 40-50mm casings, and 8 to 12 weeks for large 50-65mm casings. The end target is 30 to 40 percent weight loss confirmed by the scale, not a calendar date.
What is the salt percentage for salami?
Most home salami recipes target 2.5 to 3.0 percent salt by total weight (meat plus fat plus any added water). Cure #2 is added at 0.25 percent. So a 10-pound batch at 2.7 percent salt and 0.25 percent cure uses 122 grams of salt and 11.3 grams of cure. Use a scale that reads to 0.1 gram.
Do I need a starter culture for salami?
Yes. A commercial starter culture (Bactoferm T-SPX, F-RM-52, F-LC, or similar) drops pH below 5.0 reliably during fermentation, which is what makes the salami safe through the multi-week drying phase. Wild fermentation either fails or produces unpredictable pH speed. Cultures cost 20 to 30 dollars per packet and treat 50 plus pounds of meat.
What is the difference between Cure #1 and Cure #2?
Cure #1 contains sodium nitrite only and is used for fresh sausage, hot-smoked products, and short-cure items eaten within weeks. Cure #2 contains sodium nitrite plus sodium nitrate and is used for traditional dry-cured salami where the long aging phase needs the nitrate to slowly convert to nitrite over weeks. Use Cure #2 for any salami aged 21 days or longer.
What temperature and humidity should I dry salami at?
Dry salami at 50 to 60 degrees F (the 55F target is standard) and 70 to 80 percent relative humidity (75 percent RH is the target). Drift over 3 degrees F or 5 percent RH risks case hardening, oversaturation, or stalled drying. Air movement is essential — a low-RPM fan on a 5-on, 25-off cycle prevents the saturated boundary layer that grows bad mold.
How do I know when salami is ready to eat?
Weigh each salami immediately after stuffing and mark the target weight (start weight times 0.60 to 0.70). Pull when the salami reaches that target weight, indicating 30 to 40 percent weight loss. The salami should yield evenly when squeezed — no soft wet center, no rock-hard rind. Calendar time is a rough guide; the scale is the truth.
Why is the inside of my salami still wet?
Wet center with hard outer ring is case hardening. The surface dried faster than moisture could migrate from the center, sealing the salami before it finished drying. Causes: humidity too low, fan blowing directly at the salami, or pulling the casing too tight before fermentation. Fix the chamber climate, then move the salami to a slightly cooler and more humid spot for 1-2 weeks to allow rebalancing.
Related Articles
- How to Make Genoa Salami Step by Step (Beginner Fermented Sausage) — the recipe-and-process walk-through for the standard Italian style.
- Salami Casing Mold: Good White Mold vs Dangerous Black/Green — the visual ID and what each mold means.
- Penicillium Cultures for Salami Casings — application method for the white-mold rind dust.
- How to Build a Curing Chamber: The Complete Guide
- How to Calculate Salt Percentage for Equilibrium Curing
- Cold Smoking Salami: When to Add Smoke and at What Temperature
- Curing Chamber Humidity Control
- Duck Prosciutto: 2-Week Beginner Charcuterie
- Black Mold on Charcuterie: Dangerous or Just Ugly? — when to wipe with vinegar vs when to toss the entire piece.
- Salami Fermentation Chemistry: pH Drop and Sauerkraut Science — the acid math that makes salami shelf-stable.