Penicillium Cultures for Salami: Beneficial Mold for Charcuterie Casings
May 6, 2026

I’ve run six salami cycles in my home curing chamber, and the single biggest difference between batches that bloom evenly and batches that go spotty in week three is whether I sprayed Bactoferm Mold-600 on the casings within 30 minutes of stuffing.
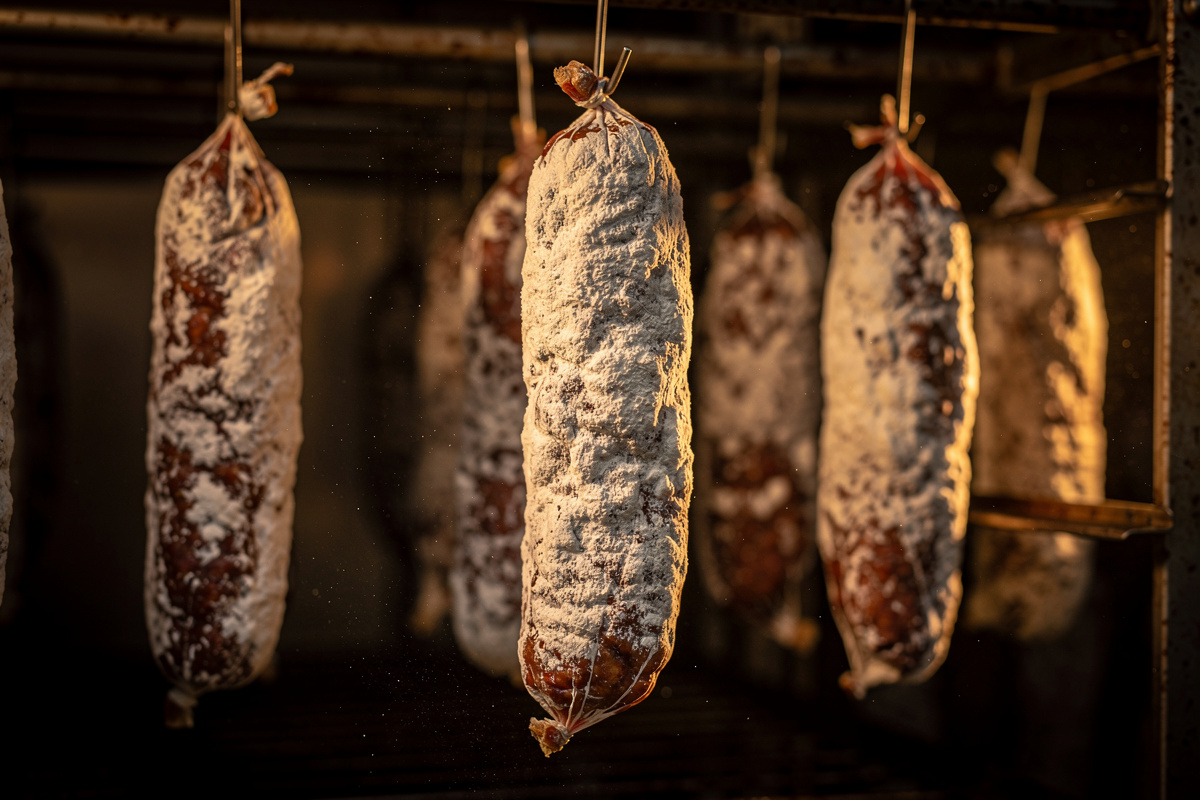
Penicillium nalgiovense — the active strain in Mold-600, dosed at 2.5 g per liter of dechlorinated water — is the beneficial white mold that gives traditional dry-cured salami its characteristic fuzzy white casing. The mold actively protects the meat by outcompeting harmful spore species, regulates moisture loss to prevent case hardening, and contributes flavor compounds across the full 60–120 day drying phase, not just the short fermentation window at the start.
This guide covers which Penicillium strains actually work for charcuterie (not all do), how I prepare and apply the spore suspension during inoculation, the temperature and humidity windows that favor beneficial growth over spoilage molds, and how to identify whether a fuzzy patch on your hanging salami is the right mold or a contamination event. The broader salami workflow — equipment, salt math, fermentation, drying — sits in the complete home salami making guide; the specific safety/contamination side is in salami casing mold: good white mold vs dangerous black/green.
As an Amazon Associate I earn from qualifying purchases.
What Penicillium Does for Cured Meat
The role of beneficial Penicillium on dry-cured products is both mechanical and biochemical:
Outcompetes contamination. The casing is the most exposed surface. By rapidly colonizing the casing with a known-safe culture in the first 5–7 days, you prevent the surface from being claimed by undesirable molds (Aspergillus, Cladosporium, harmful Penicillium strains) that would otherwise establish on the moist meat surface — the same mycotoxin-migration research I lean on for mold-defect calls elsewhere on this site (French dry-fermented sausage mycotoxin study) documents contaminant Penicillium and Aspergillus strains establishing precisely where a protective culture didn’t get there first.
Regulates moisture loss. The mold mat creates a partial barrier that slows surface drying, preventing case hardening — the failure mode where the outer 5 mm dehydrates faster than the interior, sealing the surface and trapping moisture inside (which then ferments badly and ruins the product).
Contributes flavor. Lipolytic and proteolytic enzymes from the mold release small flavor compounds — short-chain fatty acids, free amino acids, esters — that develop the characteristic earthy-mushroomy notes of European-style salumi.
Visual signature. A clean white flowering across the entire casing is the universal marker of properly cultured dry-cured salami. Restaurants and consumers expect it.
Which Strains Actually Work
Several Penicillium strains can grow on meat. Only a few are food-safe and specifically validated for charcuterie production:
| Strain | Use case | Source | Notes |
|---|---|---|---|
| P. nalgiovense (Bactoferm Mold-600) | All dry-cured salami and casing applications | Sausage Maker, ButcherPacker | Workhorse strain. Most reliable. |
| P. candidum (PC) | Soft cheese (camembert, brie); some salami applications | Cheese supply houses | Slightly more aggressive growth. |
| P. roqueforti | Blue cheese veining | Cheese supply houses | Do NOT use on meat — wrong color profile and flavor. |
| P. nalgiovense + P. candidum mix | Bavarian/Alpine-style salami | Specialty suppliers | Robust early growth, classic look. |
| P. chrysogenum | NOT for food applications | N/A | Toxin-producing strain. Avoid completely. |
For first salami batches I always recommend Bactoferm Mold-600 (P. nalgiovense) — it’s what I started with and what I still run on my Genoa-style chubs. It’s the most forgiving strain, works in the temperature and humidity ranges typical of home curing chambers, and reliably outcompetes contamination. Once you have consistent results, experimenting with P. nalgiovense + P. candidum blends is the next step for more European-style results. The 65–70°F first-week window isn’t a coincidence — it’s the same range that drives the LAB-driven pH drop covered in salami fermentation chemistry; the mold establishment and the fermentation are running on the same thermal schedule for a reason, and in my own chamber I’ve never had a batch bloom cleanly at a temperature where the pH wasn’t also dropping on schedule.
The Inoculation Process
Inoculating salami with mold cultures takes about 10 minutes per batch and costs under $1 per kilogram of finished product. The four-step process:
Step 1 — Prepare the spore suspension. Add 2.5 g of dry mold powder (a kitchen scale beats a teaspoon here — Chr. Hansen’s own Bactoferm application manual gives the ratio as 25 g per 10 liters of suspension, so weigh it if you can) to 1 liter of cool dechlorinated water (let tap water sit 24 hours, or use distilled). Stir thoroughly until the powder fully disperses. Allow 30 minutes for spores to hydrate. The suspension is good for 2–3 days refrigerated.
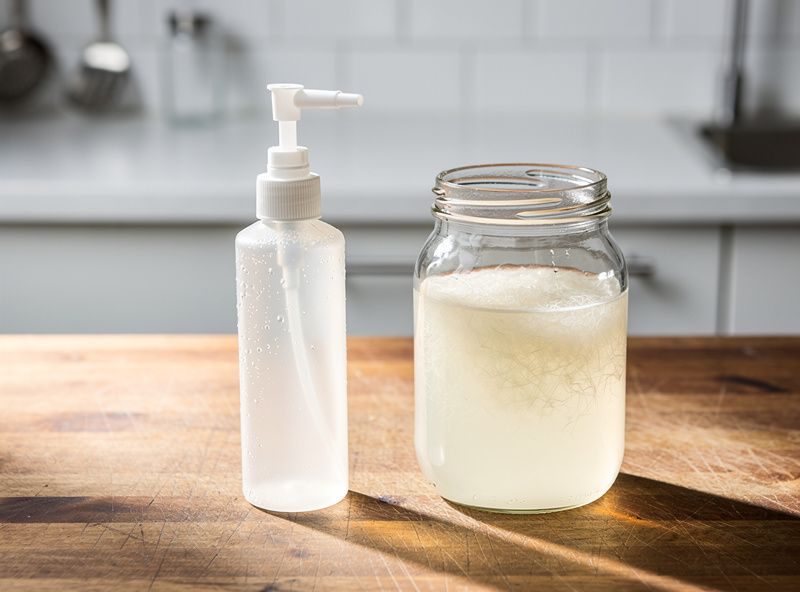
Step 2 — Apply to fresh-stuffed casings. Within 30 minutes of stuffing the salami casings (the casings should still be lightly moist from stuffing), spray the entire surface with the spore suspension using a clean fine-mist spray bottle. Coverage should be visible but not running — about 5–8 ml of suspension per medium salami. The first batch I dusted, I sprayed too thin and missed two chubs entirely on the back side; both came out splotchy with patches of green by day 11. I now spray each chub deliberately for two seconds, rotate, two seconds, rotate again.
Step 3 — Hang in chamber at incubation conditions. Move directly to the curing chamber at 65–70°F (18–21°C) and 90–95% relative humidity. These are warmer and more humid than the long-term aging conditions — the higher temperature accelerates initial mold establishment. The first 5–7 days are the critical incubation window.
Step 4 — Transition to aging conditions. Once a uniform white bloom is visible on all casings (typically day 5–7), drop chamber conditions to standard salami aging: 55–58°F (12–14°C) and 75–80% relative humidity. Continue aging until the salami reaches target weight loss (typically 35–40% of green weight, taking 60–120 days depending on diameter). The pH-drop science underneath this is in salami fermentation chemistry if you want to understand why the LAB and the mold are running on the same temperature schedule.
Reading the Mold — Beneficial vs Concerning
Three weeks into a curing run, your salami casings are covered in fuzzy growth. Is it the right kind? Three identification markers:
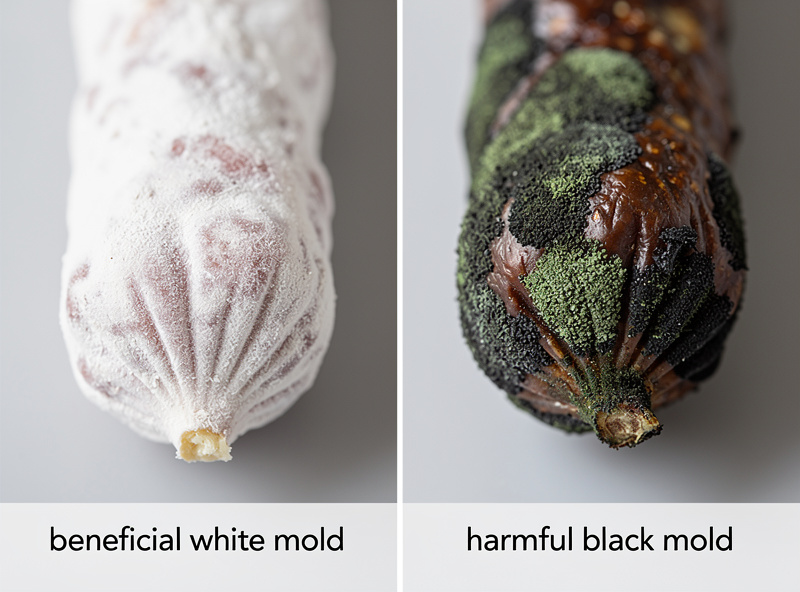
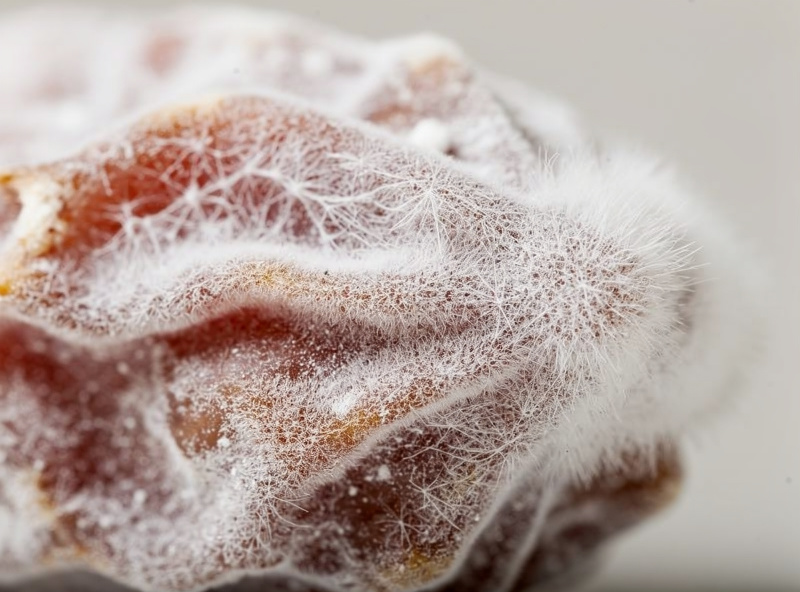
Color. P. nalgiovense and P. candidum are pure white to slightly off-white. Any patches of green, blue, black, pink, or yellow are not your inoculated culture and require investigation. Some greens within hours of dampness are surface mineral residues, not mold — wait 48 hours and look again before alarm.
Texture. Beneficial Penicillium is soft, fluffy, and slightly powdery to the touch — like the felt of a tennis ball. Harmful Aspergillus and contaminating molds typically form denser mat-like structures, sometimes with visible spore-bearing structures. Smell-test: beneficial mold smells lightly mushroomy or earthy. Harmful contamination often smells acidic, sharp, or sweet-fermented. The first time I encountered a black mold contamination, the smell was unmistakable — sharp ammonia under the wet-cardboard fungal note. I tossed the affected coppa and re-sanitized the chamber with white vinegar before the next batch.
Pattern. Beneficial mold colonizes uniformly across the casing surface. Spotty growth — patches of mold separated by bare casing — usually indicates either contamination or incomplete inoculation. If patches show different colors, you almost certainly have multiple species competing.
When in doubt, a $30 home humidity sensor and visual photo log day-by-day captures the progression. Most contamination events become obvious in retrospect once you see the timeline. In my own chamber, clean beneficial-mold-only colonization has always tracked with getting the temperature and humidity window right from day one; mixed colonization of any kind warrants either remediation or discarding the batch depending on severity — the hard color/smell rules and the real safety citations behind them are walked through in detail in salami casing mold: good white mold vs dangerous black/green.
Where the Cultures Come From — Cultivation Side
Most charcuterie operations buy commercial Bactoferm Mold-600 powder ($15–25 per packet, enough for 50+ kg of meat). For experimenters interested in cultivating their own Penicillium nalgiovense from scratch — useful for educational purposes or small-scale culinary research — the basic mycology is accessible.
Penicillium grows well on standard mushroom-cultivation substrates and at temperatures and humidities that overlap heavily with edible mushroom cultivation. The same agar plates, sterile inoculation technique, and contamination control practices apply. For the foundational mycology — sterile technique, agar preparation, contamination identification, and substrate inoculation — there’s a detailed beginner mushroom cultivation guide that covers exactly the techniques relevant to home Penicillium culture work. The substrate recipe reference handles the agar and culture media side, and the green mold troubleshooting reference covers contamination identification that transfers cleanly between mushroom cultivation and charcuterie mold work — the contamination species are mostly the same.
For most charcuterie home producers, buying commercial Bactoferm Mold-600 is the right path — sterilized, validated, predictable. The cultivation route makes sense only for educational interest or for production scales where powder cost becomes meaningful (which is several orders of magnitude beyond home-scale).
Chamber Conditions That Favor Beneficial Mold
Three environmental controls determine whether your inoculation succeeds or harmful molds outcompete it:
Temperature. The first 5–7 days at 65–70°F (18–21°C) is what gives Penicillium nalgiovense the kinetic edge. Below 55°F, beneficial growth slows enough that contaminants establish first. Above 75°F, you risk harmful Aspergillus species that prefer warmer ranges.
Humidity. 90–95% RH during the inoculation phase. Below 85%, the casings dry too quickly and the mold cannot establish. Above 96%, condensation forms on cool surfaces and creates wet spots favorable to bacteria. Use a fan with thermostatic control to manage this without aggressive ventilation. The hardware side — how to deliver and hold those numbers reliably — is in curing chamber humidity control: adapting hydroponic reservoir tech, and the broader temperature/humidity science is in curing chamber climate control: the complete guide.
Air movement. Gentle air circulation (1–2 air changes per hour) prevents stagnant pockets where harmful anaerobic species establish. A standard mushroom-cultivation oscillating fan at low speed works perfectly. The same airflow patterns that work in mushroom fruiting chambers transfer directly to curing chambers.
Troubleshooting Common Failures
Three failure modes account for most home-charcuterie mold problems:
No mold growth at all. Suspension may be expired or improperly hydrated. Verify the spore powder is within 12 months of manufacture. Re-inoculate with fresh suspension. Check that the chamber is actually at 65–70°F and 90–95% RH during the first 7 days — and that your hygrometer is calibrated; a probe drifting 4% low will read 90% when the chamber is actually at 86%, which is on the wrong side of the establishment threshold. Calibration is covered in smart temperature and humidity sensors for curing chambers.
Black or green mold spots within first week. Cross-contamination from poor hygiene during stuffing, or fan circulation pulling spores from elsewhere in the home. Discard affected casings; sanitize chamber thoroughly with food-safe sanitizer before next batch. Add a HEPA filter to chamber air handling.
Patchy bloom (some areas covered, some bare). Inoculation spray was uneven. Re-spray bare areas with fresh suspension and continue. The bloom should self-correct within 3–4 days if temperature/humidity are correct.
If I were starting today, I’d buy a single $20 packet of Bactoferm Mold-600, dose it at exactly 2.5 g per liter, spray within 30 minutes of stuffing, and hold the chamber at 68°F / 92% RH for the full first week before transitioning. Six batches in, that’s the recipe that has produced clean white blooms on every chub. Skip the cultivation rabbit hole until you have at least three successful batches under the commercial powder; the science is interesting but it doesn’t change the outcome at home scale. For the Genoa-style assembly that the first batch I cured was, the recipe walk-through is in how to make Genoa salami step by step.
Frequently Asked Questions
What mold do you use on salami casings?
Penicillium nalgiovense is the standard. It is sold as Bactoferm Mold-600 in 25g packets that cover 50+ kg of finished meat. Some Bavarian-style salami uses a P. nalgiovense plus P. candidum blend for slightly different flavor and visual character. Avoid P. roqueforti (cheese) and P. chrysogenum (toxin-producing).
Is the white mold on salami safe to eat?
Yes, when it is the inoculated Penicillium nalgiovense. The mold is integral to traditional dry-cured salami and contributes to flavor and food safety. Many people brush off heavy bloom for aesthetic preference, but it is harmless. Mold of any other color (black, green, pink, blue, yellow) on salami warrants investigation and possibly discarding the affected portion.
How do I apply mold culture to fresh salami?
Mix 2.5g of P. nalgiovense powder in 1 liter of dechlorinated cool water and let it hydrate 30 minutes. Within 30 minutes of stuffing the casings, spray the entire surface with the suspension using a clean fine-mist spray bottle. Hang at 65-70F and 90-95 percent humidity for the first 5-7 days, then transition to 55-58F at 75-80 percent humidity for aging.
How long until the white mold appears on my salami?
Visible white bloom typically appears within 3-5 days at correct temperature (65-70F) and humidity (90-95 percent). Full uniform coverage by day 7. If no growth by day 5, check that conditions are within range and the suspension was properly prepared. Re-inoculate if necessary.
What temperature does Penicillium nalgiovense need?
65-70F (18-21C) during the first 5-7 days for optimal establishment. After uniform bloom appears, drop to 55-58F (12-14C) for aging. Below 55F, beneficial growth slows enough that contamination can establish first. Above 75F, harmful Aspergillus species become competitive risks.
Can I reuse the spore suspension or do I need fresh each batch?
The hydrated suspension stays viable in the refrigerator for 2-3 days. After that, spore germination rates drop sharply. For a multi-day production run, prepare a fresh suspension each morning. Dry powder stored properly stays viable for 12-18 months.
What if I see black or green mold on my salami?
Stop and investigate. Small isolated spots of contamination may be removable with a vinegar wipe and continued aging if the rest of the bloom is healthy. Widespread or central mold patches usually mean the batch is compromised. Discard concerning portions; sanitize the chamber thoroughly before the next batch. When in doubt, do not eat.
Related Articles
- Home Salami Making: The Complete Guide
- Salami Casing Mold: Good White vs Dangerous Black/Green
- How to Make Genoa Salami Step by Step
- Salami Fermentation Chemistry: pH Drop and LAB Science
- Curing Chamber Climate Control: The Complete Guide