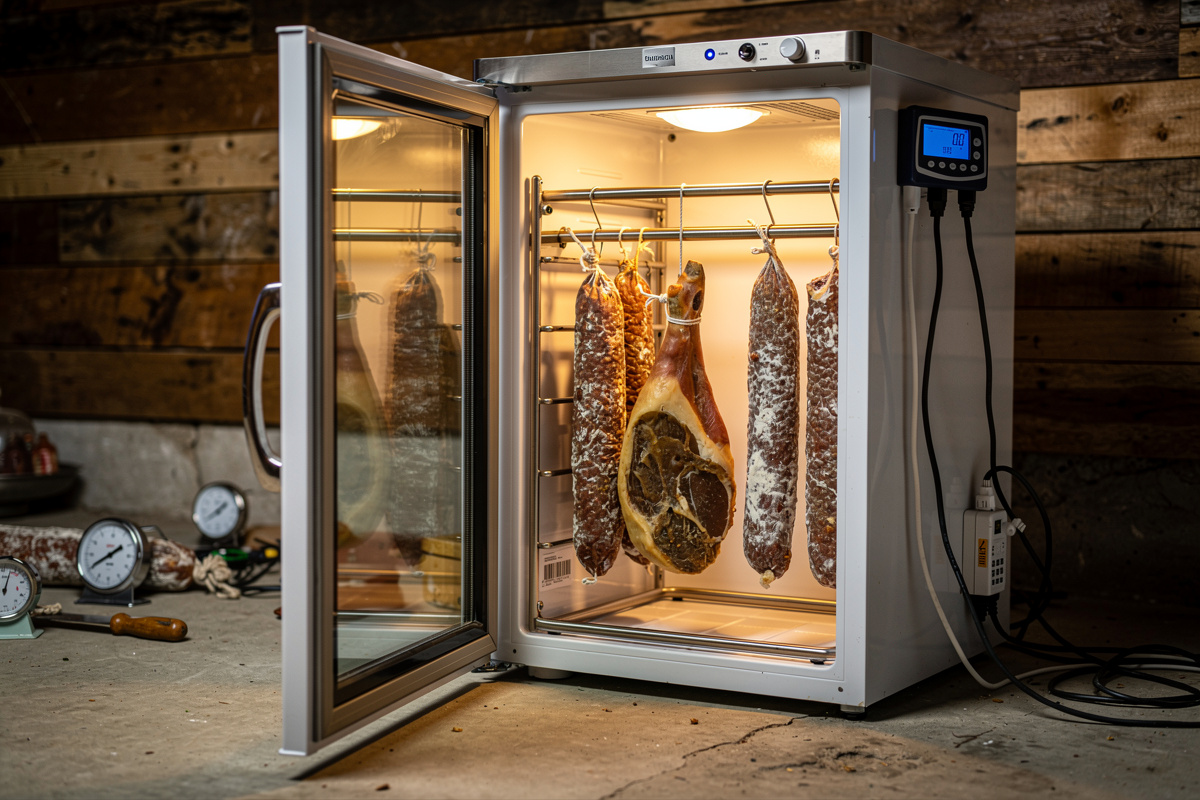

A curing chamber is a temperature- and humidity-controlled box that holds 50-60°F at 70-80% relative humidity, with gentle air movement and protection from light. The cheapest reliable build is a converted mini fridge with a dual-stage controller, an ultrasonic humidifier, a small dehumidifier, and a low-RPM cycling fan, all in for roughly 250 to 400 dollars.
That short answer hides the part most builds get wrong: holding the climate is easy for an hour and miserable for six weeks. Salami needs 35-40% weight loss without case hardening — the surface drying too fast forms a hardened outer ring that traps moisture at the center instead of letting it migrate out evenly. The food-safety side of the drying target — pH down to roughly 5.0-5.3 with water activity brought below about 0.91-0.92 for shelf stability — is documented in dry and semi-dry sausage validation guidance; the chamber climate has to support that target reliably across the full cure window. Whole-muscle prosciutto and bresaola need a humidity floor that does not collapse when the compressor cycles. Cheese rinds need a humidity ceiling that never spikes past 88% RH. This guide walks the entire build in the order I do it on every new chamber, with the parts that actually matter, the cost tiers I have priced this year, and the failure points I have personally hit. My own first build wired the humidifier directly to the wall instead of the controller outlet — chamber spent the entire first night at 96% RH and I caught it the next morning. The failure mode list below is from those mistakes plus a hundred others I have read in chamber-build forums.
As an Amazon Associate I earn from qualifying purchases.
What Is a Curing Chamber and Why a Regular Fridge Will Not Work
A curing chamber is a chamber that maintains 50-60°F (10-15°C) and 70-80% relative humidity for weeks at a time, with controlled airflow and no light. A regular kitchen refrigerator runs at 35-40°F and around 30-50% RH, which is too cold and too dry. Meat in a regular fridge dries on the outside, traps moisture inside, and cures unevenly.
The chamber’s job is to slow microbial growth, drive moisture out evenly through the casing or surface, and keep the meat in the goldilocks band where beneficial molds and lactic acid bacteria thrive while pathogens cannot. Hit the climate, and salami binds tight, prosciutto develops a clean pellicle, and a dry-aged subprimal builds the crusty bark that holds in juice when you trim and slice.
The 5 Core Systems Every Curing Chamber Needs
Every working chamber has five separable systems: the insulated box, temperature control, humidity control, air movement, and power resilience. Skip one and the others cannot compensate. A great compressor on a leaky box still spikes humidity. A perfect humidifier without airflow grows surface mold in dead corners. Plan all five before you buy anything.
- Insulated box — fridge, chest freezer, wine fridge, or purpose-built insulated cabinet. Holds the climate.
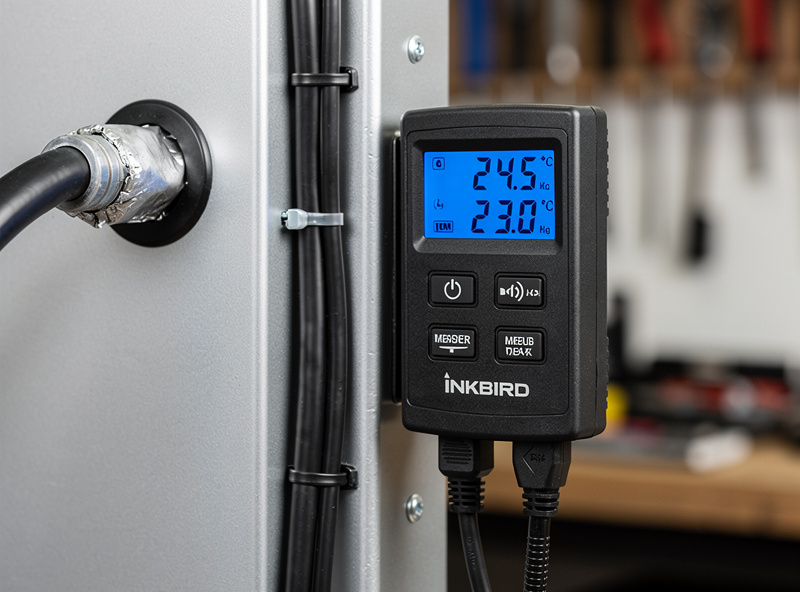
- Temperature control — a dual-stage thermostat (cooling + heating; I run an Inkbird ITC-308 temperature controller + IHC-200 humidity controller split, rather than an all-in-one unit like the ITC-608T, because two independent devices mean I can swap or troubleshoot one side without losing the other — temperature control stays live even if the humidity side needs a reset. I catch cross-zone drift separately, with a monitoring pair rather than the controllers themselves: a SensorPush HT.W at meat-shelf height as the trusted reading and an Inkbird IBS-TH3 in the coil zone, cross-checked against each other) wired to the compressor and a small heat source.
- Humidity control — an ultrasonic humidifier on a humidistat, paired with a small desiccant or compressor dehumidifier when summer humidity climbs.
- Air movement — a low-RPM PC fan or computer case fan running on a cycle to break boundary-layer humidity around the meat.
- Power resilience — a UPS at minimum, or a properly sized battery and inverter for off-grid or backup-prone locations.
I cover the box choice, sensor placement, and humidifier pairing further down. For battery and inverter sizing, see my full breakdown in off-grid curing chamber battery and inverter sizing.
Choose the Box: Mini Fridge vs Full Fridge vs Chest Freezer vs Wine Fridge
The box decision drives every other cost. Capacity matters less than insulation, defrost behavior, and door geometry. Here is how the four common boxes compare for home charcuterie.
| Box Type | Capacity | Used Cost | Defrost | Best For | Watch For |
|---|---|---|---|---|---|
| Mini fridge (3-4 cu ft) | 4-6 salami sticks or 2 small subprimals | $30-$80 | Manual | First-time builders, single-family output | Door shelves cost hanging space; weak insulation in cheap models |
| Full fridge (15-20 cu ft) | 20+ salamis, 4+ subprimals, plus cheese | $80-$200 | Auto with drip drain | Mixed charcuterie + cheese aging households | Auto-defrost cycles spike humidity 10-15% (I missed this on a Frigidaire full-size conversion my first year and a 5-week coppa got case-hardening on the back side from the cyclic RH swing); plug the drain or reroute it |
| Chest freezer (5-7 cu ft) | 6-10 salamis on a custom rack | $100-$250 | Manual, infrequent | Stable climate, low compressor cycling | Top-load ergonomics are awful; you must build a hanging frame |
| Wine fridge (24-bottle+) | 4-8 salamis on a hanger | $150-$400 used | Auto, gentle | Aesthetic builds with glass doors | Many use Peltier cooling that can’t hold 55°F in a warm garage |
For most readers I recommend a used full-size fridge from a marketplace listing, with the freezer compartment removed or sealed off. The auto-defrost is manageable if you plug the drain and increase humidifier capacity. If you want a clean step-by-step on the conversion itself, my fridge-to-curing-chamber conversion guide covers shelf removal, compressor wiring, and the controller install in detail.
Temperature Control: Sensors, Controllers, and the Wiring That Matters
A dual-stage controller switches both cooling and heating to hold a target like 55°F within a tight band. The two affordable options on the market are the Inkbird ITC-308 (around $35) and the older STC-1000 (around $20 plus a project box). The Inkbird is plug-and-play with built-in 110V outlets. The STC-1000 needs DIY wiring but offers tighter differentials.
Sensor placement is the most-skipped step. Put the probe in the middle of the chamber at meat height, never against a wall and never near the compressor outlet. Tape the probe to a hanging rod with painter’s tape, two inches off any surface. A misplaced probe reads its own microclimate and the chamber drifts 4-6°F off target.
For long-term logging and remote alerts, add a smart sensor like a SwitchBot or Govee with cloud history. I use one as a redundant reading and a phone alert when the chamber drifts. My full setup with placement diagrams and calibration steps is in smart temperature and humidity sensors for curing chambers.
Humidity Control: Adding Moisture and Removing It
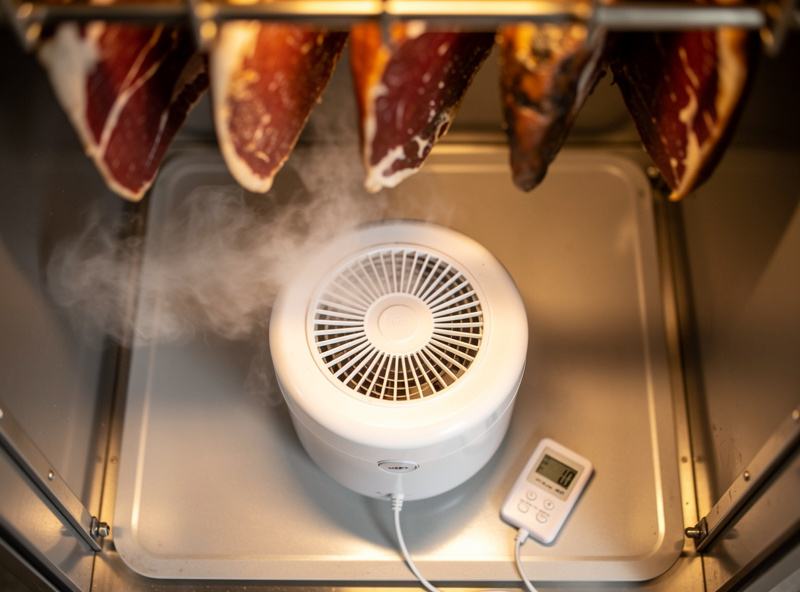
A small ultrasonic humidifier (the cheap white plastic kind sold for nurseries) is the standard moisture source. Wire it to a humidistat that switches its outlet on below 75% RH and off at 78%. Keep the reservoir full; check it every 3-4 days. Distilled or filtered water reduces the white mineral dust that ultrasonic units throw.
The harder problem is removing moisture, especially during salami’s first 48 hours when the meat releases water fast and humidity can spike to 95% RH. A small Peltier dehumidifier (the kind with a desiccant cartridge) or a larger compressor unit on a humidistat handles the second-stage drop. For the first 48 hours, I crack the chamber door for 10 minutes twice a day rather than fight the spike with electronics.
For target ranges by product type — salami is not the same as prosciutto is not the same as dry-aged beef — see ideal humidity for dry aging beef vs charcuterie. If you are running into wet floors and pooled water, my fixes are in how to fix a too-humid curing chamber. If your humidifier is fighting against an evaporative source you did not realize you had, the hydroponic-reservoir adaptation in curing chamber humidity control: adapting hydroponic tech shows how to stabilize without constant refills.
Air Movement: Why a Cycling Fan Is Non-Negotiable
Without airflow, a saturated boundary layer forms around hanging meat and the chamber holds 95% RH against the casing while reading 75% RH at the sensor three feet away. This is the single most common cause of bad mold on salami casings and the reason a salami can rot at the surface while reading “perfect” on your hygrometer.
A 120mm PC fan (5-12V) with a smart plug or a simple appliance timer running 5 minutes on, 25 minutes off provides enough air exchange to break the boundary layer without drying the surface. Mount the fan on the back wall blowing across the meat, never directly at it. A fan blowing onto a salami casing case-hardens it within 48 hours.
Power Resilience: Grid, UPS, and Off-Grid Builds
A 6-week prosciutto cure represents weeks of unrecoverable work and 50-150 dollars of meat. A 90-minute power outage during week three can drop chamber temperature into the danger zone for surface bacteria. At minimum, plug the chamber into a 600VA UPS — enough to ride a short outage without the compressor restarting cold.
For long outages or off-grid builds, you need to size battery and inverter to your compressor’s locked-rotor amps (LRA) plus the rated steady-state draw. A typical 4 cu ft fridge pulls 60-90W steady-state but spikes to 600-800W on compressor start. My full sizing math, including pure-sine inverter selection and LiFePO4 capacity for 12, 24, and 72-hour outages, is in off-grid curing chamber battery and inverter sizing.
Where to Put the Chamber: Location and Ambient Swings
The box and the controllers only have to fight the swings your location throws at them. A basement in Sweden runs cool and stable through winter — my compressor barely cycles from November to March — but the same room can climb into the mid-60s°F in July, which pushes a weak Peltier dehumidifier past what it can hold. A garage swings harder in both directions and forces the heating side of the ITC-308 to work overtime in a cold snap. An interior closet is the most stable option most people actually have, but it usually means running a condensate line or a drip tray somewhere the humidifier reservoir can overflow without soaking a floor you care about.
Two location mistakes cost readers more than any parts choice. The first is putting the chamber next to anything that off-gasses — a freshly painted wall, stored gasoline or solvents, a laundry room with scented detergent in the air. Cured meat fat absorbs airborne odors readily over a six-week hang; I keep mine well away from the side of the basement where I store paint and the lawn mower’s fuel can, after one early lonzino picked up a faint chemical note I could not get rid of. The second is skipping a dedicated, GFCI-protected outlet. A chamber wired through a shared circuit with a chest freezer or sump pump can trip a breaker and lose both the compressor and the humidifier’s fill line at once — exactly the kind of silent failure that ruins a six-week cure. I run my primary chamber on its own GFCI outlet with nothing else plugged into it.
Cleaning and Sanitizing the Chamber Between Batches
An empty chamber is not a clean chamber. Mold spores and yeast from a finished batch settle into the walls, the shelf tracks, and the fan housing, and the next batch inherits whatever was living there. Between batches I pull every rack, hook, and dowel and wash them by hand in hot soapy water, then wipe the interior walls, ceiling, and door gasket down with a food-safe sanitizing solution mixed to the label’s dilution rate — not a strong general-surface disinfectant, which can leave a residue or a smell that migrates into the next batch’s fat. I let everything air-dry fully with the door open before hanging anything new; a damp interior undoes the wipe-down before the first piece even goes in.
The humidifier reservoir gets emptied and refilled with fresh distilled water every 3-4 days during a batch, not just topped off — standing water in a warm, humid box is exactly the environment that grows the wrong kind of biofilm on the ultrasonic element, and I have opened a neglected reservoir to a genuinely unpleasant smell more than once early on. Wipe visible white mineral scale off the ultrasonic disc with a soft cloth; a scaled-up disc throws a weaker mist and the humidistat ends up cycling harder to compensate. Recalibrate your hygrometer with a fresh salt-test at the start of every new batch, not just once at setup — cheap sensors drift over months, and a chamber that reads 75% RH but is actually running at 68% will quietly produce case-hardened pieces for weeks before you notice the pattern.
Total Build Cost by Tier
Builds break into three honest tiers. Budget keeps you under $250, mid-range balances reliability and capacity around $400, pro-tier delivers commercial-style reliability for $700-$1,000.
- Budget tier (~$220): $50 used mini fridge, $35 Inkbird ITC-308, $25 ultrasonic humidifier, $15 hygrometer, $15 PC fan + smart plug, $25 25W ceramic heater bulb, $25 Peltier mini-dehumidifier, $30 misc cable/tape/extension cords.
- Mid tier (~$420): $150 used full fridge, $35 Inkbird, $35 humidifier with auto-fill reservoir, $25 humidistat, $20 fan + timer, $50 small compressor dehumidifier, $25 SwitchBot sensor, $30 wire/clamps/conduit, $50 600VA UPS.
- Pro tier (~$850): $350 commercial-grade insulated cabinet or upcycled glass-door beverage cooler, $90 PID controller, $70 humidifier + reservoir, $90 dual-stage humidistat with redundancy, $40 BLDC fan with PWM, $100 desiccant dehumidifier, $40 dual sensors with cloud logging, $70 1500VA UPS.
Every dollar I have priced lately is in curing chamber build cost: what I spent on my $200 setup, including used-marketplace tactics that knock 30-40% off the budget tier.

Common Build Mistakes and How to Avoid Them
Three mistakes account for most of the failed builds I see in reader photos. Each one is preventable with a 10-minute change before you hang any meat.
Mistake 1: Sensor next to the compressor outlet. The probe reads cold air and the chamber rides 6°F too warm. Move the probe to mid-chamber, mid-height, two inches from any surface, taped to a hanging rod.
Mistake 2: No fan, or fan blowing directly at the meat. No fan grows surface mold; direct fan case-hardens. Mount a 120mm PC fan on the back wall, set it to a 5-on/25-off cycle, and confirm airflow with a piece of tissue paper hanging from the rod. The tissue should sway gently, not flap.
Mistake 3: Trusting a single hygrometer. Cheap dial hygrometers drift 8-15% RH out of the box. Calibrate with a salt-test (saturated NaCl in a sealed container reads 75% RH) before you trust any reading, or run two sensors in parallel and split the difference.
For the chemistry behind why dry-cured surfaces fail, see case hardening in curing chambers: causes, prevention, and fixes. For mold problems specifically, the visual ID guide is black mold on charcuterie: dangerous or just ugly. And for the strange smells you may notice in week two, dry aging smell: what is normal vs what means trouble is the reference I send to readers.
Light, Lighting, and Why Your Chamber Should Stay Dark
Light degrades fats. UV and visible-light exposure accelerates oxidation in the surface fat of cured meat, producing the soapy, off-flavor notes most home charcuterie makers blame on bad cure. A working chamber is dark inside, with no interior light bulb, no glass door without a film, and no LED status lights pointing at the meat. If your chamber came with a fridge bulb, unscrew it. If you bought a glass-door wine fridge, cover the inside of the glass with low-tack frosted film or a layer of brown craft paper.
External LED indicators on controllers and humidifiers are usually too dim to matter, but if you can read by them in a dark room, redirect them. The single biggest light-related mistake I see is opening the chamber door under bright kitchen lighting for 5-10 minutes during routine checks. Quick checks under reduced lighting protect the surface fats from the cumulative dose that turns prosciutto rancid by month four.
What to Cure First Once the Chamber Is Built
Once your chamber holds climate for 72 hours without intervention, start with low-risk projects. Duck prosciutto in 2 weeks is the standard first project — small batch, fast feedback, hard to ruin. Once that succeeds, scale up to a beginner salami like Genoa salami step by step using a lab-quality starter culture and properly calculated salt percentages from how to calculate salt percentage for equilibrium curing.
If salami is the goal, learn the role of beneficial mold cultures from Penicillium cultures for salami casings before your first stuff-and-tie session. For dry-aged beef, the chamber-free alternative bag method is in best dry aging bags tested; pair the chamber and bags depending on what cuts you can buy that week. Add cheese aging to the same chamber by following best cheeses to age at home for beginners and how to wax cheese for aging.
Cold smoking is a natural extension once you have hanging space. The DIY cold smoke generator build attaches to most converted fridges through a 1-inch fitting, and the cold smoking salami timing and temperature guide walks the schedule.
Frequently Asked Questions
How much does it cost to build a curing chamber at home?
A budget DIY curing chamber runs about 220 dollars total: 50 dollar used mini fridge, 35 dollar Inkbird controller, 25 dollar humidifier, 15 dollar hygrometer, 15 dollar PC fan with smart plug, 25 dollar ceramic heat bulb, 25 dollar mini dehumidifier, and miscellaneous cables. Mid-tier builds run about 420 dollars; pro-tier with redundant sensors runs 700 to 1000 dollars.
Can I use a regular kitchen fridge as a curing chamber?
Not without modification. A stock kitchen fridge runs at 35 to 40 degrees F and 30 to 50 percent humidity, which is too cold and too dry for charcuterie. You need to bypass the factory thermostat with an Inkbird ITC-308 or STC-1000, add an ultrasonic humidifier on a humidistat, and install a cycling fan. Conversion takes 60 to 90 minutes for someone comfortable with basic wiring.
What temperature and humidity should a curing chamber hold?
Target 55 degrees F at 75 percent relative humidity for most salami and whole-muscle charcuterie. Hold the band 50 to 60 degrees F and 70 to 80 percent RH with no more than 3 degrees and 5 percent drift. Cheese aging runs slightly warmer at 55 to 60 degrees F and 85 percent RH. Dry-aged beef runs 33 to 40 degrees F and 80 percent RH.
Do I really need a fan in my curing chamber?
Yes. Without airflow a saturated humidity layer forms around hanging meat. The chamber reads 75 percent RH at the sensor while the meat surface sits at 95 percent RH, which is the leading cause of bad mold and slime on salami casings. A 120mm PC fan on a 5-minute-on, 25-minute-off cycle solves it. Never blow the fan directly at meat or you will case-harden the surface in 48 hours.
How long can a curing chamber lose power before food spoils?
A well-insulated chamber can ride 4 to 8 hours of outage with the door shut and meat already past its initial cure. Within the first 48 hours of fresh salami, any outage longer than 90 minutes is risky and you should plug the chamber into at least a 600VA UPS. For longer protection, a 100Ah LiFePO4 battery with a 1500W pure-sine inverter holds a typical 4 cu ft chamber for 24 to 36 hours.
Can I age cheese and cure salami in the same chamber?
Yes, but stagger them carefully. Cheese rinds can carry molds that will colonize salami casings, and salami pH and surface yeast can flavor cheese rinds. Run salami batches and cheese aging on separate cycles when possible, or partition the chamber with food-safe plastic and a second small fan. Many home setups simply choose one product family per chamber.
What size chamber do I need for one salami batch?
A 3-4 cubic foot mini fridge holds 4 to 6 medium salami sticks (about 2 pounds each) plus a small subprimal. A typical 8-pound batch of homemade Genoa salami yields 4 to 5 sticks and fits comfortably in a converted mini fridge. Scale up to a full 15-20 cu ft fridge once you make more than one batch a month.
Related Articles
- How to Convert a Fridge Into a Curing Chamber: Step-by-Step — the actual conversion sequence with shelf removal, controller wiring, and first-fill checklist.
- Off-Grid Curing Chamber: Battery and Inverter Sizing — LiFePO4 capacity math, pure-sine inverter selection, and 12/24/72-hour ride-through.
- Curing Chamber Build Cost: What I Spent on My Setup — itemized parts list with used-marketplace pricing tactics.
- Smart Temperature and Humidity Sensors for Curing Chambers
- Ideal Humidity for Dry Aging Beef vs Charcuterie
- Curing Chamber Too Humid: How to Fix Oversaturation Fast
- Case Hardening in Curing Chambers: Causes and Fixes
- Duck Prosciutto: The 2-Week Beginner Charcuterie Project
- Curing Chamber Climate Control: The Complete Guide — temperature, humidity, airflow, and sensor calibration for salami, prosciutto, and cheese.
- Curing Chamber Troubleshooting: The Complete Guide — diagnostic decision tree for the 7 most common chamber failures.
- Whole Muscle Charcuterie: The Complete Guide — bresaola, lonza, coppa, pancetta, and prosciutto from start to finish.
- Smart Plug Schedules for Curing Chambers — compressor duty cycle, humidifier pulse pattern, and defrost timing.