
Curing chamber climate control means holding the box at a target temperature and relative humidity for weeks at a time, with calibrated sensors, sized humidifiers and dehumidifiers, and a cycling fan that breaks the saturated boundary layer around hanging meat. The psychrometric relationship between temperature and relative humidity is why the four layers below have to be tuned together instead of one at a time — drop the air temperature a few degrees and the same absolute moisture reads as a higher RH percentage, which is the trap that catches a lot of first-time chamber builders chasing a number on a display.
The standard target band I split the difference at for most charcuterie is 55°F (13°C) at 75% relative humidity, with drift under 3°F and 5% RH. That’s close to the published semi-dry sausage drying-room parameters (12.9-15.7°C / 65-75% RH) — I run slightly warmer and wetter than a strict dry-sausage room because my chamber does double duty across salami, whole muscle, and the occasional cheese wheel, and this is the band where none of them suffer badly.
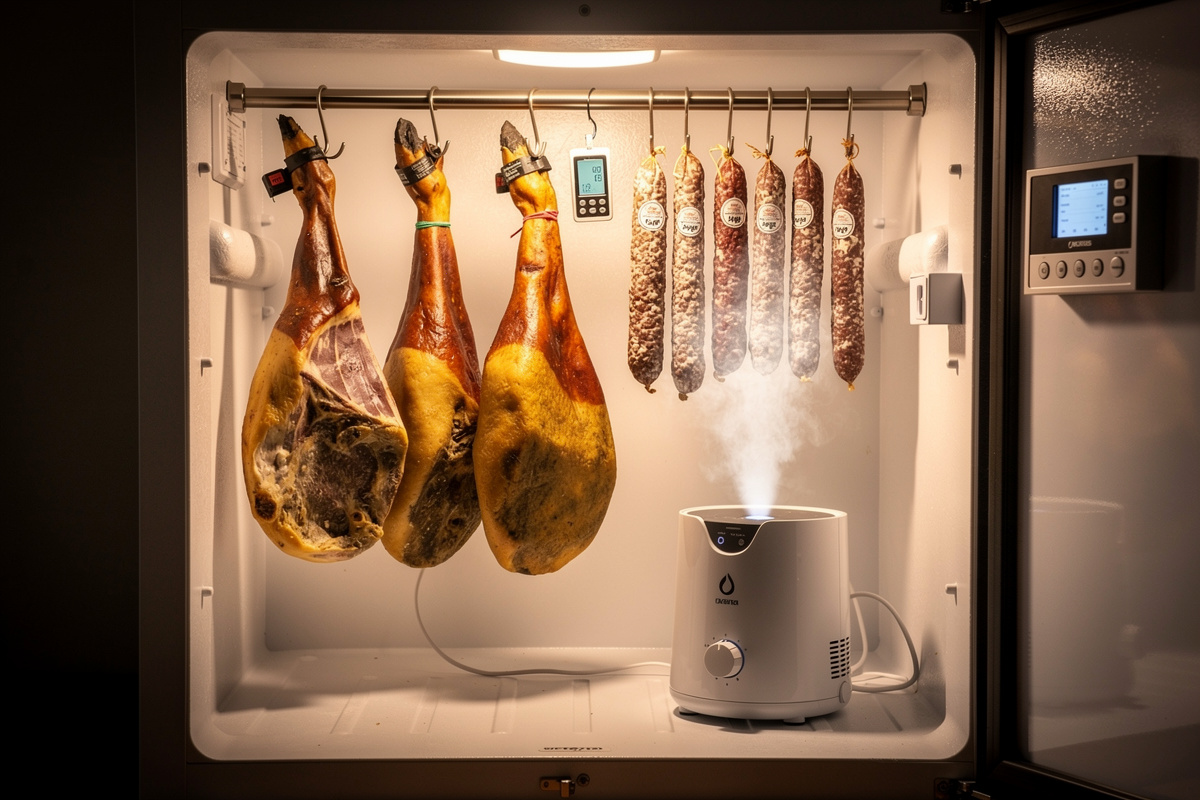
The reason climate control gets its own discipline is that any single device — controller, humidifier, dehumidifier, fan — can hold its setpoint while the chamber as a whole drifts. A thermostat reading 55°F next to a humidifier that just dumped a fog of mist is reading the air around the probe, not the meat hanging four inches above. This guide covers the four layers of climate control, how they interact, what to set them to for each product class, and how to read what your chamber is actually doing instead of what its display claims. I run a SensorPush HT.W at meat-shelf height plus an Inkbird IBS-TH3 at the coil zone as a two-sensor cross-check, and the third week of my first salami run was when I learned the value of that — the controller probe drifted 7% high while the SensorPush stayed accurate, and the discrepancy caught a 5-day overshoot before it ruined the batch.
As an Amazon Associate I earn from qualifying purchases.
What Curing Chamber Climate Control Actually Means
Climate control in a curing chamber is the maintenance of four interacting variables: temperature, relative humidity, air movement, and pressure (less often discussed but real for sealed chambers with refrigeration cycling). The four are coupled. Temperature changes change the air’s water capacity, which changes RH. Humidifier output adds water and slightly cools through evaporative effect. Compressor cycling drops temperature and dumps moisture out at the cold coil. A fan moves air, which moves both temperature and humidity, and breaks the still boundary layer around meat surfaces.
Beginner mistakes happen when builders treat the four variables as independent. Setting the controller to 55°F and the humidifier to 75% RH does not produce 55°F and 75% RH at the meat surface. The interaction effects matter. The four-layer mental model that follows is how to think about it.
Target Climate Ranges by Product
Each charcuterie or aging product has a different climate band. Mixing products in one chamber means picking compromise setpoints that no individual product loves. Here is what each product wants.
| Product | Temperature | Humidity | Air Movement | Notes |
|---|---|---|---|---|
| Salami (Italian dry) | 50-60°F (10-15°C) | 70-80% RH | Cycling fan 5/25 | Drying phase, after fermentation |
| Whole-muscle (prosciutto, bresaola) | 50-55°F (10-13°C) | 75-80% RH | Cycling fan 5/25 | Tighter humidity floor |
| Dry-aged beef | 33-40°F (1-4°C) | 75-85% RH | Constant gentle airflow | Much colder than salami |
| Hard cheese aging (cheddar, gouda) | 52-55°F (11-13°C) | 80-85% RH | Light cycling fan | Higher RH than salami |
| Bloomy rind (brie, camembert) | 50-55°F (10-13°C) | 90-95% RH | Minimal airflow | Almost still air for rind bloom |
| Cold smoking (any) | Below 80°F (27°C) | Variable | Light positive flow out | Smoke flows through; chamber pulls it |
The 5°F gap between salami target (75% RH) and cheese target (85% RH) sounds small but produces large effects over weeks. Salami at 85% RH stalls and grows surface mold problems. Cheese at 75% RH cracks and dries out. The compromise solution is to run product-specific batches; the target-band reasoning is in ideal humidity for dry aging beef vs charcuterie.
Layer 1: Temperature Control
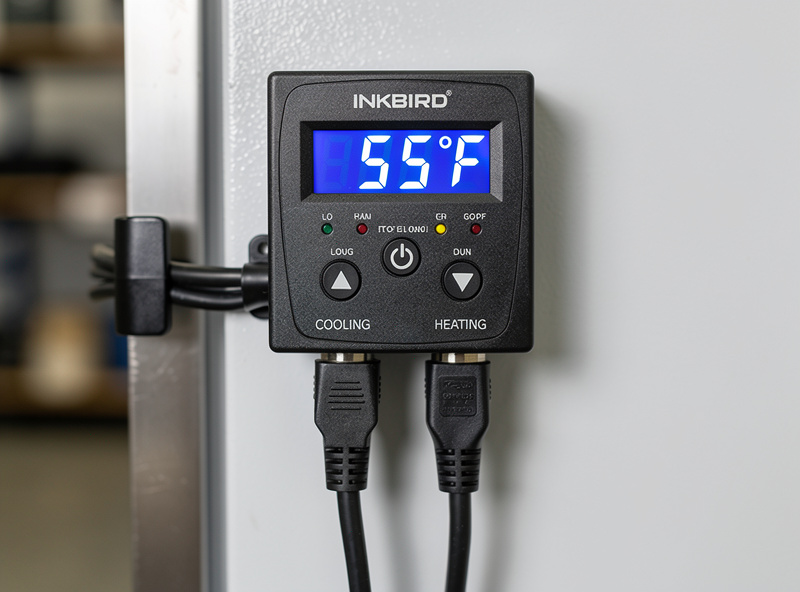
Temperature control on a home chamber is a dual-stage thermostat that switches both cooling (the compressor in the fridge) and heating (a small ceramic bulb or heat mat). The Inkbird ITC-308 is the most common choice — plug-and-play, two outlets (one cool, one heat), 2-degree differential. The STC-1000 is the older budget option requiring DIY wiring into a project box. My full bench comparison of all three is in Inkbird vs Auber vs Willhi for a curing chamber controller.
The differential matters more than the setpoint. A 1°F differential cycles the compressor too often (short-cycle wear and humidity spikes at each cycle); a 5°F differential lets temperature drift far past target. The 2-3°F differential range is the sweet spot.
Probe placement determines what the controller actually measures. A probe taped to the back wall reads cold air dropping off the cold coil and the chamber sits 4-6°F warmer than displayed. A probe near the door reads warm room air every time the door opens. Best practice: probe in mid-chamber, mid-height, two inches off any surface, taped to a hanging rod with a small piece of foam between probe and rod.
Layer 2: Humidity Control
Humidity control runs in two directions: adding moisture when RH falls below target, and removing moisture when RH climbs above target. Adding is easy — an ultrasonic humidifier wired through a humidistat, or through an Inkbird IHC-200 humidity controller like the one I run on my own chamber, runs steady-state without fanfare. Removing is harder, especially during the first 48 hours of fresh salami when meat releases water rapidly.
For adding moisture, an ultrasonic humidifier (the cheap white nursery kind) is the standard. The full ultrasonic vs wick vs steam breakdown is in choosing a curing chamber humidifier. Wire it to a humidistat that switches its outlet on below 75% RH and off at 78%. Keep the reservoir filled with distilled water to reduce mineral dust. The reservoir-management tactic that uses hydroponic-style auto-fill is in curing chamber humidity control: adapting hydroponic reservoir tech.
For removing moisture, a small Peltier dehumidifier handles routine spikes (5-15% above target). How to pick and size one is covered in choosing a curing chamber dehumidifier. For larger spikes — first 48 hours of salami, especially in summer — a compressor-based dehumidifier inside the chamber, or temporarily cracking the door for 10 minutes twice a day, both work. Detailed troubleshooting for chronic over-humidity is in curing chamber too humid: how to fix oversaturation fast.
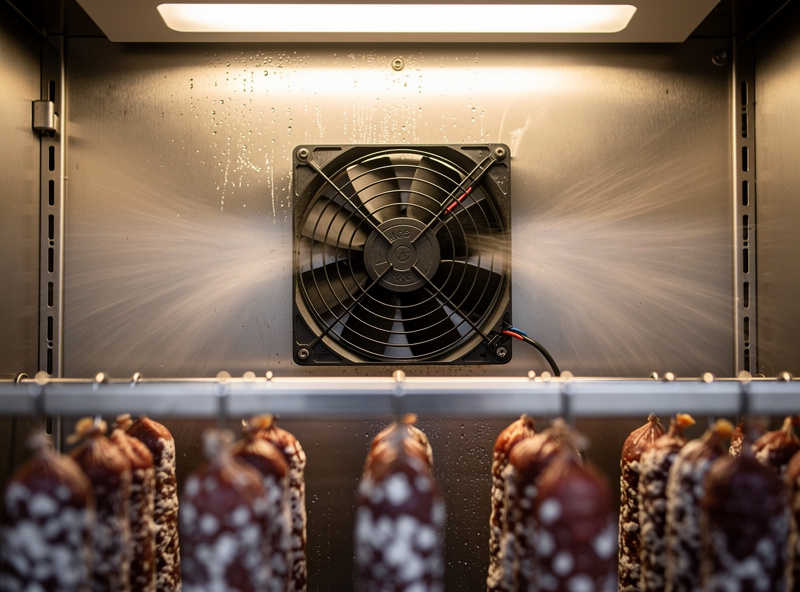
Layer 3: Air Movement
Air movement is the most-skipped layer. Without airflow, a saturated boundary layer forms around hanging meat. The chamber reads 75% RH at the sensor while the meat surface sits at 95% RH, growing surface mold that should not be there. With too much airflow, the surface case-hardens within 48 hours and the salami dries on the outside while the inside remains wet.
The right balance is a 120mm PC fan (5-12V, low RPM) running on a cycle: 5 minutes on, 25 minutes off. Fan size, placement, and the tissue-paper airflow test are covered in curing chamber airflow: fan size, placement, and CFM. A simple smart plug or appliance timer does the job. Mount the fan on the back wall or top, blowing across the meat — never directly at it. Test airflow by hanging a piece of tissue paper from the rod; the tissue should sway gently, not flap.
The case-hardening mechanism — surface dries faster than internal moisture migrates — is documented in case hardening in curing chambers: causes, prevention, and fixes. Air movement is the single biggest variable that determines whether case hardening happens, more than humidity or temperature alone.
Layer 4: Sensors and Calibration
The sensor reading is what your control loops act on. A drifted hygrometer reading 75% RH when the chamber is actually at 85% RH causes the humidifier to keep adding moisture, raising RH further. A 5% calibration error compounds quickly across weeks.
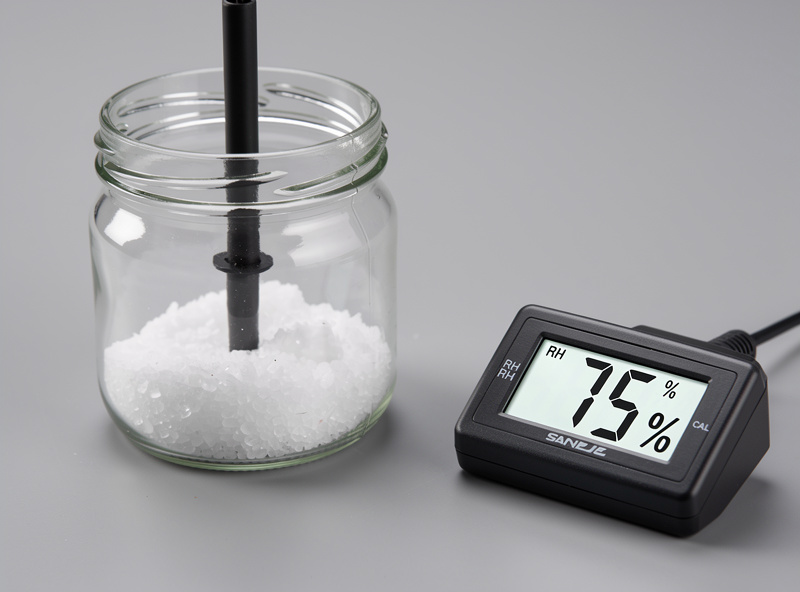
Calibrate hygrometers with the salt test: a saturated solution of plain table salt in a sealed container reads close to 75% RH at 25°C, the reference value in ASTM E104, the standard practice for maintaining constant RH with saturated salt solutions, regardless of brand or age. Place hygrometer in the test container for 6+ hours, compare reading to 75%, note drift, and either compensate in software or replace the sensor. Every cheap dial hygrometer I’ve run through this test has drifted — the worst was off by 12% RH out of the box, and none of the four I’ve tested so far have landed within 3%. The full salt-test and ice-water calibration walkthrough is in how to calibrate curing chamber sensors.
For long-term logging, smart sensors like SwitchBot, Govee, or Inkbird IBS-TH series produce cloud history and phone alerts when chamber drifts. Setting that up so you never open the door is covered in curing chamber data logging without opening the door. Use them as redundant readings against the controller’s primary probe. The full sensor selection, placement, and logging setup is in smart temperature and humidity sensors for curing chambers.
Common Climate Control Failures
Failure 1: Stratification — top/bottom temperature gap. A tall chamber without airflow develops a 3-5°F gap between the top and bottom shelves. The controller probe reads one zone; the meat in the other zone lives at a different temperature. Fix: cycling fan with deflection.
Failure 2: Humidity spike at every compressor cycle. Auto-defrost fridges spike humidity noticeably during their defrost cycle — on the SwitchBot log from my own converted units, the spike is easy to pick out as a fast RH climb that outpaces anything the humidifier is doing. Solution: plug the drain and reroute condensate, or shift to a manual-defrost box, or add a dehumidifier on a humidistat.
Failure 3: Setpoint right, surface wrong. Chamber reads target perfectly but meat is case-hardened or moldy. The boundary-layer effect — local microclimate around the meat differs from chamber-wide reading. Fix: more airflow, deflected from direct hits.
Failure 4: Seasonal drift. Garage chambers in summer fight against high ambient humidity; in winter against ambient cold infiltration. Same setpoints can produce different chamber behavior in July vs January. Track outdoor temperature and humidity along with chamber readings to see the patterns.
Failure 5: Probe placement next to humidifier. A probe two inches from the humidifier outlet reads transient mist rather than chamber RH. The humidistat sees 95% RH, shuts off, then the spot reading drops as mist disperses. Mount the probe at meat height, far from any humidifier or compressor outlet.
Climate Control on a Budget vs Pro Tier
Climate control gear scales from 80 dollars total to over 500 dollars depending on tier. The budget approach gets a workable chamber holding 55°F at 75% RH within a few percent. The pro approach gets redundant sensors, programmable setpoints, and cloud logging.
Budget tier (about $80): Inkbird ITC-308 controller ($35), basic ultrasonic humidifier ($25), simple humidistat outlet ($15), a 120mm PC fan with smart plug ($10). Skip the dehumidifier; manage spikes by cracking the door manually for the first 48 hours. Skip the smart sensor; calibrate the controller probe with a salt test.
Mid tier (about $180): Inkbird ITC-308 ($35), humidifier with auto-fill reservoir ($40), wired humidistat with two outlets ($25), Peltier dehumidifier ($35), 120mm fan with timer ($15), SwitchBot sensor for cloud logging ($30). This is the sweet spot for serious home charcuterie.
Pro tier (about $450): PID controller ($90), reservoir humidifier ($70), dual-stage humidistat ($60), compressor dehumidifier ($90), BLDC fan with PWM ($40), dual logging sensors ($60), insulation board upgrade ($40). The tier where the chamber holds spec without daily attention.
Reading Chamber Logs to Diagnose Problems
A 24-hour log of chamber temperature and humidity tells you more than spot readings. The logs from a smart sensor (SwitchBot, Govee, Inkbird) graph temperature and RH over time and reveal patterns no point reading shows. The diagnostic value is huge.
Three patterns to look for. Sawtooth temperature with sharp spikes every 2-4 hours is normal compressor cycling — not a problem. Sawtooth temperature with sharp spikes every 6-8 hours plus matching humidity drops is auto-defrost cycles dumping moisture out the drain. A long flat humidity at 85% with no humidifier output is the boundary-layer issue, where the sensor sits in saturated dead air.
Logs over multiple weeks reveal seasonal drift. A chamber that holds 75% RH steady in May but creeps to 80-85% RH in July is fighting summer ambient humidity. Logs caught at the moment of a problem (case-hardened salami at week 4) often show that the chamber climate was actually fine — the issue was the boundary layer or the door-open frequency, both invisible to a single sensor.
Climate Control During Salami Fermentation
The drying climate (55°F at 75% RH) is wrong for fermentation. Fermentation needs 75-85°F at 90% RH for 24-48 hours so the lactic acid bacteria multiply rapidly and pH drops below 5.0. Trying to ferment in the same chamber that does drying requires programmable setpoint shifts that most home controllers cannot do.
The practical solution is a separate small fermentation cabinet for the 24-48 hour warm phase. An oven with the light on (40-watt incandescent) reaches 75-85°F naturally. A small Styrofoam cooler with a heat mat and a humid sponge holds 80°F at 90% RH for the duration. Once fermentation completes (confirmed by pH meter or strips), move the salami to the curing chamber for the multi-week drying phase.
Tuning a Chamber Through the Seasons
A chamber that holds spec in May may drift in August. Summer adds three challenges: ambient room temperature 80°F+ that the compressor must overcome, ambient humidity 60%+ that increases moisture infiltration with every door open, and reduced compressor efficiency at high ambient. Garage chambers feel this most.
Seasonal tuning patterns: in summer, expect humidifier to run less (chamber is fighting to dehumidify rather than humidify), shift fan duty cycle slightly higher to compensate for boundary-layer issues at higher absolute moisture, and consider adding insulation board on chamber sides. In winter, expect humidifier to run more (cold air holds less water), monitor for cold-zone freezing of bottom shelves, and watch for door gasket condensation freezing the seal.
The off-grid version of these seasonal challenges, where battery sizing must account for higher compressor duty cycles in summer, is in off-grid curing chamber battery and inverter sizing. The chamber-build philosophy sets up the layers that climate control then operates on, in how to build a curing chamber.
Running Two Chambers Side by Side: What A/B Testing Taught Me
The second chamber I run isn’t redundancy, it’s a comparison tool. A converted bar fridge sits next to the primary larder chamber, sized for bresaola and short cures, and I’ve used it more than once to settle an argument I was having with myself about whether a change was actually helping or whether I was reading noise into a normal week-to-week swing.
The clearest example: I ran the same coppa cure split across both chambers, one on the ultrasonic humidifier and humidistat setup, the other on a damp-sponge passive fallback with no active humidifier at all, both logged on the same SensorPush/IBS-TH3 pairing I use everywhere else. The active chamber held its 75-80% band tighter — tighter swings day to day — but the passive-sponge chamber wasn’t the disaster I expected going in, it just needed the sponge refreshed more often than I wanted to bother with on a chamber running actively-humidified pieces too. That’s the kind of result a single-chamber build never surfaces, because you have nothing to compare it against except your memory of last time, which is a bad instrument.
If you’re building a second chamber purely to add capacity, size it for whatever you cure least often — short whole-muscle pieces and bresaola-sized cuts don’t need the full envelope a hanging salami rack does, and a smaller box is easier to hold steady besides. Smaller air volume swings faster in both directions, which is a downside for stability but an upside if you’re deliberately testing a change and want to see the result inside days instead of weeks.
Automating the Response: Home Assistant and Smart Plugs
Every layer above this point assumes you’re reading a display and reacting by hand. That works for the first few batches, but once you’re running two chambers plus a fermentation cabinet, checking each one daily stops being sustainable. The chamber compressor and fan both sit on smart plugs on my setup, and the SwitchBot/Govee loggers feed into the same Home Assistant hub that runs the grow lights and the hydroponic reservoir on the other side of the workshop — the automation layer doesn’t care whether it’s watching a curing chamber or a plant tent, humidity is humidity to the sensor.
What automation actually buys you is the alert, not the control. I don’t run closed-loop automation that fires the humidifier or dehumidifier off a smart plug when RH crosses a threshold — a stuck relay or a lag in the polling interval can overshoot badly on a chamber that has weeks of work hanging in it, and the failure mode of an unattended automated humidifier running away is worse than the failure mode of a slow manual response. What I do run is threshold alerts: a push notification the moment any sensor crosses outside the target band, so I catch a drifting compressor or a humidifier that ran dry before it costs a batch, without handing the chamber blind control. The fuller build for that alert pipeline, plus the smart-plug scheduling approach I use on the compressor and fan cycle, is covered from the automation side at HomeAutoCentral’s smart home sensor guide.
Insulation and the Chamber Envelope
A converted fridge already has insulated walls, but the door gasket and any hole you’ve cut for cable pass-through or a fan mount are the weak points, and they matter more than people expect. A gasket that’s lost its seal lets warm, humid room air infiltrate every time the compressor cycles the door pressure, which shows up as a slow humidity creep that looks like a control-loop problem but is actually an envelope problem.
Check the gasket with the dollar-bill test — close the door on a bill and pull; if it slides out with no resistance anywhere around the perimeter, the gasket needs replacing or reseating before you troubleshoot anything else. Any cable or fan-mount hole through the cabinet wall should be sealed with closed-cell foam or silicone, not just left as a gap — a 1-inch hole doesn’t sound like much, but on a chamber running a 15-20°F delta against room temperature it’s a constant infiltration point that fights the controller around the clock.
Adding rigid foam board to the exterior (the pro-tier line item in the cost breakdown above) helps most on chambers in unconditioned spaces — a garage or unheated basement — where the ambient swing across a day is large. On a chamber already living in a climate-controlled room, the stock fridge insulation plus a good gasket usually holds without the extra board. I added foam board to the primary chamber after the first winter in an unheated section of the workshop; the second, smaller chamber lives somewhere the ambient stays closer to target year-round and has never needed it.
Frequently Asked Questions
What is the ideal climate for a curing chamber?
The standard target band for most charcuterie is 55 degrees F (13 degrees C) at 75 percent relative humidity, with drift under 3 degrees F and 5 percent RH. Cheese aging runs slightly higher at 80-85 percent RH. Dry-aged beef runs much colder at 33-40 degrees F. Air movement should be a cycling fan at 5 minutes on, 25 minutes off across the chamber.
How do I control humidity in a curing chamber?
Use an ultrasonic humidifier for adding moisture, wired to a humidistat that switches at the target band (75 to 78 percent RH for salami). For removing moisture during initial drying spikes, use a small Peltier or compressor dehumidifier on the same humidistat. Cracking the door 10 minutes twice a day handles short-term spikes manually. Reservoir auto-fill is the long-term solution.
Why is my curing chamber reading right but the meat is wrong?
This is the boundary-layer effect. The sensor reads chamber-wide air, but a saturated layer forms around hanging meat that can be 10-20 percent RH higher than chamber average. Without air movement, the meat surface lives at near 95 percent RH while the sensor reads 75 percent. Fix with a cycling fan that breaks the boundary layer without case-hardening the surface.
How accurate are cheap hygrometers in a curing chamber?
Cheap dial hygrometers drift noticeably out of the box and worsen over months — every one I’ve bench-tested has been off by double digits. Calibrate with a salt test (saturated table salt in a sealed container reads close to 75 percent RH at 25 degrees C per ASTM E104) for 6 hours, compare reading to 75 percent, and note drift. Replace any sensor that drifts more than 5 percent. Use redundant smart sensors for cross-checking.
What temperature differential should my controller use?
A 2 to 3 degree F differential is the sweet spot. Below 1 degree F differential the compressor short-cycles and humidity spikes at every cycle. Above 5 degree F differential the chamber drifts too far from target. The Inkbird ITC-308 I run holds a 2 degree differential without issues — check your own unit’s setting on first setup rather than trusting the factory default blind.
How do I keep humidity stable during salami fermentation?
Fermentation runs at 75-85 degrees F at 90 percent RH for 24-48 hours, which is much warmer and more humid than the drying phase. Use a separate fermentation cabinet (an oven with the light on works) for this phase, then move salami to the curing chamber for drying. Trying to ferment in the same chamber as drying salami requires programmable setpoint shifts that most home controllers cannot do.
Why does my chamber humidity spike when the compressor cycles?
Auto-defrost fridges spike humidity during their defrost cycle as condensate evaporates back into the chamber. Solutions: plug the auto-defrost drain so condensate exits to a tray you empty manually, switch to a manual-defrost box, or add a small dehumidifier on a humidistat that catches the spike. The compressor cycle itself is normal; the defrost is the problem.
Related Articles
- Smart Temperature and Humidity Sensors for Curing Chambers — sensor selection, placement, and cloud logging.
- Curing Chamber Humidity Control: Adapting Hydroponic Tech — auto-fill reservoir tactics borrowed from hydroponics.
- Ideal Humidity for Dry Aging Beef vs Charcuterie — target ranges by product class.
- Curing Chamber Too Humid: How to Fix Oversaturation Fast — emergency steps for chronic over-humidity.
- How to Build a Curing Chamber: The Complete Guide
- Case Hardening in Curing Chambers: Causes and Fixes
- Off-Grid Curing Chamber: Battery and Inverter Sizing
- Dry Aging Beef at Home: The Complete Guide
- Home Cheese Aging: The Complete Guide