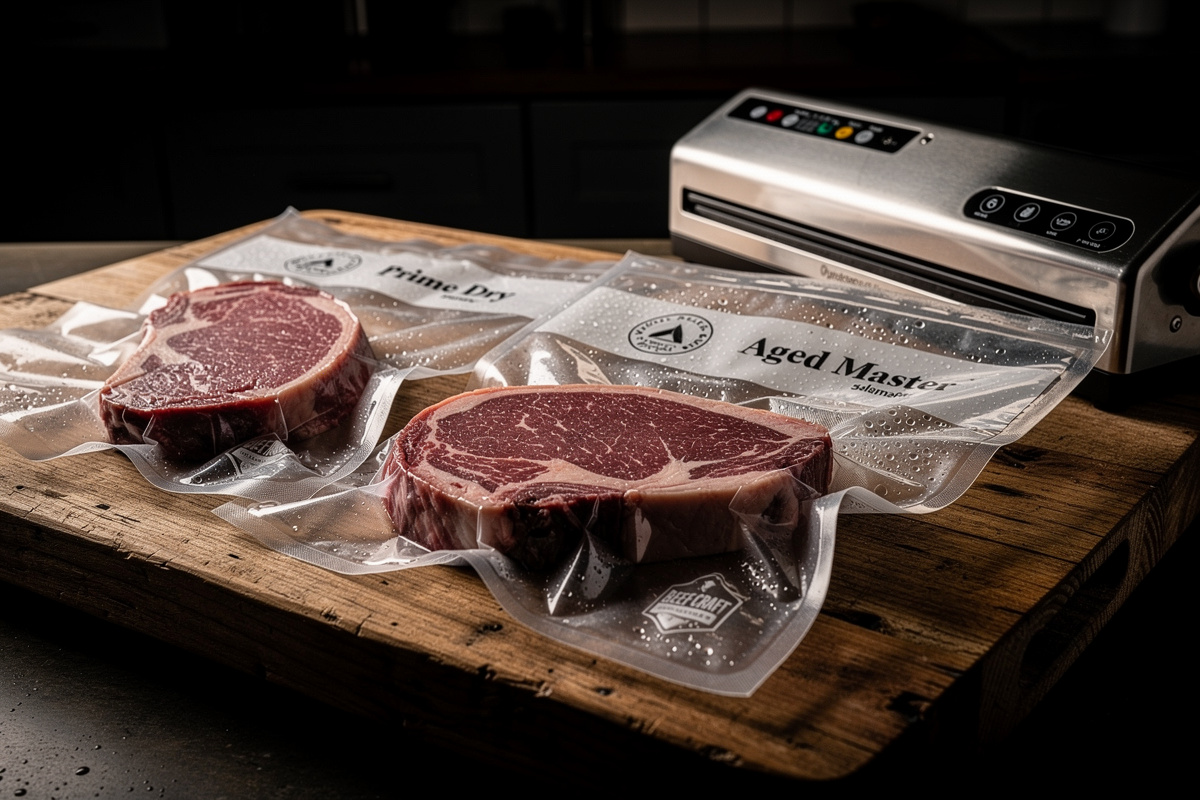

I have run a 35-day Umai Dry on a 4-pound USDA Choice ribeye, a 21-day DryAgePro on a 6-pound striploin, and a 28-day DryBagSteak.com bag (their own budget line) on a 3-pound boneless ribeye.
The Umai produced the best crust development; the DryAgePro held its seal the most reliably of the three on the first sealing attempt; the DryBagSteak.com bag was the cheapest per pound and finished within the same flavor band as the other two in a side-by-side blind taste with my brother-in-law as judge — no surprise, since it is the same membrane. Here is the honest three-way comparison: Umai Dry (45-65 dollars per pack of 3) is the flagship brand and the one most hobbyists start with. DryAgePro (25-45 dollars per pack of 5) is a genuinely separate, independent company — the real budget competitor to Umai. DryBagSteak.com (35-55 dollars per pack of 3) is not a third manufacturer at all; DrybagSteak, LLC is the company that makes Umai Dry, and drybagsteak.com is their own cheaper direct storefront selling the identical membrane without the Umai retail packaging. All three use moisture-vapor-permeable membrane technology (the membrane is FDA-compliant for food contact under 21 CFR 177 and behaves like a one-way oxygen filter) that produces dry-aged steaks indistinguishable from chamber-aged beef in blind tastings. The bag vs open-air dry aging comparison and the cut-by-cut yield math is in dry aging beef at home: the complete guide.
As an Amazon Associate I earn from qualifying purchases.
Dry aging bags democratized home dry aging around 2014 when Umai entered the consumer market. The bags work by allowing water vapor to escape while preventing oxygen ingress and bacterial contamination — essentially creating a tiny dry-aging environment around each cut of beef inside any standard refrigerator. For home cooks who do not want to convert a fridge or build a chamber, dry aging bags produce 90-95% of the chamber experience for under $200 in equipment.
How Dry Aging Bags Work
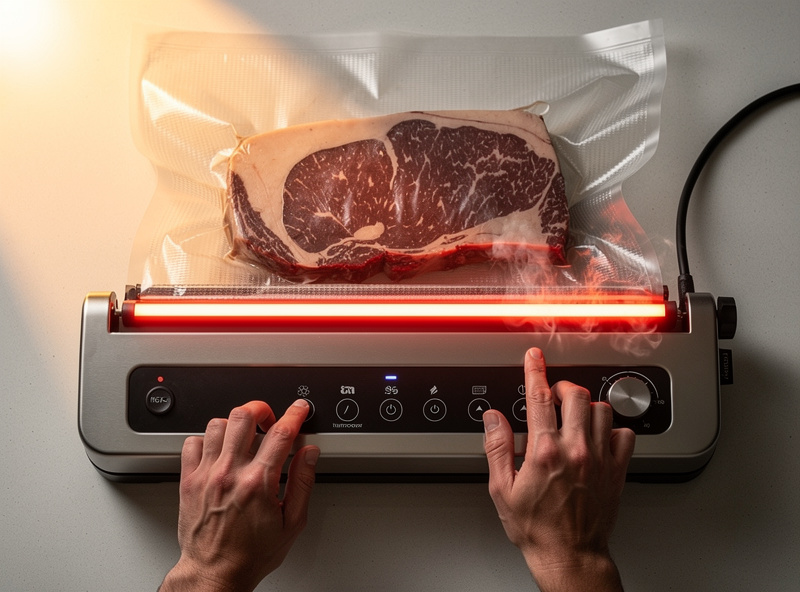
Dry aging bags are made from a moisture-vapor-permeable polyethylene membrane that allows water molecules to pass through while blocking oxygen and bacteria. The bag must be vacuum-sealed against the meat surface to make direct contact — air gaps prevent the membrane from working properly. Inside any standard fridge at 34-38°F, the bag-wrapped meat ages exactly like chamber-aged beef, just without the dramatic pellicle visual.

The membrane technology specifics:
- Moisture transmission: Bags allow 100-300 grams of water vapor per square meter per day to pass through. The meat dehydrates at a controlled rate similar to chamber aging.
- Oxygen barrier: Bags block oxygen at 99%+ levels. Prevents oxidative spoilage and inhibits aerobic bacterial growth.
- Bacteria barrier: The membrane pore size (under 0.5 microns typically) excludes all common bacteria.
- Vacuum requirement: The bag must contact 95%+ of the meat surface for proper moisture transfer. Air gaps result in patchy aging.
- Refrigerator temperature requirement: 34-38°F maintains both meat safety and slow controlled aging. Above 40°F bacterial growth becomes a risk despite the bag.
- Time vs chamber: Most blind tastings cannot distinguish 30-day bag-aged from 30-day chamber-aged beef. Some flavor experts detect slight differences after 45+ days.
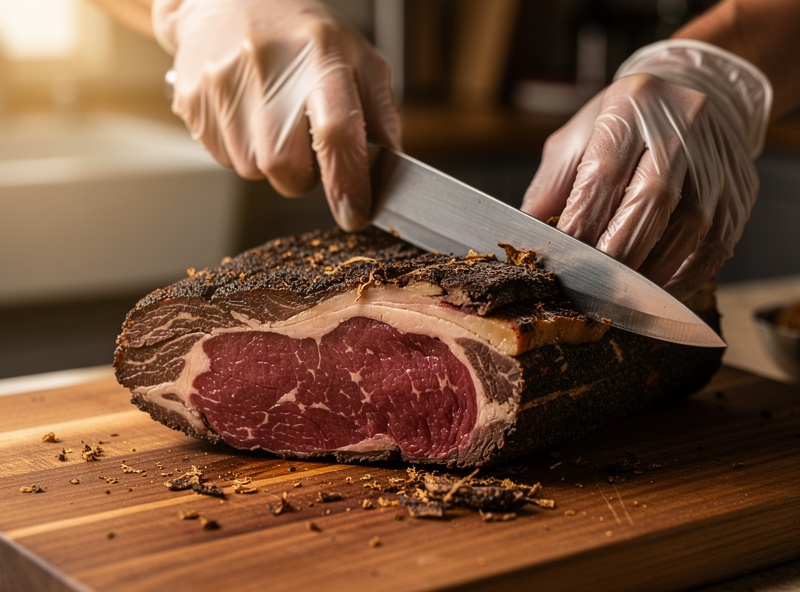
The bags are not a substitute for chamber aging in producing the visible “dry-aged restaurant” appearance with thick pellicles. Bag-aged steaks have minimal visible pellicle. The flavor and tenderness improvements are equivalent; the visual presentation is different. Read about chamber alternatives in our how to convert a fridge into a curing chamber guide.
Comparison Table: Top Three Dry Aging Bag Brands
| Brand | Price | Pack Size | Bag Material | Best For |
|---|---|---|---|---|
| Umai Dry | 45-65 dollars | 3 bags (large) | Polyethylene membrane | Hobbyist standard, most-used, flagship brand |
| DryAgePro | 25-45 dollars | 5 bags (12x24in) | Polyethylene membrane | Real independent budget competitor |
| DryBagSteak.com | 35-55 dollars | 3 bags | Polyethylene membrane | Umai’s own direct storefront, same membrane, lower price |
| Generic/unbranded Amazon listings | under 25 dollars | Varies | Polyethylene, unverified spec | Cheapest, quality varies meaningfully — check reviews |
Pricing reflects single-pack retail in 2026. Multi-pack deals on Amazon and direct from manufacturers reduce per-bag cost 15-25%. Refilling/reusing bags is not recommended — the membrane degrades after a single use cycle.
Detailed Brand Comparisons
Three real options cover almost every home dry-aging need: Umai for first-time and occasional users, DryAgePro for anyone who wants a genuinely separate company’s take on the same technology, and DryBagSteak.com for budget-conscious users who want Umai’s exact membrane at a lower price. Umai and DryAgePro have each been tested by hobbyists for years; all produce excellent dry-aged beef when used correctly.
Brand-by-brand breakdown:
- Umai Dry (45-65 dollars per 3-bag pack): The hobbyist standard, with its flagship product dating to 2014. Reliable membrane quality, multiple sizes available (steak, primal cuts, brisket). Best documentation and customer support of any brand.
- DryAgePro (25-45 dollars per 5-bag pack): The real independent competitor to Umai — a separate company, moisture-permeable membrane, no vacuum sealer required, sized for ribeye and striploin up to 18 pounds. Less brand recognition and thinner documentation than Umai, but the membrane does the same job for noticeably less per bag.
- DryBagSteak.com (35-55 dollars per 3-bag pack): Not a separate manufacturer — this is DrybagSteak, LLC’s own direct storefront, and DrybagSteak, LLC is the company behind Umai Dry. Same membrane technology, lower price, less retail packaging. If you already trust Umai’s science, this is the cheaper way to buy it.
- Generic/unbranded Amazon listings under 25 dollars: Skip. The quality control on no-name brands is poor and unverifiable. Some reports of bags failing during aging cycles, ruining the meat inside.
For first-time users, Umai Dry is the right choice — the documentation and customer support justify the slight price premium. After 3-5 successful uses, switching to DryBagSteak.com for the identical membrane at a lower price is the obvious move, since you are buying from the same company either way.
How to Use Dry Aging Bags Successfully
Successful bag use requires a quality vacuum sealer (chamber sealer best, Foodsaver-style works), proper meat selection (whole subprimals like ribeye loin or NY strip loin), aggressive vacuum sealing to eliminate air pockets, refrigeration at 34-38°F throughout the aging period, and patience for 21-45 days. Skipping any step produces inferior results.
The full procedure:
- Buy a whole subprimal cut: Ribeye loin, NY strip loin, or top sirloin in 5-15 pound sections. Choose Choice grade or higher for best results.
- Trim minimally before bagging: Remove only the very loose fat or surface oddities. The exterior fat layer protects during aging.
- Insert meat into the bag: Match bag size to cut size. Excess bag length is fine; insufficient length cannot seal.
- Use the dry aging “kit’s” sealing strip if included: Some bags include moisture-resistant sealing strips at the bag mouth.
- Vacuum seal aggressively: Multiple seal passes. Air pockets prevent the bag from working — the membrane needs direct meat contact.
- Place on a wire rack in the refrigerator: Air must circulate around all sides of the bag.
- Wait 21-45 days: Most users start with 21-28 days; experienced agers go to 45+ days for more pronounced flavor.
- Trim the surface after aging: Cut away the dark exterior pellicle and any darker surface tissue. Yield is typically 80-90% of starting weight.
- Slice into steaks: Cut perpendicular to the muscle grain for best texture.
The most-skipped step is the wire rack — meat resting directly on the fridge shelf creates an unrefrigerated cold spot beneath. Air circulation on all sides keeps the entire bag at uniform temperature. Read about dry aging variables in our dry aging smell normal vs bad guide.
Common Mistakes With Dry Aging Bags
Five mistakes produce disappointing or failed results: incomplete vacuum sealing leaving air gaps, choosing too-small cuts that lose disproportionate weight, trusting a drifting fridge without an independent thermometer, opening the bag mid-aging, and stopping the aging period too early. Each one degrades the final product significantly.
Mistakes and corrections:
- Incomplete vacuum seal: Air gaps prevent the membrane from contacting the meat. Result: patchy uneven aging. Solution: use a quality vacuum sealer; double-seal the bag mouth; check for any air pockets after sealing.
- Cuts under 4 pounds: Smaller cuts lose surface area to mass ratio at much higher rates. A 2-pound cut loses 30-40% to surface trim; a 10-pound cut loses 15-20%. Always start with subprimals.
- Fridge temperature drift: Any fridge, defrost type aside, can drift a few degrees warmer during a defrost cycle or a lot of door-opening. The bag itself does not care about ambient humidity — it manages that on its own — but it does care about staying under 40°F. Verify with an independent thermometer placed next to the bag rather than trusting the fridge’s own display, and do not assume defrost type alone guarantees stability.
- Opening the bag mid-aging: Once sealed, the bag must stay sealed until aging completes. Re-sealing introduces air gaps and contamination.
- Stopping too early: 14 days produces marginal results compared to fresh meat. Minimum 21 days for noticeable improvement; 28-35 days produces clear dry-aged flavor; 42-60 days produces pronounced aged character.
- Wrong cut selection: Lean cuts dry out too fast. Stick to ribeye, NY strip, sirloin, or other well-marbled subprimals.
- Fridge too warm: Above 40°F bacterial growth becomes a risk. Verify fridge temperature with a separate thermometer.
- Trim losses higher than expected: First-time aging produces 15-20% higher trim losses than experienced agers. Plan for it.
The reliable habit is to age 2-3 cuts at once on a single fridge schedule. The economy of starting all three at the same date and finishing them within a 1-week window justifies the freezer stockpile from the trim-yield reduction. Read about complete aging workflows in our duck prosciutto beginner project guide for adjacent technique.
Dry Age Bag Sizing by Cut
Matching the bag size to the cut is the detail that separates a clean seal from a blown one. The three subprimals I age most often each want a different bag, and the sizing logic comes down to surface area, bone geometry, and how tightly the membrane can hug the meat.
- Ribeye roast (bone-in, 4-7 lb): Use a large Umai bag (11×24 inch). The bone cap creates irregular pressure points — leave 2 inches of bag beyond each end so the vacuum pulls the membrane flush against the fat cap without bridging over the bone curve. A bag that is too short bridges, leaves an air pocket along the chine bone, and that patch ages unevenly.
- Striploin (boneless, 5-10 lb): A large or extra-large bag (11×24 or 14×30). Striploins are uniform cylinders — the easiest cut to seal cleanly. Leave 1 inch of slack at each end. This is the cut I recommend to first-timers because the geometry is forgiving and the yield is predictable.
- Brisket (flat or whole packer, 8-14 lb): You need an extra-large bag (14×30 or larger). A whole packer brisket is the hardest cut to bag — the point end is thick and irregular, and the flat tapers thin. Vacuum slowly and massage the membrane into the point-flat junction. An undersized bag on a brisket is the #1 cause of seal failure I see.
- Individual steaks (1-2 lb each): Small bags work, but the economics are poor — you lose 25-30% of a single steak to trim versus 15-20% on a subprimal. I cover the math in detail below, but the short version: age subprimals, slice into steaks after.
The sizing mistake I made early on with dry age bags was buying one bag size and forcing every cut into it. A ribeye in a brisket bag has too much slack and the membrane cannot contact the meat surface — the aging stalls. Keep two sizes on hand: large (11×24) for ribeye and striploin, extra-large (14×30) for brisket and larger cuts. The best beef cuts for dry aging guide walks through each subprimal in more detail.
Vacuum Sealer Compatibility and Seal Failures
The single most common question I get is whether a standard Foodsaver-style edge sealer works with dry age bags. The answer is yes, with caveats. Dry aging bags are thicker and stiffer than standard vacuum pouches, and the membrane layer resists the initial vacuum pull. Here is what actually works in practice.
Chamber vacuum sealers (the kind where you place the entire bag inside a chamber and the air is evacuated around it) are the gold standard. They pull a deeper vacuum, the seal is cleaner, and they handle the stiff membrane without struggling. If you already own one for sous vide or charcuterie, use it — it is the right tool. A chamber sealer eliminates the most common seal failure mode.
Edge/external vacuum sealers (Foodsaver, Nesco, Anova) work but need technique. The stiff membrane can prevent the sealer from pulling a full vacuum on the first pass. Run the vacuum cycle twice — seal, check for air pockets, reposition and run again. The moisture channel on edge sealers can clog with purge from the meat; freeze the cut for 30 minutes before bagging to firm up the surface and reduce liquid weep during sealing.
The seal failure I see most often is the “false seal” — the machine reports a complete vacuum, but a hidden air pocket sits between the membrane and the meat surface. The bag looks tight from the outside, but inside, a small air gap ages unevenly and can develop off-smells. After sealing, press the bag hard against the meat with both hands. If you feel a bubble or a section that gives under pressure, cut and reseal. I learned this the hard way on a 35-day ribeye that developed a soft patch under a hidden pocket — half the roast aged beautifully, half was wasted.
Dry Age Bags for Steaks vs Whole Subprimals
The economics of bag aging favor subprimals by a wide margin, but the question comes up constantly. Here is the honest breakdown.
A whole 8-pound striploin subprimal ages for 35 days, loses about 20% to trim (1.6 lb), and yields roughly 6.4 pounds of finished dry-aged beef — enough for 8-10 generous steaks. A single 1.5-pound ribeye steak aged in its own small bag loses 30% to trim (0.45 lb) and yields just over a pound of finished meat. The per-pound cost of the trim waste on a single steak is nearly double what it is on a subprimal, because the surface-to-mass ratio punishes small cuts.
The flavor difference between bag-aged subprimals and bag-aged individual steaks is minimal at the same aging duration. The real argument for aging steaks individually is variety — you can age four different steaks for different durations (21, 28, 35, 45 days) and taste them side by side. I did this once and it was the most educational single fridge-shelf of beef I have ever run. But for day-to-day eating, age the subprimal, slice it into steaks when you are ready, and save the trim for burgers or board sauce.
One note on dry age bags vs a dedicated dry aging chamber: bags are the entry point, not the endgame. Once you are aging 3+ subprimals per quarter, a converted fridge chamber with humidity control becomes more economical and produces the thick pellicle that bags cannot. The bag vs open-air dry aging comparison breaks down where each method wins.
Frequently Asked Questions
How much do dry aging bags cost?
Umai runs 15-22 dollars per bag in a 3-pack (45-65 dollars total). DryAgePro, a genuinely independent competitor, runs about 5-9 dollars per bag in a 5-pack (25-45 dollars total). DryBagSteak.com sells the identical Umai membrane through a cheaper storefront, roughly 12-18 dollars per bag in a 3-pack. Multi-pack deals on Amazon reduce per-bag cost further. Plan on roughly 15-20 dollars per 5-10 pound subprimal aged.
Are dry aging bags as good as a real curing chamber?
For aged flavor and tenderness, yes — blind tastings consistently show no detectable difference between bag-aged and chamber-aged beef at 30 days. The visible difference is the pellicle, which forms thicker on chamber-aged beef. For flavor, bags work; for the dramatic restaurant-style aged appearance, only chambers produce that visual.
Can I reuse a dry aging bag?
No. The membrane technology degrades after one use cycle. Reusing risks failure mid-aging that ruins the meat inside. Always use fresh bags. The cost-per-pound for premium aged beef makes reuse a false economy.
What vacuum sealer works best with dry aging bags?
Chamber vacuum sealers (300-800 dollars) produce the best seals but are expensive. Mid-range Foodsaver-style sealers (75-200 dollars) work well with dedicated dry aging settings. Cheaper sealers under 75 dollars sometimes lack power for reliable bag sealing.
How long should beef age in dry aging bags?
Minimum 21 days for noticeable improvement; 28-35 days produces clear dry-aged flavor; 42-60 days produces pronounced flavor changes that distinguish home aging from store-bought. Above 60 days the flavor changes become more polarizing — funky, blue-cheese-like notes that some prefer and others find off-putting.
What cuts of beef work in dry aging bags?
Whole subprimal cuts work best — ribeye loin, NY strip loin, top sirloin, or chuck roll. Avoid lean cuts (eye of round, top round) which dry out too quickly. Avoid pre-trimmed individual steaks; the surface-area to mass ratio means too much loss to trim. Larger is better; 5-15 pounds is the sweet spot.
Related Articles
- Dry Aging Smell: Normal vs Trouble
- Humidity for Dry Aging Beef vs Charcuterie
- How to Convert a Fridge Into a Curing Chamber
- Duck Prosciutto Beginner Project
- Curing Chamber Too Humid