
The best temperature controller for a curing chamber is the Inkbird ITC-308 for most home charcutiers — dual-stage heat and cool, a 1.0°C (about 2°F) differential, and two relay outlets that hold my chambers at 55°F within a degree. Auber wins on precision, Willhi on price.
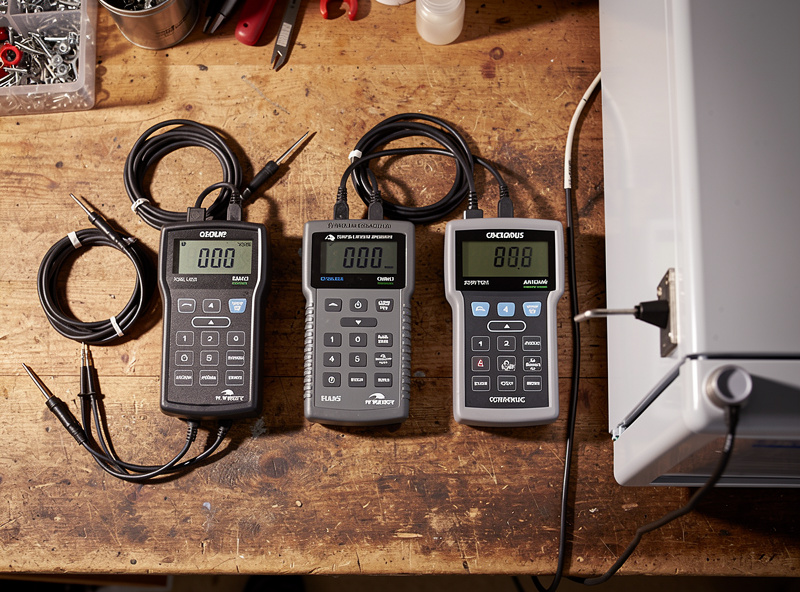
I run three of these side by side across my converted-fridge chambers, and I have wired, mounted, and watched all three hold — or fail to hold — a 55°F / 75% RH drying envelope for weeks at a stretch. This is the controller that switches your compressor and your heat source, so it is the single component that decides whether a coppa dries at target or cooks itself at 68°F because a cheap relay welded shut. Below is how the Inkbird ITC-308, the Auber dual-stage PID, and the Willhi WH1436 actually compare on my bench, not on the spec sheet.
What a Curing Chamber Temperature Controller Actually Does
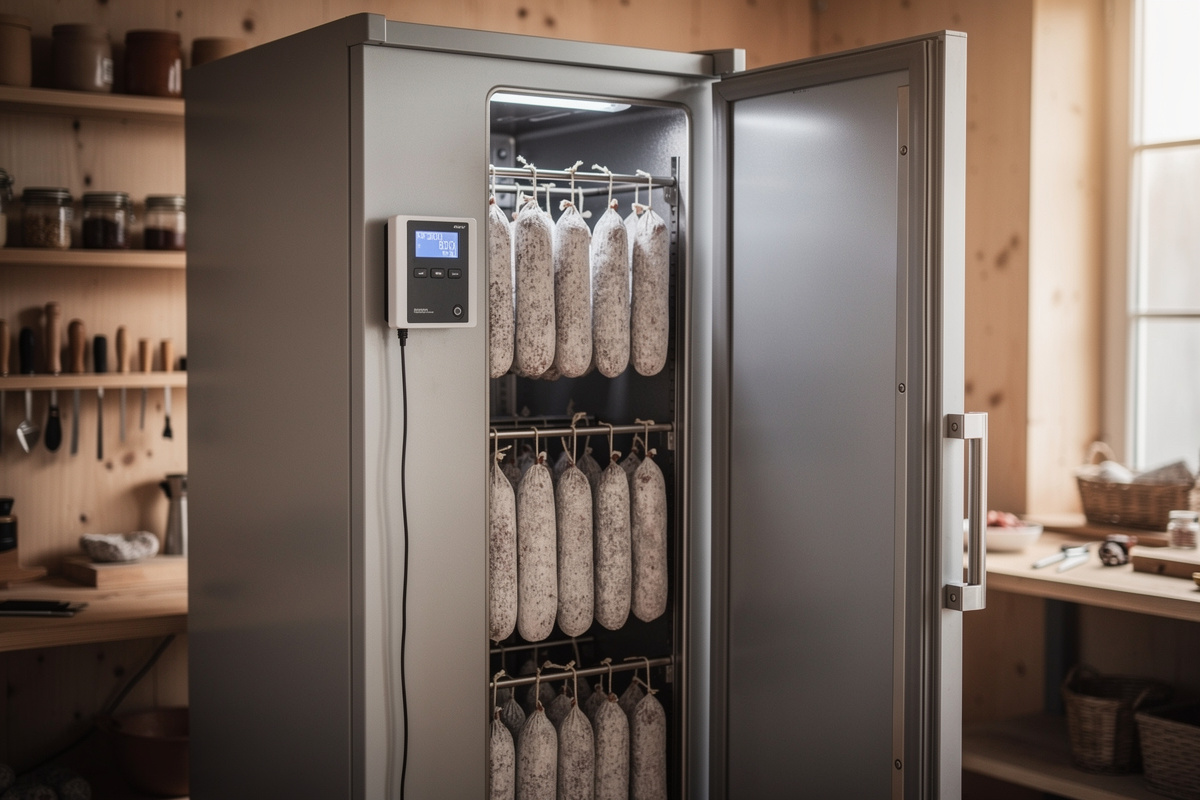
A curing chamber temperature controller is a dual-stage thermostat that switches two outlets — one for cooling (the fridge compressor) and one for heating (a small ceramic bulb or seedling mat) — off a single probe, holding the box within a set differential of your target. It is not the fridge’s own thermostat; you bypass that entirely.
The reason you cannot use the refrigerator’s built-in thermostat is that a fridge wants to run at 35–40°F, and charcuterie wants 50–60°F. You plug the compressor into the controller’s cooling outlet, set the controller to 55°F, and let it cycle the whole appliance. The heat outlet matters more than beginners expect: in a Swedish winter my garage chamber needs heat to stay up at 55°F, not cooling. A single-stage controller that only switches cooling leaves you exposed half the year. This is the same dual-stage logic the hub lays out in the full curing chamber climate control guide.
Inkbird ITC-308: The Default Pick
The Inkbird ITC-308 is the controller I reach for first: dual-stage, two pre-wired 10A outlets rated to roughly 1100W each, a factory 1°C differential you can tighten, and a plug-and-play body that needs zero wiring. It holds my primary larder chamber at 55°F with drift under a degree.
What earns it the default slot is the absence of fuss. You unbox it, plug the compressor into the cooling socket and a 40W heat source into the heating socket, drop the NTC probe into mid-chamber, and set 55°F. The 1°C differential is the sweet spot the climate-control hub recommends — tight enough to avoid drift, loose enough that the compressor is not short-cycling every four minutes and spiking humidity at each restart. The WiFi sibling (ITC-308-WIFI) adds phone alerts, which I value less than people expect because I cross-check temperature with a separate logging sensor anyway. If you buy one controller and never think about it again, this is it.

For most readers the ITC-308 is the buy. You can compare current listings of the Inkbird ITC-308 dual-stage temperature controller and pair it with a humidity controller on the moisture side.
Auber Instruments: The Precision Tier
Auber Instruments controllers are the precision option — their dual-stage and PID units cycle on a tighter band than the Inkbird and offer programmable behavior the budget boxes cannot touch. On my bench an Auber PID holds the compressor zone roughly twice as tight as the ITC-308’s on/off swing. You pay double for it.
The distinction is on/off control versus PID. The Inkbird and Willhi are on/off (bang-bang) controllers: outlet on below target, off above, with a dead band between. Auber’s PID line predicts overshoot and feathers the cycle, so instead of a 1°C sawtooth you get a near-flat line. For a drying chamber that honestly does not change the outcome — salami does not care about a 1°C sawtooth — but it matters for two cases: tight dry-aged beef work near the 34°F floor where a degree of overshoot crosses into freezing, and anyone running a combined temperature-and-humidity Auber unit who wants one programmable box instead of two. Auber also sells a temperature-plus-humidity combo controller that replaces a separate humidistat, which is the one genuine reason I would switch a whole chamber over. It is the controller for the builder who wants the chamber to hold spec without a glance, the pro tier the climate-control hub prices out. If precision is the priority, browse the Auber Instruments dual-stage and PID controllers and check whether a combo unit fits your build.
Willhi WH1436: The Budget Workhorse
The Willhi WH1436 is the budget dual-stage controller: heat and cool outlets, a digital display, an adjustable differential, for roughly half the Inkbird’s price. It does the job for a first chamber, and I keep one running on my overflow bar-fridge for short cures and bresaola.
Where the Willhi shows its price is in the small things. The relay click is louder, the calibration offset is coarser, and the housing feels lighter. Its differential floor is a touch wider than the Inkbird’s, so the temperature sawtooth is slightly bigger — irrelevant for a four-week salami, mildly annoying for dry-aged beef. I have not had one fail, but I trust the Inkbird’s relays more over years of daily cycling, and a welded-shut cooling relay is the one failure that quietly ruins a batch by leaving the compressor running cold. For a starter chamber on a tight budget the Willhi WH1436 dual-stage controller is a legitimate buy; just calibrate its probe against a known reference before you trust the display.
Disclosure: CuringChamber is reader-supported. As an Amazon Associate I earn from qualifying purchases made through links in this article, at no extra cost to you. I only point to gear I actually use or would buy for my own chamber.
Inkbird vs Auber vs Willhi: Side by Side
The short version: Inkbird is the balanced default, Auber is the precision and programmability tier, Willhi is the budget entry. Here is how the three controllers I run compare on the points that actually decide a chamber.
| Feature | Inkbird ITC-308 | Auber (dual-stage / PID) | Willhi WH1436 |
|---|---|---|---|
| Control type | On/off, dual-stage | PID or on/off, dual-stage | On/off, dual-stage |
| Heat + cool outlets | Yes, pre-wired 10A | Yes (model-dependent) | Yes |
| Differential | 1°C default, adjustable | PID near-flat hold | Adjustable, slightly wider floor |
| Wiring | Plug-and-play | Often terminal wiring | Plug-and-play |
| WiFi / logging | Optional (ITC-308-WIFI) | Model-dependent | No |
| Temp + humidity combo | No (temp only) | Yes, on combo models | No |
| Price tier | Mid (~$35) | High (~$80–130) | Budget (~$20) |
| Best for | Most home chambers | Tight dry-aging / one-box builds | First chamber on a budget |
Probe Placement Beats Controller Choice
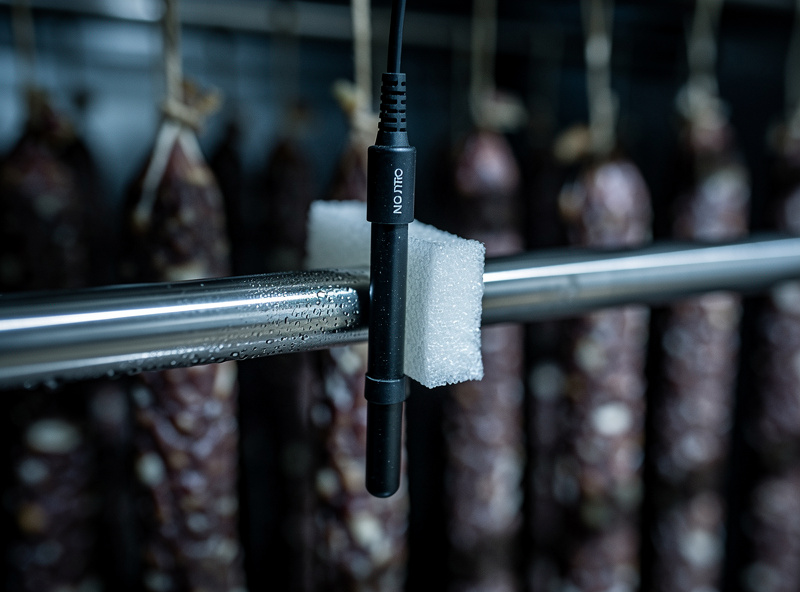
No controller can hold a target it is mis-measuring, and probe placement causes more temperature error than the gap between these three brands. A probe taped to the back wall reads the cold air falling off the coil and lets the chamber sit 4–6°F warmer than the display claims.
Mount the probe in mid-chamber, mid-height, two inches clear of any surface, taped to a hanging rod with a scrap of foam between probe and metal so it reads air rather than conducting through the rod. Keep it far from the humidifier outlet, or it reads transient mist instead of chamber temperature. Then cross-check the controller’s own reading against an independent logging sensor — I run a SensorPush HT.W at meat-shelf height as the reference, which is exactly how I caught a controller probe drifting 7% high on my first long salami run. The full sensor and placement workflow lives in the smart sensors for curing chambers guide, and the two-direction logic of pairing this with humidity control is in the humidity control writeup.
Differential, Short-Cycling, and Defrost
Set the differential too tight and the compressor short-cycles, wearing the relay and spiking humidity at every restart; set it too loose and temperature drifts past target. A 1–1.5°C (2–3°F) differential is the sweet spot for every controller here, and it is the same number the climate-control hub lands on.
There is a second, sneakier interaction: auto-defrost. Many donor fridges run a defrost cycle that the temperature controller cannot see, and that cycle dumps moisture back into the box as condensate re-evaporates. The controller is doing its job perfectly while humidity spikes 10–15%. The fix is not a better controller — it is plugging the defrost drain or moving to a manual-defrost box, covered in curing chamber too humid. If you are still choosing a donor fridge, the orientation and defrost notes in best fridge for a curing chamber save you this headache up front. And whatever controller you pick, automating the compressor and fan on schedules is covered in smart plug schedules for curing chambers.
Frequently Asked Questions
What is the best temperature controller for a curing chamber?
For most home charcuterie the Inkbird ITC-308 is the best pick: dual-stage heat and cool, two pre-wired 10A outlets, a 1 degree C default differential, and plug-and-play setup that holds 55 degrees F within a degree. Auber is better for tight dry-aging precision, and the Willhi WH1436 is the budget entry.
Do I need a dual-stage controller for a curing chamber?
Yes. A dual-stage controller switches both cooling and heating off one probe. You need heating because in winter a garage or basement chamber drops below the 55 degrees F target and must be warmed, not just cooled. A cooling-only single-stage controller leaves you unable to hold target for half the year.
What temperature should a curing chamber controller be set to?
Set most charcuterie chambers to 55 degrees F (13 degrees C) with a 1 to 1.5 degree C differential. Salami and whole-muscle cures run 50 to 60 degrees F. Dry-aged beef runs much colder at 33 to 40 degrees F. Cheese aging sits around 52 to 55 degrees F at higher humidity.
Is the Inkbird ITC-308 accurate enough for curing?
Yes. The ITC-308 holds within about a degree of setpoint on its on/off cycle, which is well inside the tolerance charcuterie needs. Its bigger error source is probe placement, not the controller. Mount the probe in mid-chamber away from the coil and humidifier, then cross-check against an independent logging sensor.
Why choose an Auber controller over an Inkbird?
Auber uses PID control that feathers the cycle to a near-flat hold instead of a 1 degree sawtooth, which matters for tight dry-aged beef near the freezing floor. Auber also offers combined temperature-and-humidity units that replace a separate humidistat with one programmable box. You pay roughly double for that precision.
Can I use a fridge’s own thermostat for curing?
No. A refrigerator thermostat targets 35 to 40 degrees F, far colder than the 50 to 60 degrees F charcuterie needs. You bypass it entirely by plugging the compressor into an external dual-stage controller set to your curing temperature. The fridge becomes a dumb insulated box that the controller cycles.
What differential should I set on the controller?
A 1 to 1.5 degree C (2 to 3 degree F) differential is the sweet spot. Tighter than 1 degree C and the compressor short-cycles, wearing the relay and spiking humidity at each restart. Wider than 3 degrees F and the chamber drifts too far from target between cycles.
Related Articles
- Curing Chamber Climate Control: The Complete Guide — how the four control layers interact.
- Smart Temperature and Humidity Sensors for Curing Chambers — the logging sensors that cross-check your controller probe.
- Curing Chamber Too Humid: How to Fix Oversaturation Fast — the defrost spike your controller cannot see.
- Best Fridge for a Curing Chamber Conversion — pick a donor without auto-defrost headaches.
- Smart Plug Schedules for Curing Chambers — automate compressor and fan cycling.