
Dry aging beef at home holds a beef subprimal at 33-40°F (1-4°C) and 75-85% relative humidity for 14 to 45 days while enzymes break down muscle proteins, water evaporates from the surface, and a hard outer bark forms that is later trimmed off.
The result is a more tender, deeply concentrated steak that grocery-store wet-aged beef cannot match. For the full head-to-head — why the flavor diverges and when each method is right — see dry aging vs wet aging beef: a side-by-side taste test.
The hard part is not the aging itself; it is keeping a sustained microbial-safe climate for weeks while choosing cuts that yield enough usable meat after the bark is trimmed. A whole subprimal ribeye loses 15-25% of its weight to evaporation and another 10-15% to bark trim by week four — the math determines whether home dry aging is worth doing at all. This guide walks the climate, the four method options, the cuts that yield, the timeline by days, and the trim work that decides your final cost per pound. I have personally run a 35-day Umai bag on a 4-pound USDA Choice ribeye, a 28-day chamber on a 6-pound striploin, and a 45-day open-air ribeye that I posted progress photos of every Sunday — the last two weeks of that 45-day run carried the strongest funk note (Stilton-cellar by week 5, right at the edge of where I’d push a home setup without dedicated UV/air-filtration) and the cleanest education on what each week actually contributes.
What Dry Aging Is and What Happens to the Beef
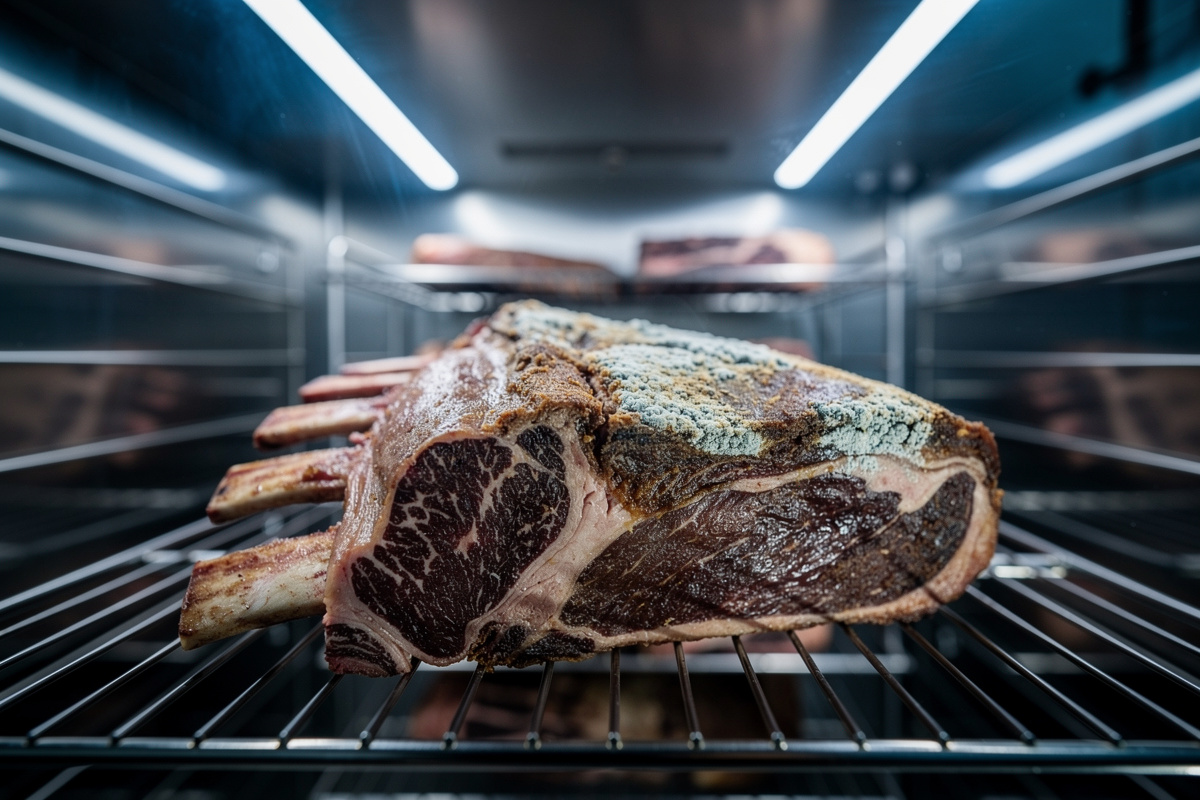
Dry aging is the controlled exposure of beef to refrigerated, dehumidified air (the published range is documented in this peer-reviewed dry-aging-of-beef review, which confirms 32-39°F as the safe holding band the cure window has to stay inside) for an extended period. Three things happen simultaneously. Endogenous enzymes (cathepsins and calpains) break down muscle protein structures, tenderizing the meat from the inside out. Water evaporates from the surface, concentrating flavor compounds in the remaining tissue. And a thin film of beneficial mold and yeast colonizes the bark, contributing the funky, nutty, blue-cheese-adjacent flavors that distinguish premium dry-aged steak from any other.
The hard outer bark that develops over weeks is not the steak you eat — it is a sacrificial layer that protects the interior. After aging, the bark is trimmed off and discarded along with any fat that has gone rancid. The interior, now darker and dense, is portioned into steaks. A 14-pound rib subprimal aged 28 days might yield 8 pounds of usable steak after trim and evaporation losses.
The Climate Dry Aging Needs
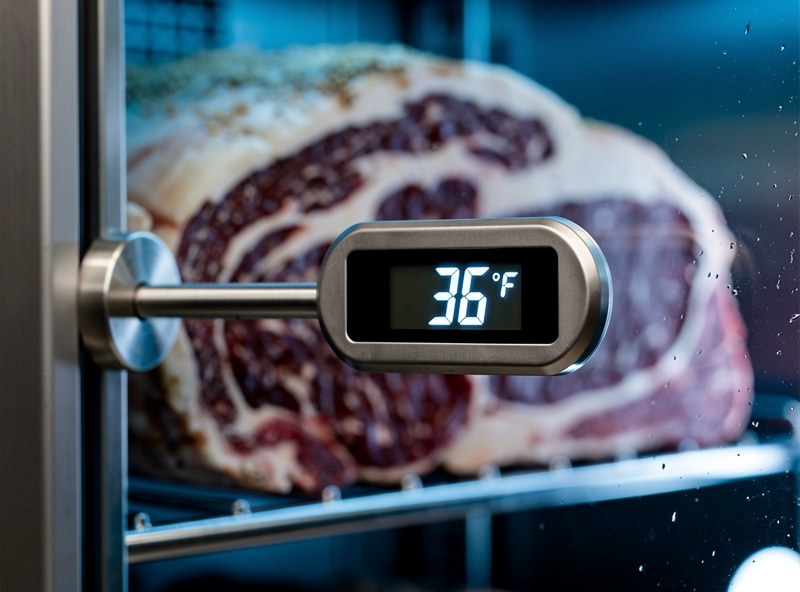
Hold 33-40°F (1-4°C) and 75-85% relative humidity for the duration. Drift should stay under 3°F and 5% RH. Cooler is safer; warmer accelerates breakdown but raises spoilage risk. Most professional dry-age coolers run 34-38°F at 80% RH as the sweet spot. Air movement is constant but gentle — never blow a fan directly at the meat.
This is significantly colder than what salami or cheese needs. A multi-purpose curing chamber that holds 55°F for charcuterie cannot dry-age beef without dropping the setpoint and waiting for the new temperature to stabilize over 48 hours. The chamber-build philosophy in how to build a curing chamber applies, with the controller setpoint at 36°F and a slightly stronger air-circulation cycle. The humidity-control logic from curing chamber humidity control works the same. For target ranges by product, see ideal humidity for dry aging beef vs charcuterie.
The 4 Dry Aging Methods Compared
Four methods cover almost every home dry-aging project. Each trades equipment cost, climate stability, and yield differently.
| Method | Setup Cost | Yield (% of starting weight) | Best For | Watch For |
|---|---|---|---|---|
| Dedicated dry-age fridge or chamber | $200-$1,500 | 60-70% after trim | Serious home agers; multi-cut runs | Climate stability; bark contamination |
| Vacuum bag (UMAi, DryAgePro) | $30-$60 per cut | 80-85% after trim | Beginners; small cuts; existing kitchen fridge | Bag failures; insufficient weeks for full effect |
| Salt block aging | $50-$120 (block) plus fridge | 70-75% | Moderate-time projects; thicker cuts | Block hygiene; sodium absorption |
| Open-air shelf in beverage cooler | $150-$300 (cooler) | 55-65% after trim | Maximum flavor depth; long ages | Climate drift; mold colonization |
For most home cooks the bag method is the best starting point. The bag forms a permeable membrane that allows moisture out but blocks contamination, producing a true dry-aged flavor with most of the yield benefits and none of the chamber-management overhead. The detailed bag testing across UMAi, DryAgePro, and DryBagSteak is in best dry aging bags: Umai vs DryAgePro vs DryBagSteak tested.
As an Amazon Associate I earn from qualifying purchases.
Open-air aging in a dedicated chamber produces the deepest flavor but demands the most attention. Plan on a chamber that does nothing else during the run — sharing space with cheese, salami, or other charcuterie risks cross-contamination at the bark. For the full method head-to-head — yield, flavor, and effort — see dry aging bag vs open air.
Best Cuts for Home Dry Aging
Not every cut is worth aging. The yield math punishes small cuts and lean cuts. Subprimals (large primal sections sold whole, often direct from a butcher) work best because they carry enough fat and surface area to justify the trim losses. Buy from a butcher who sells whole subprimals or a Costco-style warehouse where ribeye and strip subprimals are available unportioned.
- Bone-in ribeye subprimal (5-bone or 7-bone, 14-22 lb): The premium cut for dry aging. Generous fat cap protects the interior. Yields 4-8 thick steaks after trim. Best at 28-45 days.
- Striploin / NY strip subprimal (12-16 lb): Excellent fat cap, leaner meat than ribeye. Yields 8-12 strip steaks after trim. Best at 21-35 days.
- Top butt / sirloin (8-12 lb): Budget option. Less fat but acceptable yield. Best at 14-21 days; longer aging produces dryness without proportional flavor gain.
- Picanha (cap of top sirloin, 3-4 lb): Brazilian-style cut. Bag method only at home — too small for chamber yield to work.
- Whole tenderloin (5-7 lb): Generally not worth dry aging. Already very tender; aging concentrates flavor but the small cross-section makes trim losses huge.
Avoid pre-cut steaks. A single 1-inch ribeye steak loses too much volume to trim to be worth aging. Aging happens at the subprimal level, then portioning happens at trim time. For the cut-by-cut breakdown of which subprimals yield best, see best beef cuts for dry aging: ribeye vs striploin vs sirloin.
Dry Aging Timeline: 14, 21, 28, 45 Day Windows
Each duration produces a recognizably different steak. Pick based on the flavor profile you want and the cut you have. The full window-by-window breakdown — flavor, texture, evaporation loss, and risk at each mark — is in how long to dry age beef: 21 vs 35 vs 60 vs 100 days.
- 14 days: Subtle. Tenderness improves noticeably. Flavor still recognizably “fresh beef” with mild concentration. Best for first-time agers; minimal funk.
- 21 days: The flavor inflection point. Buttery, slightly nutty notes start to develop. Bark is firm but not yet hard.
- 28 days: The sweet spot most steakhouses target. Well-developed nutty, savory funk; substantial tenderness gain; bark hard and trim losses peak.
- 35-45 days: Pronounced funk territory. Blue-cheese, mushroom, and strong umami notes. Texture continues to soften. Risk of off-flavors from poor climate control rises.
- 60+ days: Specialty territory. Some restaurants do 90 to 120-day aged steaks. At home, the climate control demands and yield losses make this rarely worthwhile.
Smell is the best progress indicator. The familiar dry-aged-funk smell is normal and good. A sharp ammonia note, a sour-vinegar smell, or any rotten-vegetable note is a problem and the meat should be inspected immediately. The full smell-diagnosis guide is in dry aging smell: what is normal vs what means trouble.
The Trim and Yield Math
Trim losses are the variable that decides whether dry aging at home costs more than buying retail dry-aged steak. A 14 lb bone-in ribeye subprimal aged 28 days at proper climate ends up weighing about 11 lb (loss to evaporation: ~3 lb, ~21%). After trimming the hard bark and any rancid fat, the usable meat is 7-8 lb (further loss: ~3 lb, ~30%). Final yield: 50-55% of starting weight in usable steak.
At a starting cost of 12-15 dollars per pound for a Choice subprimal, that means your 14 lb subprimal cost roughly 200 dollars and produced 7 lb of dry-aged steak — about 28-30 dollars per pound effective cost. Retail dry-aged ribeye at a butcher shop runs 35-65 dollars per pound. Home dry aging beats retail per-pound only when you target deep aging (35+ days) or buy subprimals at warehouse pricing.
The detailed cost-per-pound math along with subprimal sourcing tactics is in curing chamber build cost: what I spent on my setup for the chamber-side, and the bag-method math is in best dry aging bags tested.

The Pellicle and Bark
Within the first 48 hours of aging, the surface forms a tacky pellicle as moisture leaves the cut surface. Over the next week the pellicle hardens into the dry, dark, lightly molded bark that protects the interior throughout the rest of the age. The bark is intentionally inhospitable to spoilage bacteria — it dries fast and pH-drops slightly from microbial activity.
The fat cap on the outside protects underlying muscle from drying too fast. Cuts with a thin or absent fat cap (like sirloin) lose more usable meat to drying. The bone end of bone-in cuts protects that face entirely. Strip and ribeye subprimals oriented with the fat cap up, bone end against the wall, lose minimum yield to evaporation.
The white-blue surface mold that develops on a properly-aged subprimal is normal and even desirable; it contributes flavor notes you cannot replicate any other way. Black, green, or pink mold is not normal and indicates climate problems. The mold ID logic from salami casing mold: good vs dangerous applies; black mold on charcuterie is the same conversation.
Sourcing Subprimals: Where to Buy Whole Cuts
Subprimals are not displayed at most grocery store meat counters; they are stored in the back. Three sourcing channels work for home agers. Direct relationship with a butcher shop produces the best meat at moderate prices — most independent butchers will sell a whole subprimal with a day’s notice for 12-15 dollars per pound on Choice grade. Costco Business Center and similar warehouse clubs sell ribeye and strip subprimals open-market at 10-13 dollars per pound for Choice. Online specialty meat suppliers (Crowd Cow, Porter Road, Snake River Farms) ship Prime and Wagyu subprimals at 25-60 dollars per pound for high-end aging projects.
Whatever channel you use, target a subprimal that is at most 7-10 days post-slaughter when you start the age — fresh-cut subprimals respond to dry aging better than bag-aged inventory that has already shrunk on a wholesaler’s shelf. Ask the butcher when the cut was harvested or vacuum-sealed.
Dry Aging Through a Swedish Winter vs Summer
Ambient conditions outside the chamber decide how hard the compressor has to work, and that changes by season more than most guides admit. My basement here in Sweden sits naturally cool from November through March — the compressor on my dry-age setup barely cycles, and I have run open-air ages down to 33°F with almost no drift because the room itself is doing half the work. The same setup in July, with the basement climbing into the low-to-mid 60s°F, forces the compressor to run nearly continuously to hold 36°F, and the humidity side struggles more too since warmer ambient air holds more moisture that has to be pulled back out. If you are in a similarly cold-winter climate, a first open-air dry-age project is genuinely easier to start in the cold months — the margin for error on temperature is bigger, and a brief compressor hiccup is far less likely to push you into the danger zone.
This is also the reason I do not recommend a beginner’s first open-air ribeye in a garage or shed during a hot summer stretch unless the space is air-conditioned. A chamber that has to fight both the compressor’s own heat output and a warm room around it drifts more, and drift is what turns a clean 28-day age into a case-hardened or off-flavor one. The bag method sidesteps most of this — a sealed Umai-style bag in a kitchen fridge does not care nearly as much what the room around the fridge is doing — which is part of why I still point first-timers there regardless of season, and save open-air chamber ages for once the climate-control side is dialed in.
Cooking Dry-Aged Steak
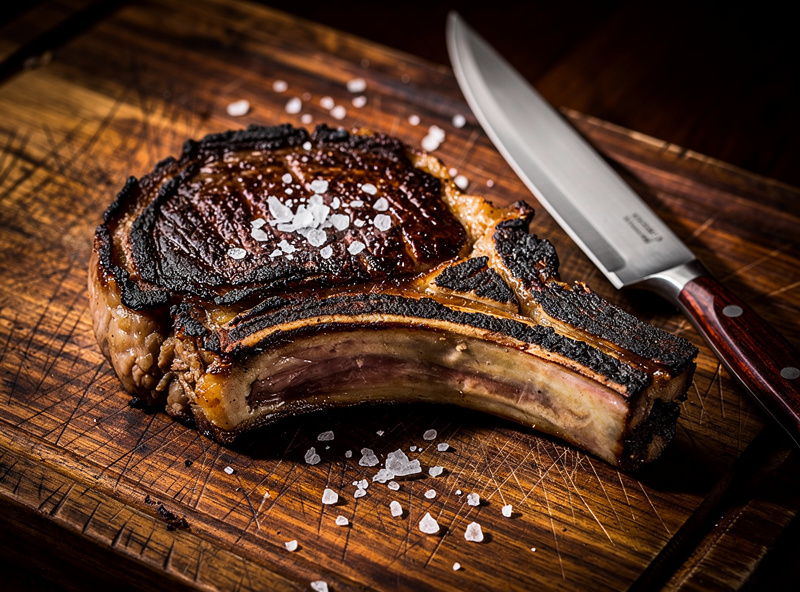
Dry-aged steak cooks differently from fresh beef. The lower moisture content means it sears faster and pulls past medium-rare more abruptly. The concentrated flavor stands up to high heat without needing the long sear that makes fresh steak interesting. The general rule: cook dry-aged steaks slightly cooler than you would fresh beef. Once it is cooked, plating it well is its own small craft — see serving dry-aged beef restaurant-style.
Reverse-sear works best for thick (1.5+ inch) cuts. Bring the steak to 110-115°F internal in a 250°F oven, rest 10 minutes, then sear in a screaming-hot cast iron pan with neutral oil and a knob of butter at the end. For thinner steaks (under 1 inch), a high-heat single-pass sear in cast iron is fine. Salt 40 minutes before cooking — the surface forms a dry pellicle that browns rapidly. Avoid marinades; the dry-age flavor is the point. The full basting technique, aromatics, and pull temperatures are in butter-basting a dry-aged steak.
Trimmings from the bark trim are not waste. Save the cleanest fat trim for tallow rendering, and any clean meat trim (not from the bark itself, but from re-shaping the subprimal) makes outstanding ground beef for burgers. Dry-aged burgers cooked medium-rare are a revelation that shows what the subprimal really cost per pound when you count every gram of usable meat.
Common Dry Aging Mistakes
Mistake 1: Aging cuts that are too small. A 4 lb chuck or a single ribeye steak does not have enough mass to survive trim losses. Buy whole subprimals, not retail-cut steaks.
Mistake 2: Sharing a chamber with high-humidity work. Dry aging at 80% RH and salami curing at 75% RH can coexist on humidity, but cheese aging at 85% RH cannot. The bigger problem is cross-contamination of mold cultures. Run dry-age subprimals as a chamber-monopolizing project.
Mistake 3: Insufficient airflow. A still chamber grows surface mold colonies that are not the helpful kind. A gently cycling fan (5 minutes on, 25 off) is enough to break the boundary layer and produce the right kind of surface flora. Detailed fan placement is in case hardening in curing chambers; the same principles apply.
Mistake 4: Skipping the trim. The bark looks dramatic but is rancid in spots and inedible. Trim aggressively. A 28-day age that looks great externally and tastes funky-bad inside almost always reflects under-trimming, not over-aging. The step-by-step break-down — bark, fat, bone, and portioning — is in how to trim a dry-aged steak.
Mistake 5: Using a regular kitchen refrigerator without a bag. A kitchen fridge runs at 35-40°F at 30-50% RH — too dry and with too much air exchange (every door open dumps moisture). Open-air aging in a kitchen fridge produces a desiccated brick rather than properly-aged beef. Use a dedicated chamber, a beverage cooler, or the bag method.
Tools and Equipment for Dry Aging at Home
Beyond the chamber itself, dry aging is light on specialty tools. A sharp boning knife and a cimeter (long curved butcher knife) handle the trim. A heavy cutting board large enough for the whole subprimal (24 inches plus). Disposable gloves for trim sanitation. A vacuum sealer for portioning post-aging. A digital scale that reads to 0.1 oz for tracking weight loss.
For sensors and logging, the same setup that monitors a charcuterie chamber works for dry aging. The detailed sensor selection and probe placement is in smart temperature and humidity sensors for curing chambers.
Frequently Asked Questions
How long should you dry age beef at home?
For first-time dry-agers, target 21 days for a clear flavor inflection without aggressive funk. The classic steakhouse target is 28 days, where nutty and savory notes are well-developed and tenderness gains are substantial. Strong dry-aged flavor builds at 35 to 45 days. Beyond 60 days, climate-control demands and yield losses make the project rarely worthwhile at home.
What temperature and humidity should you dry age beef?
Hold 33 to 40 degrees F (1 to 4 degrees C) and 75 to 85 percent relative humidity. Most professional dry-age rooms target 34 to 38 degrees F at 80 percent RH. Drift should stay under 3 degrees and 5 percent RH for the entire age. Air movement should be gentle and constant; never blow a fan directly at the meat.
Can I dry age beef in my regular fridge?
Not effectively in open air. A kitchen refrigerator runs at 30 to 50 percent humidity, far too dry, and door openings disturb the climate constantly. Use a dry-age bag (UMAi, DryAgePro, DryBagSteak) for a kitchen-fridge project. The bag forms a permeable membrane that keeps the meat at the right surface humidity while protecting it from contamination.
What cuts of beef are best for dry aging?
Whole subprimals with generous fat caps work best. Bone-in ribeye (5- to 7-bone, 14-22 lb) is the premium choice and yields 4 to 8 steaks after trim. Striploin or NY strip subprimal (12-16 lb) is excellent. Top butt and sirloin work for shorter ages on a budget. Avoid pre-cut steaks and small cuts under 4 pounds — trim losses make them uneconomical.
How much weight does beef lose during dry aging?
A 14-pound subprimal aged 28 days loses about 21 percent of its weight to evaporation, ending around 11 pounds. After trimming the hard bark and rancid fat, usable yield is typically 50 to 55 percent of starting weight. So a 14-pound subprimal yields roughly 7 pounds of dry-aged steak. Yields shrink further at 45+ day ages and grow at 14-day ages.
Is the white mold on dry aged beef safe?
Yes. The thin white or pale-blue surface mold that develops during proper dry aging is beneficial and contributes the characteristic nutty, funky flavor of dry-aged beef. It is trimmed off along with the bark before cooking. Black, green, pink, or fuzzy mold is not normal and indicates climate or sanitation problems; inspect the underlying meat before deciding whether to continue or pull the cut.
What does dry aged beef smell like?
Properly dry-aged beef smells nutty, slightly funky, like aged blue cheese or wet hay or even mild beef stock. The smell intensifies with age. A sharp ammonia note, sour vinegar smell, or any rotten or sulfurous note signals a problem and the meat should be inspected. Smell is the best ongoing progress indicator during the age.
Related Articles
- Dry Aging Smell: What Is Normal vs What Means Trouble — the smell-by-smell diagnosis through the age.
- Best Dry Aging Bags: Umai vs DryAgePro vs DryBagSteak Tested — head-to-head bag method results with yields and trim notes.
- How to Build a Curing Chamber: The Complete Guide
- Ideal Humidity for Dry Aging Beef vs Charcuterie
- Smart Temperature and Humidity Sensors for Curing Chambers
- Case Hardening in Curing Chambers
- Black Mold on Charcuterie: Dangerous or Just Ugly?
- Dry Aging Pork at Home: Safe Limits and How to Do It — why pork follows entirely different rules than beef.
- When Is Charcuterie Done? Weight Loss and Readiness Guide