
How to Make Genoa Salami Step by Step (Beginner Fermented Sausage)
May 4, 2026

I made my first Genoa salami batch with 4 lbs of pork shoulder, $18 worth of Bactoferm T-SPX starter culture, and a $40 LEM 5-lb stuffer borrowed from a neighbour.
As an Amazon Associate I earn from qualifying purchases.
The pH dropped from 5.7 to 5.1 in 47 hours at 73°F, and the chubs hit 33% weight loss at day 32 in the curing chamber — sliceable and sour-tangy in the right Genoa way. Make Genoa salami by grinding 80% lean pork shoulder and 20% pork back fat through a 4mm plate, mixing with 2.8% salt, 0.25% pink curing salt #2, garlic, peppercorns, and a Bactoferm starter culture, stuffing into 60mm beef middle casings, fermenting at 75°F and 90% humidity for 48-72 hours until pH drops below 5.3 (UW-Madison’s meat HACCP program lists pH 5.3 or lower paired with water activity 0.91 or lower as the validated shelf-stable combination for fermented sausage), then aging at 55°F and 75% humidity for 4-6 weeks until 30-35% weight loss brings the water activity down to that safe range, a target consistent with the validated drying-room parameters for semidry/dry fermented sausage. The whole process takes 6-8 weeks. The broader salami toolkit — equipment list, salt math, starter culture choice, fermentation, and drying — is in home salami making: the complete guide.
Genoa-style salami is the gateway fermented sausage for home charcuterie because it forgives more variables than other styles. The grind is coarser (more visual character), the seasoning is mild (defects less obvious), and the fermentation period short enough that contamination risk stays manageable. Most experienced home charcuterie makers started their salami journey with Genoa, then expanded into more demanding styles like Felino, Saucisson Sec, or Sopressata.
What Makes Genoa Salami Different from Other Styles
Genoa salami has a coarse 4-6mm grind versus the fine 2-3mm grind of Felino or Milano styles, includes whole black peppercorns and crushed garlic for visual character, runs slightly higher fat content (20-25% vs 15-18% in lean styles), and ferments to a slightly higher final pH (5.0-5.2 vs 4.8-5.0 for tangy styles). The result is a salami that looks visually rustic and tastes mild, with chunky fat distribution that catches the eye on a charcuterie board.
Style differences worth knowing:
- Genoa salami: Coarse grind, 20-25% fat, mild seasoning (garlic + black peppercorns), pH 5.0-5.2 final. Mild flavor, chunky texture.
- Milano salami: Fine grind, 18-22% fat, mild seasoning, pH 5.0-5.2. Creamier texture; classic deli salami style.
- Felino salami: Fine grind, 18-20% fat, garlic + white pepper, pH 4.9-5.1. Refined regional Italian style.
- Sopressata: Coarser grind than Genoa, sometimes pressed flat, regional Italian variations. 22-25% fat.
- Saucisson Sec: French style; fine grind, garlic-forward seasoning, pH 4.8-5.0. Tangier than Italian styles.
- Hungarian salami: Often paprika-seasoned, smoked variety. Different flavor profile entirely.
- Chorizo (Spanish): Paprika and garlic dominant. Different culture (Bactoferm F-LC instead of T-SPX).
For first-time salami makers, Genoa is the right choice — its forgiving nature provides a baseline of success before tackling more demanding styles. After 3-5 successful Genoa batches, branching out into other styles becomes natural. Read about specific salami troubleshooting in our salami casing mold guide.
Ingredient List for 1 Kilogram of Salami
For a 1kg batch yielding two 500g salami links: 800g lean pork shoulder, 200g pork back fat, 28g kosher salt (2.8%), 2.5g pink curing salt #2 (0.25%), 5g dextrose for fermentation (0.5%), 4g cracked black peppercorns, 6g minced garlic (3 cloves), 0.15g Bactoferm T-SPX starter culture (check your packet — commercial dosing runs roughly 0.13-0.25g per kilogram), 60mm beef middle casings (about 2 feet of casing).
The complete ingredient breakdown:
- Pork shoulder, 800g: Lean, well-trimmed of silverskin. Boston butt is the standard cut.
- Pork back fat, 200g: Hard back fat specifically — not soft belly fat or jowl fat which behaves differently.
- Kosher salt, 28g: Diamond Crystal preferred for its consistent grain size. Non-iodized.
- Pink curing salt #2, 2.5g: Required for safety on long-aged products. Buy from Butcher & Packer or similar specialty supplier.
- Dextrose, 5g: Fast-acting sugar to feed the fermentation culture. Skipping this stalls fermentation.
- Black peppercorns, 4g: Coarsely cracked, not finely ground. The visible whole peppercorns give Genoa its character.
- Minced garlic, 6g: About 3 medium cloves. Fresh garlic; powdered garlic burns during aging.
- Bactoferm T-SPX, 0.15g: The traditional Italian-style starter culture and my default for Genoa. F-RM-52 ferments faster and sourer — it is built for North European-style dry sausage, not the mild Italian character Genoa wants, so I do not reach for it here.
- Beef middle casings, 60mm: About 2 feet of casing for two 500g links. Pre-soak in cool water for 30 minutes before stuffing.
Total ingredient cost is roughly 12-18 dollars for 1kg of salami yield. The casings, starter culture, and pink curing salt #2 are specialty items requiring online ordering — most local grocery stores carry none of them. Plan a single order from Butcher & Packer or Sausage Maker covering 6-12 months of charcuterie projects.
Step-by-Step Production Procedure
The full Genoa production runs through five phases: cold preparation (chilling all ingredients before grinding), grinding and mixing (the coarse 4mm grind plus seasoning incorporation), stuffing (loading the seasoned mix into casings), fermentation (48-72 hours at warm temperature for the culture to drop the pH), and aging (4-6 weeks at chamber conditions for water loss and flavor development). Total active work time is 4-6 hours; total project duration is 6-8 weeks.
Full procedure:
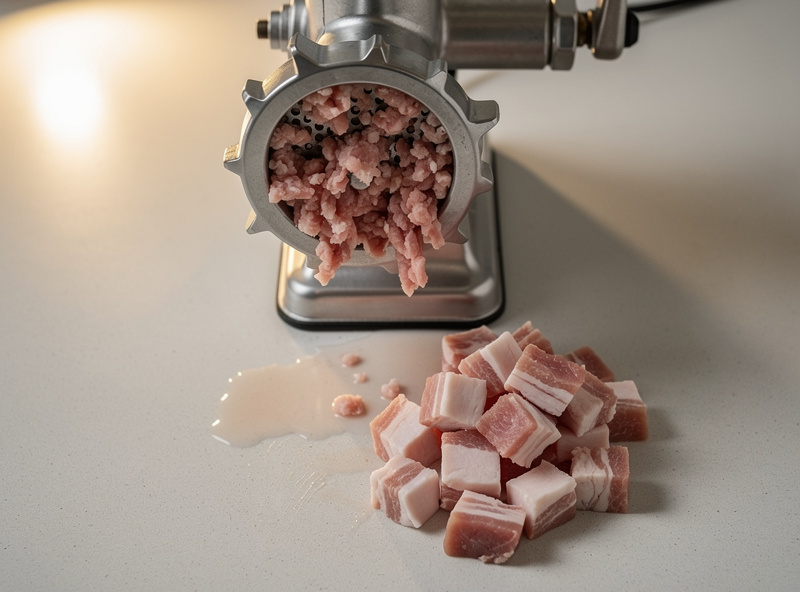
- Chill everything aggressively: Pork shoulder, fat, grinder parts, mixing bowl, even your hands. Target meat temperature 28-32°F before grinding. Warm meat smears in the grinder instead of cutting cleanly.
- Cube the meat and fat: 1-inch cubes for both. Easier to grind than larger chunks.
- Grind through 4mm plate: Single pass produces the coarse Genoa-style texture. Two passes produces a finer grind unsuitable for Genoa style.
- Mix all dry ingredients: Salt, pink curing salt #2, dextrose, peppercorns. Ensure even distribution before adding garlic.
- Combine ground meat with seasoning mix: Mix thoroughly with hands or a stand mixer with paddle attachment. The mixture should feel slightly tacky — that is the protein extraction creating bind.
- Hydrate the starter culture: Mix 0.15g T-SPX with 1 tablespoon distilled water 15 minutes before adding to meat. Adding dry kills some bacteria.
- Add the hydrated culture to the meat: Mix briefly to incorporate. Excess mixing damages the texture.
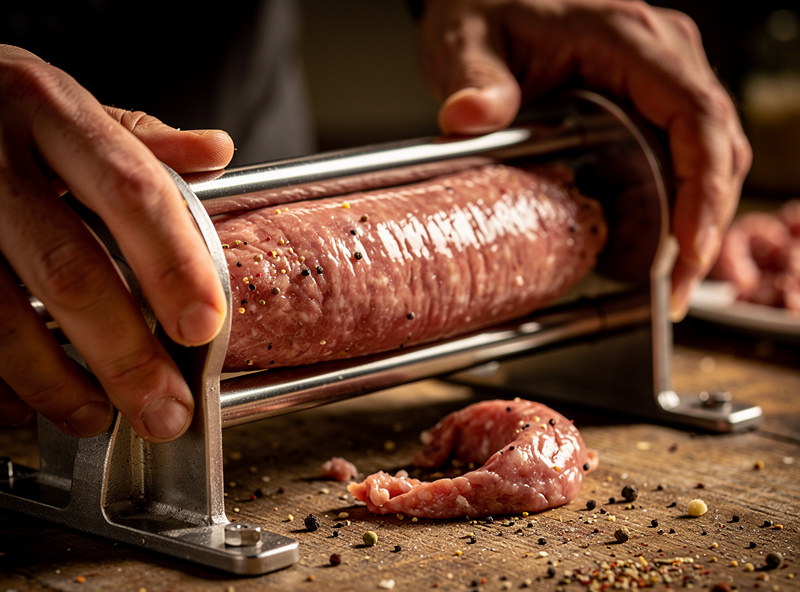
- Stuff into pre-soaked casings: Use a sausage stuffer; fill tightly with no air pockets. Twist or tie off into 500g links.
- Hang for fermentation: 75°F and 85-90% RH for 48-72 hours. The culture drops the pH from initial 5.6-5.7 down to 5.2 or below.
- Verify pH drop with a meat-grade pH meter: Insert into the center of a salami; reading must show 5.3 or below. If above 5.4 after 72 hours, fermentation has failed and the batch is unsafe.
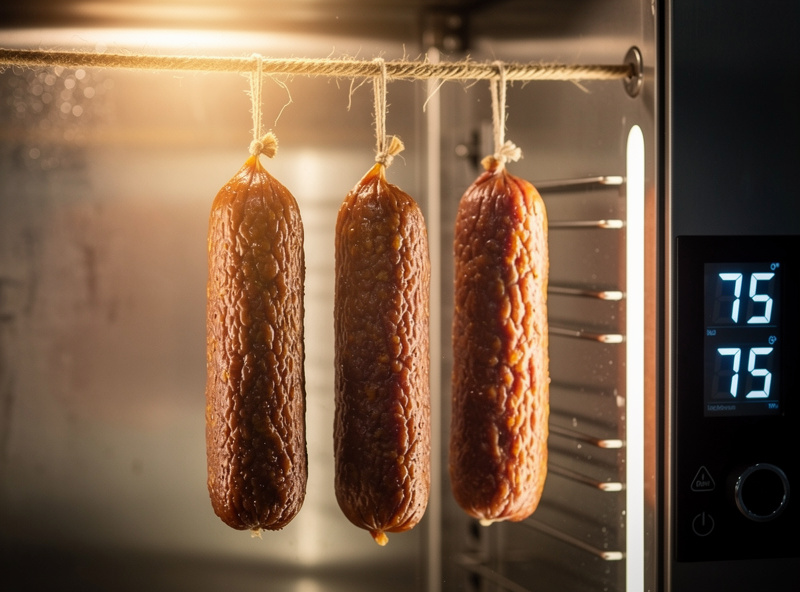
- Transfer to curing chamber: 55°F and 75% RH for 4-6 weeks of aging.
- Weigh weekly: Target 30-35% weight loss before consuming. A 500g salami is ready at 325-350g.
The pH check at fermentation end is the critical safety step — it verifies the culture worked and the meat is now too acidic to support pathogenic bacteria. A meat pH meter (60-90 dollars) is genuinely required equipment for safe salami making. Read about specific safety considerations in our black mold on charcuterie guide.
The Fermentation Phase: Where Most Beginners Fail
Fermentation at 75°F and 90% humidity for 48-72 hours is the most-failure-prone step in salami making. The starter culture needs warmth and humidity to multiply rapidly enough to drop pH before competing bacteria establish. Cold rooms produce stalled ferments; dry rooms produce surface case-hardening that prevents culture activity from reaching the interior.
Fermentation requirements:
- Temperature: 70-78°F (warmer than chamber, cooler than dangerous): Below 65°F culture activity stalls; above 85°F unwanted bacteria multiply faster than the culture.
- Humidity: 85-90% RH: Higher than chamber humidity. Prevents casing case-hardening that blocks culture activity.
- Duration: 48-72 hours: 48 hours minimum for pH to drop below 5.3; 72 hours maximum before risk of over-fermentation.
- Air circulation: gentle: Stagnant air develops surface mold; aggressive air flow dries the casings too fast.
- Verification: pH meter: Insert probe into the salami center after 48 hours. Below 5.3 = success; above 5.4 = failed batch.
Setting up a dedicated fermentation chamber: a styrofoam cooler with a small heating mat, a humidifier, and a digital thermostat covers the requirements at 60-100 dollars in equipment. A bathroom with a warm shower running steam works in a pinch but is harder to control. A converted fridge with the cooling reversed (heating only) works well long-term.
Common Genoa Salami Mistakes
Six mistakes account for most Genoa salami failures: warm meat during grinding (smear instead of cut), insufficient salt or pink curing salt, fermentation temperature too low (stalled ferment), forgetting to verify pH drop, using the wrong starter culture (mixing T-SPX vs F-LC), and rushing the aging period (eating salami before 30% weight loss). Fat smear — when the fat network breaks down during grinding or mixing rather than cutting cleanly — is the single hardest defect to recover from, and the fat smear in salami causes guide explains the temperature and technique factors that cause it.
On my second batch I added the starter culture to a meat mix that was still 38°F from the freezer; the LAB never woke up and the pH was still 5.6 after 60 hours. I had to add a fresh dose of T-SPX rehydrated in 90°F water and re-ferment for another 36 hours. Now I let the seasoned mix rest at room temperature for 30 minutes before stuffing.
Mistakes and corrections:
- Smeared meat from warm grinding: Re-chill ingredients and hardware before any grinding. Target meat temperature 28-32°F at the grinder. Smeared meat ferments unevenly and produces poor texture.
- Insufficient salt: Below 2.5% total salt allows pathogenic bacteria to compete with the starter culture. Always 2.5-3.0% minimum.
- Skipping pink curing salt: Botulism risk is real for salami aged 30+ days. Pink curing salt #2 specifically (not #1) is required.
- Cold fermentation room: Below 65°F stalls the culture. Use a dedicated fermentation setup with heat source.
- No pH verification: Without a meat pH meter, you cannot verify the fermentation succeeded. The 60-90 dollar tool is required equipment, not optional.
- Wrong starter culture: T-SPX produces traditional mild Italian salami — my default for Genoa. F-RM-52 ferments faster and sourer, better suited to North European-style dry sausage than Genoa’s mild character. F-LC is for chorizo and other fast, tangy styles. Match the culture to the style.
- Eating too early: Salami less than 30% weight loss is not fully aged. Texture and flavor are immature; food safety profile is also incomplete.
The reliable practice is to start with a single 500g batch on first attempt rather than a 5-10 pound bulk attempt. Smaller batches are easier to manage and the loss if something fails is manageable. After 3 successful batches, scaling up to family-size production becomes natural. Read about salami visual diagnosis in our salami casing mold good vs bad guide.
Frequently Asked Questions
What temperature should I ferment salami at?
75°F (24°C) at 85-90 percent humidity for 48-72 hours. The temperature must stay above 65°F for the starter culture to multiply rapidly enough; above 85°F unwanted bacteria become a competing risk. The 70-78°F sweet spot produces reliable fermentation in most home setups.
Do I need a pH meter to make salami?
Strongly recommended for safety verification. The pH must drop below 5.3 within 72 hours of fermentation start to confirm the starter culture worked. Without verification, the salami may look right but actually have failed fermentation. Meat-grade pH meters cost 60-90 dollars at Butcher & Packer or Amazon.
What is Bactoferm T-SPX and where do I get it?
T-SPX is a Christian Hansen starter culture for traditional Italian-style salami. Available from specialty butcher supply stores like Butcher & Packer, Sausage Maker, or The Spice House. About 12-18 dollars for a 25-gram packet that treats roughly 100-190 kilograms of meat at typical dosing rates (0.13-0.25g per kilogram) — plenty for years of home batches. Refrigerate after opening.
Why do I need to verify weight loss in salami?
Salami safety requires water activity (Aw) below 0.92, which roughly corresponds to 30 percent weight loss for most styles. Weighing weekly tracks progress; 500g salami at 325-350g is fully aged. Eating before this point means the moisture content is still high enough to support bacterial growth.
What casing should I use for Genoa salami?
Beef middle casings 55-65mm diameter for traditional Genoa-style links. Hog middles work in a pinch but produce smaller-diameter salami that ages faster than typical recipes assume. Avoid synthetic casings for traditional salami; they prevent the surface mold development that contributes to flavor.
How long does Genoa salami take from start to finish?
Total time is 6-8 weeks: 4-6 hours active grinding, mixing, and stuffing on day 1; 48-72 hours fermentation; 4-6 weeks aging in chamber. Most home batches finish at 5-7 weeks total. Larger salami (1kg+ links) take 8-10 weeks; smaller links (250g) finish in 4-5 weeks.
Related Articles
- Salami Casing Mold: Good vs Bad
- How to Calculate Salt Percentage for EQ Curing
- Black Mold on Charcuterie
- Cold Smoking Salami: Temperature Guide
- Duck Prosciutto Beginner Project