Stainless Steel Smoker Build: How to Weld a Cold-Smoking Cabinet for Home Charcuterie
June 4, 2026

A welded stainless steel cold-smoking cabinet costs $300 in materials — a sheet of 304 stainless, a spool of 308L MIG wire, a door gasket, and two hours of argon mix — and replaces a $1,200 commercial unit.
As an Amazon Associate I earn from qualifying purchases.
The difference is the labor, and the labor is the point: a welded smoker built to the exact dimensions of your curing chamber’s spare shelf space fits where no commercial cabinet fits, and the stainless welds that hold it together are the same welds that will build the boat or the coop run frame or the workshop bench. The smoker is a weekend project that teaches more about stainless welding than any practice coupon ever will.
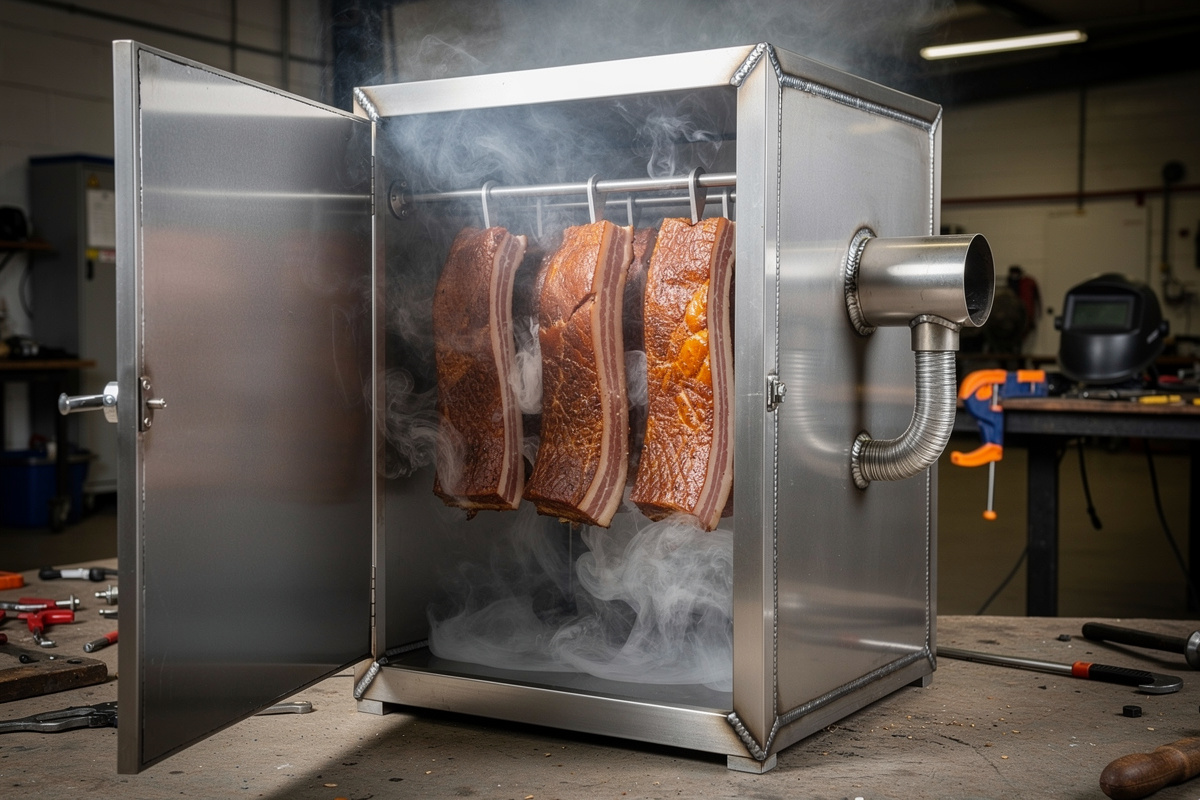
Cold smoking is the gentlest form of smoke application — the smoke generator sits outside the cabinet, the smoke travels through a duct into the chamber, and the temperature inside never exceeds 30 degrees Celsius. The cabinet is not a heat vessel. It is an airtight box with a smoke inlet, a vent outlet, and hanging rods for the meat. The welding on a cold smoker is not structural in the way a trailer hitch is structural — the cabinet holds 10 kilograms of hanging sausage, not a ton of steel — but it must be food-safe, corrosion-resistant, and sealed against smoke leakage. Stainless steel is the only material that satisfies all three requirements, and welding stainless is the skill that the smoker teaches you while you build it. For the full cold-smoking method this cabinet serves — temperature windows, wood selection, and food-safety timelines — see the cold smoking guide before you start cutting steel.
Why Stainless, Not Mild Steel or Aluminum, for a Smoking Cabinet
Mild steel rusts — the combination of smoke moisture, salt residue from the curing process, and the acidic compounds in wood smoke (acetic acid, formic acid, phenolic compounds) corrodes bare steel within a single smoking season. Paint is not a solution because the interior of the cabinet cannot be painted — paint off-gasses volatile organic compounds at any temperature, and those VOCs condense on the meat surface along with the smoke particles. The first bacon you pull from a painted-steel smoker tastes like the paint smells, and the taste does not cook out.
304 stainless is a 300-series chromium-nickel alloy (18 percent chromium, 8 percent nickel) with its composition and mechanical properties defined by ASTM A240, the same material specification behind commercial kitchen prep tables, dairy processing equipment, and pharmaceutical vessels. The chromium-nickel content is also what makes the alloy acceptable under NSF/ANSI 2, the actual food-equipment standard for surfaces that touch or hang food. The alloy forms a self-healing chromium oxide layer that resists salt, acid, and moisture indefinitely, which is why a welded 304 cabinet outlasts its builder.

Aluminum does not rust but reacts with the salt in cured meat. Salt and aluminum in the presence of moisture create galvanic corrosion — the aluminum pits, the pits harbor bacteria, and the cabinet that was food-safe on day one becomes a contamination vector by month six. Aluminum also cannot be scrubbed with the alkaline cleaners that remove smoke residue from the interior walls without etching the surface. Stainless steel — specifically 304-grade, the food-industry standard — resists salt corrosion, tolerates alkaline cleaners, and welds with 308L filler rod to produce a joint that is as corrosion-resistant as the base metal. The material costs roughly $80 for a 4-foot-by-8-foot sheet of 20-gauge 304 stainless at a metal supplier, which is enough for a cabinet measuring 24 inches wide by 18 inches deep by 36 inches tall — large enough for 15 kilograms of hanging sausage or two full pork bellies for bacon.
Welding Stainless for Food Safety: What the Joints Must Do
A food-safe weld on stainless steel must be continuous — no pinholes, no craters, no porosity — because every gap in the weld bead is a crevice where smoke condensate and meat residue collect and where cleaning cannot reach. The weld must be back-purged with argon on the inside of the joint if the cabinet interior will contact food directly, because the back side of an un-purged stainless weld oxidizes into a rough, porous surface called “sugaring” that traps bacteria. For a cold-smoking cabinet where the meat hangs from rods and does not touch the walls, back-purging is optional — the weld sugaring is cosmetic, not a food-contact surface. But if the cabinet includes a drip tray welded to the bottom, that tray’s welds must be back-purged because the tray catches meat juices and must be cleanable.
The settings for 20-gauge 304 stainless with 0.030-inch 308L wire on a MIG welder: 17 to 18 volts, 250 to 300 inches per minute wire speed, tri-mix gas (90 percent helium, 7.5 percent argon, 2.5 percent CO2) or straight argon mix if tri-mix is unavailable, and a stickout of roughly 10 millimeters. The thin gauge demands short welds — 25 to 40 millimeters at a time — with a pause between each bead to let the metal cool. Stainless warps more than carbon steel under heat because it expands more per degree and conducts heat more slowly, so the heat concentrates in the weld zone instead of dissipating through the surrounding metal. Skip-welding — placing short beads at intervals along the joint, then coming back to fill the gaps — controls warping better than a single continuous bead. For the full project-based approach to learning how these settings translate to real builds, the DIY welding projects guide covers the progression from practice coupons to finished builds — the smoker is a natural next step after the initial set of skill-building projects.
Welding stainless carries a fume hazard mild steel does not: the same chromium content that makes 304 corrosion-resistant produces hexavalent chromium (Cr(VI)) fume when it’s melted, and OSHA identifies welding on stainless and other chromium-alloy steels as a major source of worker Cr(VI) exposure. This is a garage or driveway project, not a closed-room one — weld with the door open or a fan pulling fume away from your face, and if you’re doing more than an occasional cabinet, a respirator rated for welding fume is worth the $30. It’s the one part of this build where “I’ve always just cracked a window” isn’t good enough advice to pass on.
Cabinet Design: Smoke Flow, Drainage, and Rack Spacing
The smoke inlet enters the cabinet at the bottom, opposite the vent, which exits at the top. The diagonal flow path — smoke in at the bottom-left, out at the top-right — ensures that smoke passes across every piece of hanging meat rather than streaming directly from inlet to vent along the shortest path. The inlet is a 50-millimeter diameter stainless tube welded into a hole in the side wall, angled slightly downward to prevent condensate from the smoke duct from dripping back into the smoke generator. The vent is a 50-millimeter tube welded into the top wall, with a butterfly damper inside the tube to regulate airflow and smoke density.

The hanging rods are 10-millimeter stainless round bar, cut to the interior width minus 10 millimeters for clearance, resting in notches welded to the side walls. Four rods spaced 150 millimeters apart vertically accommodate four rows of hanging sausage or bacon. The rods are not welded in place — they lift out for cleaning — but the notches are welded to the side walls, and those notches are the trickiest welds in the cabinet because they are small, vertical, and easily overheated. In my setup, the smoker cabinet shares a wall with the curing chamber — both run off the same Home Assistant hub that cycles the compressor and logs humidity, so I positioned the smoker’s vent to blow away from the chamber intake. Weld the notches at 16 volts and 200 inches per minute wire speed, two short tacks per notch, and let each tack cool before placing the next.
The drip tray is a shallow pan — 20-gauge stainless, 50 millimeters deep, with a drain tube welded into the lowest corner — that slides onto angle-iron rails welded to the side walls near the bottom. The tray catches fat drips during smoking and channels them to the drain, where a small bucket or a disposable container catches them for disposal. The tray’s bottom weld — the seam where the flat bottom meets the side walls — must be continuous and clean because fat pools in the corners and a pinhole leaks fat onto the floor of the cabinet, where it goes rancid before the next smoking session. This is the one weld in the cabinet that justifies back-purging with argon, and the extra 10 minutes of setup saves hours of cleaning a rancid drip tray later.
Door Seal: The Gasket That Keeps the Smoke In
The door is the most common failure point on a homemade smoker because the builder welds a beautiful cabinet and then hangs a door on hinges with no gasket, and the smoke leaks out around all four edges, reducing the smoke density inside the cabinet and wasting the wood chips that produce it. A high-temperature silicone gasket — the same material used on oven doors — adhered to the door frame with food-grade RTV silicone sealant creates an airtight seal when the door latch compresses the gasket against the cabinet face. The gasket costs $12 for a 3-meter roll and is the difference between a smoker that produces consistent results and one that smokes the garage more than the meat.
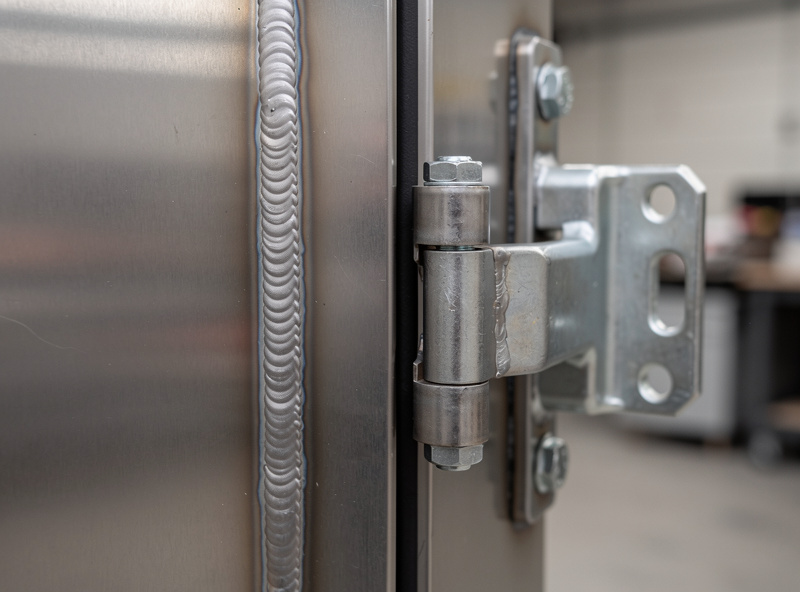
The door hinges are two stainless butt hinges welded to the cabinet body and bolted to the door. Welding the hinges to the body is straightforward — two short beads per hinge leaf, 16 volts, let it cool. The alignment is the hard part: if the hinges are even 1 millimeter out of parallel, the door hangs crooked and the gasket compresses unevenly, leaving a gap at the corner opposite the hinges. Tack the hinges in place with the door clamped to the cabinet in the closed position, then open the door and complete the welds. The tack-welds hold the alignment; the finish welds hold the door. Skip the clamping step and the door will never seal right.
A welded stainless cold smoker is one of those projects where the process teaches as much as the product delivers. The same welds that seal your cabinet against smoke leaks will hold your next project together — and the first bacon you pull from it, properly cold-smoked over 6 hours of applewood, makes every skipped practice coupon worth it. Build to your shelf dimensions, back-purge the drip tray seam, and test the door gasket thoroughly before the first smoke session. If you can see light through the seal with a flashlight on the inside, smoke will find it too — but once that seal is right, the cabinet does its job for decades.
Frequently Asked Questions
Do I need to back-purge stainless welds on a cold smoker?
Only on welds that contact food or catch drips, such as the drip tray seams. The cabinet walls do not touch the meat and do not need back-purging. The drip tray bottom weld should be back-purged with argon to prevent sugaring that traps fat and bacteria.
What gauge stainless steel should I use for a cold-smoking cabinet?
20-gauge (roughly 0.9-millimeter) 304 stainless steel. Thinner 22-gauge warps too easily under welding heat. Thicker 16-gauge is heavier and more expensive than needed for a non-structural cabinet. 20-gauge balances weldability, weight, and cost for a cabinet that holds 10 to 15 kilograms of hanging meat.
Can I use a flux-core welder on stainless for this project?
No. Flux-core wire produces slag that must be chipped and brushed from every weld, and the slag residue in the weld bead is not food-safe. Flux-core also generates more spatter than MIG with gas, and spatter on the interior walls creates rough spots that trap smoke residue. Use MIG with tri-mix or argon-CO2 shielding gas.
How do I clean a welded stainless smoker between uses?
Scrub the interior with hot water and a nylon brush — no steel wool, which leaves iron particles that rust on the stainless surface. For heavy smoke residue, use a food-grade alkaline cleaner or a paste of baking soda and water. Rinse thoroughly and dry with a towel. Do not use bleach or chlorine-based cleaners on stainless — chlorine pitting is permanent.
What smoke generator works best with a welded stainless cabinet?
A pellet-tube smoker or an external cold-smoke generator like the ProQ or Smoke Daddy loads from outside the cabinet through the inlet tube. The tube smoker is simpler and costs $20 — fill it with wood pellets, light one end, and it smolders for 4 to 6 hours. The external generator is more consistent over long sessions but costs $80 to $150. Both connect to the cabinet inlet tube with a short section of flexible aluminum duct.
How long does it take to weld a cold-smoking cabinet from scratch?
Roughly 12 to 16 hours spread across a weekend: 4 hours cutting and fitting the stainless sheets, 6 hours welding (including cool-down pauses between beads), and 2 hours installing the door gasket, hinges, hanging rods, and smoke connections. A second person helps with sheet handling but the welding is a one-person job.
Related Articles
- Cold Smoking at Home: The Complete Guide
- How to Build a Curing Chamber: The Complete Guide
- How to Calculate Salt Percentage for Equilibrium Curing
- Home Salami Making: The Complete Guide
- Curing Chamber Humidity Control: Hydroponic Tech for Salami