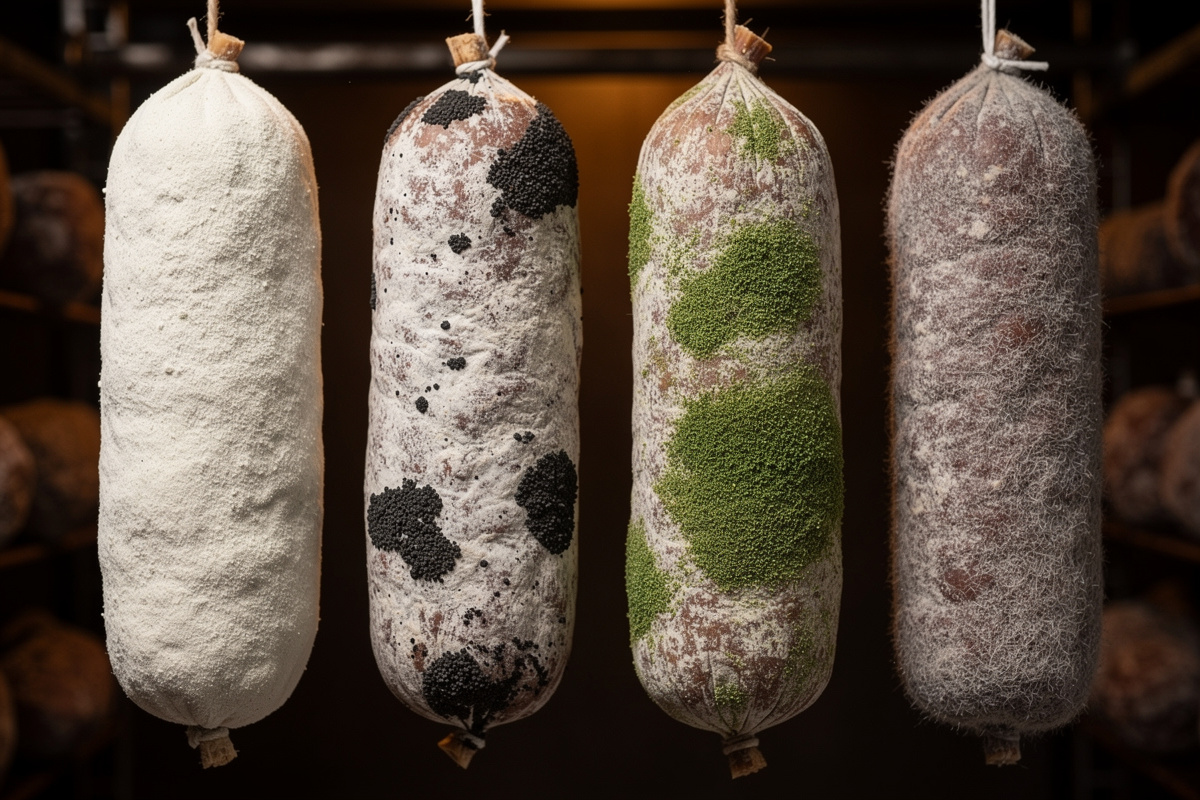

Across six salami cycles in my own chamber, I have seen four of the five mold colors covered in this guide on at least one chub: white nalgiovense (every batch), Aspergillus niger black spots (twice), Penicillium expansum green (once on a batch where I forgot to inoculate), and Mucor cobweb gray (once when my fan died for two days). The pink Fusarium I have only seen in photographs, which is what you want — its appearance means the chamber spent days at 90%+ RH and the entire batch is gone. The five-second visual ID below is the same one I run on chub two of every batch.
As an Amazon Associate I earn from qualifying purchases.
White fluffy mold on salami casing is good (Penicillium nalgiovense, the same beneficial mold on commercial Genoa and Soppressata) and should cover the casing evenly within 5 to 7 days. Black, green, fuzzy gray, or pink mold means contamination — black is usually safe to wipe with vinegar but indicates chamber problems, green/pink means toss the affected piece. The visual ID test takes 5 seconds and decides whether your batch is on track or in trouble. Note that external green mold on the casing is different from a green ring that appears on the cut face of the salami itself — the green ring in dry-cured sausage guide explains what causes that internal discoloration and whether the batch is safe. Where casing mold fits in the broader salami workflow — equipment, cultures, fermentation, weight-loss targets — is in home salami making: the complete guide.
The four-color rule covers about 95% of what shows up on home charcuterie. White: keep going. Black: surface wipe with vinegar, fix chamber. Green: trim deep or toss. Pink/red: toss immediately. This guide walks each color, what fungal species causes it, what’s safe to eat, and the chamber adjustments that prevent recurrence.
White Mold (Penicillium nalgiovense): What You Want
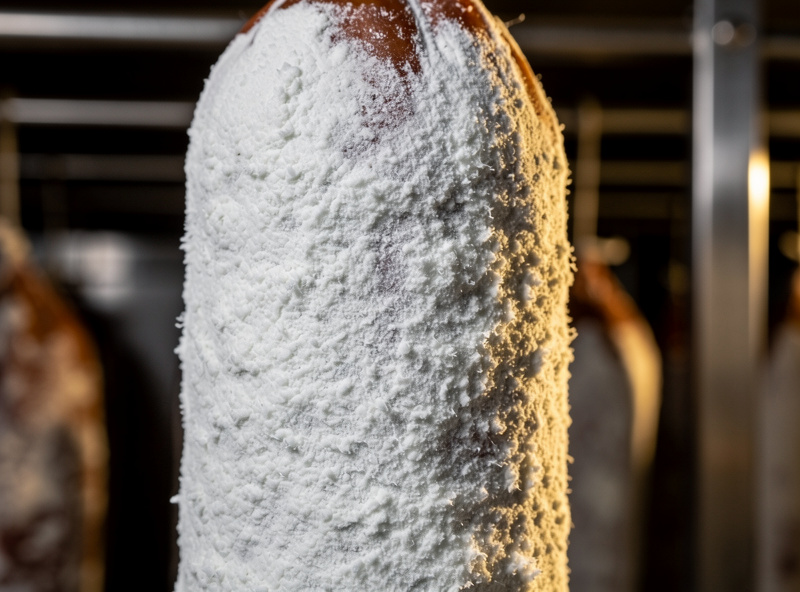
The white mold deliberately inoculated on commercial dry-cured salami is Penicillium nalgiovense, sometimes blended with P. chrysogenum or Mucor species. It produces an even fluffy white-to-pale-gray coverage across the entire casing surface within 5 to 7 days of hanging at 55°F and 75% humidity — the same look you get on a properly inoculated Genoa-style salami. The texture is loose and powdery; you can brush it off with a finger and it leaves no stain.
Why white mold matters: it competes with bad fungi for surface real estate, secretes acidic metabolites that lower the local pH and inhibit competitor growth, and contributes positive flavor compounds to the finished salami (slight cheese-rind notes, faint mushroom). Commercial salami without white mold tastes one-dimensional compared to traditional dry-cured products.
Encourage white mold dominance by inoculating with a starter culture (Bactoferm Mold-600 is what I run, $18 per packet) within 2 hours of stuffing the salami. Mix roughly 2.5 grams per liter of dechlorinated water (the standard Bactoferm dilution — a full gram per 100 ml runs about four times too concentrated), spray-coat the casings, then ferment at 65 to 75°F for 12 to 24 hours before moving to the curing chamber. The single batch I skipped inoculation on — I had run out of Mold-600 and decided to try the ambient-spore approach — produced patchy green by day 9 and I trimmed half of the resulting chubs. Without inoculation, you’re betting that ambient white mold spores establish before competing dark molds, and that bet runs about 50/50 in my basement.
Black Mold (Aspergillus niger): Cosmetic, Usually Safe
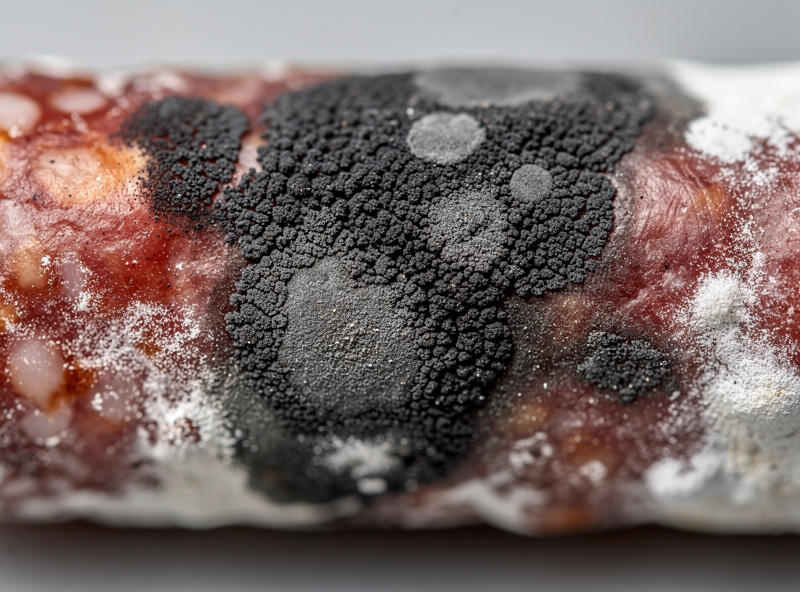
Black mold on home charcuterie is almost always Aspergillus niger — the same species used commercially to produce citric acid and the dominant mold on aged grapes for raisin production. That commercial pedigree doesn’t make it automatically harmless: a meaningful share of A. niger strains, including some used in industrial fermentation, are capable of producing ochratoxin A or fumonisin under the right conditions. That’s why this is a wipe-and-monitor mold, not an ignore-it mold — treat every patch the same way regardless of how cosmetic it looks.
What it looks like: dry powdery dark spots in distinct patches rather than even coverage, often concentrated in chamber corners or on the side of the salami facing the wall (where airflow is lower). Texture is closer to coffee grounds than the cotton-fluffy white mold. Spots are usually 0.5 to 3 cm in diameter and isolated rather than continuous.
The fix: mix 50/50 white vinegar and water in a spray bottle, saturate a clean cloth, wipe the affected area firmly. The acetic acid kills the mold on contact and the wipe physically removes the fungal mass. Re-inoculate with Bactoferm Mold-600 after the vinegar dries — without re-inoculation, the cleaned spot is a blank canvas for whatever spores land first.
Chamber root cause for recurring black mold: humidity spikes above 85%, stagnant air pockets, contaminated chamber surfaces from prior batches, or no white mold starter culture giving competitor protection. The black mold on charcuterie guide covers diagnostic detail.
Green Mold: Penicillium expansum and Aspergillus Species
Green mold patches usually mean Penicillium expansum (the bright bluish-green mold from rotting fruit) or Aspergillus species. Several Penicillium and Aspergillus species that show up as green surface contaminants on dry-cured sausage are known mycotoxin producers, and the toxins don’t stay put — a peer-reviewed study on French dry fermented sausage measured citrinin and cyclopiazonic acid diffusing well below the visible mold layer, into the meat itself, at levels in the thousands of nanograms per gram. That’s the reason a small isolated spot gets trimmed with margin and a heavier bloom gets the whole piece tossed — by the time you can see it on the casing, some of it is already past the surface.
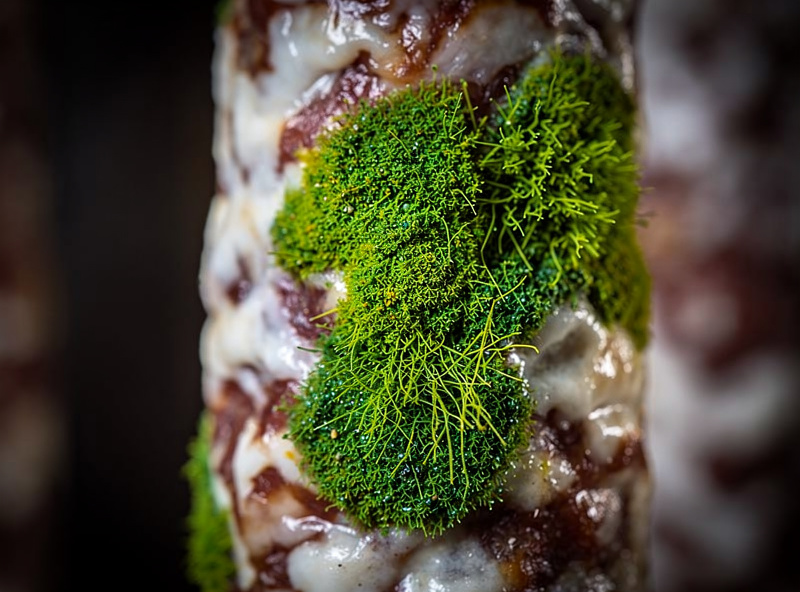
What it looks like: vivid green patches with a fuzzy texture, often raised slightly above the casing surface. Color ranges from pale green-gray to deep emerald depending on species and age. Sometimes accompanied by a faint sweet smell that’s distinct from the cheese-rind smell of healthy white mold.
Decision: if green mold is isolated in 1-2 small spots and the rest of the casing is white-mold-dominated, trim 1 cm into the meat past the visible edge of the green spot — discard the trim, wipe the trimmed area with vinegar, re-inoculate with Mold-600. If green mold covers more than 20% of the casing surface or shows up alongside off-smells, toss the entire piece.
Green mold means chamber environment failed. Check: humidity above 80% sustained, white mold starter culture not used or applied incorrectly, chamber not cleaned between batches. Fix the cause before hanging the next batch.
Pink, Red, or Orange Mold: Toss Immediately
Pink, red, or orange-tinted mold growth almost always indicates Fusarium, Neurospora, or other genera capable of producing serious mycotoxins — the FDA’s mycotoxin monitoring list includes several toxin classes these genera are known to produce (trichothecenes, fumonisins, zearalenone), none of which are reliably destroyed by cooking or trimming. Mold on dry-cured sausage has been documented diffusing well past the visible surface into the meat itself, which is why a pink or red patch isn’t a trim-and-salvage situation. Toss the entire piece.
What it looks like: pinkish or reddish patches, sometimes orange-tinted, often slimy rather than dry. Texture is typically wetter than other mold types because Fusarium thrives in humidity above 90%. The color is unmistakable once you’ve seen it once.
Pink/red mold means chamber humidity was sustained above 90% for several days. Empty the chamber completely, scrub all surfaces with 1:10 bleach solution, rinse, dry thoroughly for 24 hours, and re-inoculate the chamber walls with Mold-600 spray before hanging the next batch. Skipping this deep clean almost guarantees the next batch develops the same problem.
Don’t try to rescue pink/red mold even if it’s small. The mycotoxin migration risk doesn’t justify the salvage. A $30 lost piece of salami is much cheaper than a hospital visit.
Fuzzy Gray Mold (Mucor / Cobweb-Like)
Gray mold with a hairy or cobweb-like texture is usually Mucor species, which can be either neutral (some strains are used in commercial cheese-making) or dangerous (other strains produce mycotoxins). The visual ID alone can’t distinguish them, so the decision tree leans conservative.
What it looks like: gray-to-tan growth with longer fibrous threads visible (the “cobweb” texture), often spreading rapidly across the casing in 24-48 hours. Distinct from the more uniform fluffy texture of healthy white mold.
Decision: if gray cobweb mold appears alongside healthy white mold and only in small patches, wipe with vinegar and re-inoculate. If gray cobweb mold has overtaken the casing or is the only growth present, toss the piece. Mucor’s rapid expansion suggests chamber conditions strongly favor it (high humidity + low airflow), and the next batch will likely fail the same way without environmental fixes.
Salami Mold Visual ID Cheat Sheet
| Color | Likely Species | Texture | Action | Chamber Fix |
|---|---|---|---|---|
| White (fluffy, even) | P. nalgiovense | Loose powder, brushes off | Continue cure | None — this is the goal |
| Black (powdery, patchy) | A. niger | Dry like coffee grounds | Vinegar wipe, re-inoculate | Lower humidity, increase fan |
| Green (fuzzy, vivid) | P. expansum, Aspergillus | Raised, sometimes slimy | Trim 1cm into meat or toss | Lower humidity, deep clean chamber |
| Pink/red/orange | Fusarium, Neurospora | Slimy, often wet | Toss entire piece | Empty chamber, bleach clean, dry 24h |
| Gray (cobweb texture) | Mucor species | Hairy, fibrous threads | Wipe small spots; toss if widespread | Increase airflow, lower humidity |
| White (sticky, thick) | Bacterial slime, not mold | Wet sticky mass | Toss — surface bacteria, not mold | Severe over-humidity event |
| Yellow tint on white | P. nalgiovense aging | Fluffy, slightly cream | Continue cure (normal at week 4+) | None |
The Smell Test Confirms the Visual ID
Healthy white-mold-dominated salami smells faintly mushroomy with a cheese-rind note around weeks 3 to 6. Black-mold-affected pieces smell similar but slightly sour. Green-mold pieces often have a faint sweet or fruity smell that’s distinct and “wrong” for cured meat. Pink/red mold smells overtly off — sour, ammonia, or bright sweet-rotten.
If the smell test contradicts the visual ID, trust the smell. Mold colors can vary based on chamber conditions, and a piece that looks like healthy white mold but smells sour should be evaluated more carefully — a strong off-smell with mostly-white visible mold often means bacterial spoilage developing under the mold layer.
Cross-section confirmation: cut into the salami at the affected area. Healthy salami shows red meat with white fat distribution and no visible mold penetration past the casing. Compromised salami shows discoloration extending into the meat (gray-brown patches, soft texture, off-smells from the cut surface). The smell-test guide walks the chamber-air smell test in detail.
Preventing Bad Mold From Establishing
The single most effective prevention is white mold inoculation within 2 hours of stuffing. In my own runs, an inoculated batch reliably beats a bad-mold spot to the punch — the one time I skipped it (noted above), green mold won the race by day 9. Bactoferm Mold-600 is the standard product, $15 to $20 for enough culture to inoculate 50+ batches. The full inoculation walk-through (dilution, spray pattern, transition timing) is in penicillium cultures for salami, and the underlying LAB/pH-drop science that makes the cure shelf-stable is in salami fermentation chemistry: pH drop and LAB science.
Maintain humidity at 75% (range 70-80%) — this is the white mold sweet spot. Above 85% the chamber favors black, green, and pink molds. Below 65% the white mold won’t establish and the casing dries before any beneficial mold grows.
Clean the chamber between batches: empty completely, wipe all surfaces with 1:10 bleach solution, rinse with clean water, dry thoroughly for 24 hours, then spray fresh Mold-600 inoculant onto the chamber walls before hanging the next batch. This sets up a “clean room” with the right mold dominance from day 1 of the new batch.
Maintain consistent airflow with a small fan running 30 to 60 minutes per hour. Stagnant air pockets are where bad molds establish. The fan doesn’t need to blow hard — just enough to keep the chamber air mixing.
What “Wiping With Vinegar” Actually Does
White vinegar (5% acetic acid) kills mold spores on contact at the surface. It does not penetrate into the meat past 1-2 mm. Wiping black mold off with vinegar removes the visible growth and prevents further surface expansion, but it doesn’t address spores that may have already migrated into surface micro-cracks of the casing.
For cured salami where the visible mold area is small (under 5% of casing surface), vinegar wiping plus re-inoculation works reliably. The protective layer of white mold that re-establishes will out-compete returning Aspergillus before it can spread.
For pieces where bad mold has covered more than 20% of the casing, vinegar wiping is insufficient because the underlying chamber environment has clearly failed. Address the chamber first (lower humidity, clean surfaces, re-inoculate), let the chamber stabilize for 48 hours, then assess whether the affected piece can be salvaged or should be tossed. The curing chamber troubleshooting hub covers chamber recovery protocols, and the deeper Penicillium-strain reference is in penicillium cultures for salami.
What to Do in the First 48 Hours
The first 48 hours after hanging your salami in the chamber are when mold decisions get made — and most of the panic I hear from readers comes from checking too early and misreading what they see. Here is the decision flow I run on every batch, timed to the first two days.
Hour 0-12 (fermentation phase): You should see nothing yet. The salami is in the warm fermentation hold (65-75°F, 90%+ RH) and the starter culture is dropping pH, not growing visible mold. If you sprayed Bactoferm Mold-600 at stuffing, the spores are sitting on the casing surface waiting for the temperature to drop. Do not open the chamber, do not wipe anything, do not panic about the surface looking bare. This is correct.
Hour 12-36 (transition to drying): Move the salami to the drying chamber (55°F, 75% RH). Within 12-18 hours, a faint white bloom should begin spreading from the areas you sprayed most heavily. This is your Penicillium nalgiovense waking up. The bloom looks like a barely-visible dusting — not the full fluffy coat yet. A white bloom spreading evenly across the casing in the first 36 hours is the single best early sign that your batch is on track. Do not touch it.
Hour 36-48 (first visual check): This is when you look for trouble. Three outcomes:
- White bloom spreading: Good sign. Leave it alone. Full coverage arrives by day 5-7.
- Fuzzy green spot: Competition mold. Wipe the spot firmly with a vinegar-soaked cloth, re-spray the area with Mold-600 solution, and recheck in 24 hours. If the green returns and spreads, trim that chub out of the batch — one contaminated chub can shed spores onto the rest.
- Black wet patch: This is the one that matters. A black, wet, slimy patch in the first 48 hours means the chamber humidity is too high (90%+) and the surface has been wet for too long. Drop humidity to 75% immediately, increase air exchange, and inspect every chub. If the black patch is small and dry at the edges, vinegar-wipe and isolate. If it is spreading and wet, pull the chub and discard it — this is not a rescue scenario.
The mistake I made on my second-ever salami batch was checking at hour 24, seeing bare casing, and re-spraying Mold-600 “to help it along.” The extra moisture delayed the bloom by another 12 hours and I spent the next day convinced the batch was failing. It was not — I just needed to wait. Patience in the first 48 hours is not optional; it is the technique.
Frequently Asked Questions
Is white mold on salami safe to eat?
Yes — white mold (Penicillium nalgiovense) is the beneficial mold deliberately inoculated on commercial dry-cured salami like Genoa and Soppressata. It should cover the casing evenly within 5 to 7 days of hanging. Brush it off before slicing if you prefer, but it is safe and adds positive flavor.
What does dangerous mold on salami look like?
Pink, red, or orange mold (Fusarium species) is the most dangerous — toss the entire piece. Green mold (Penicillium expansum, Aspergillus) needs trimming or tossing depending on coverage. Fuzzy gray cobweb mold is suspicious. Black mold spots (Aspergillus niger) are usually safe to wipe off.
Can I wipe off black mold from salami and keep eating it?
Yes for surface black mold (usually Aspergillus niger). Mix 50/50 white vinegar and water, wipe affected areas firmly with a clean cloth, then re-inoculate with Bactoferm Mold-600 starter culture. Black mold inside the meat (visible on cross-section) means toss the entire piece.
Why is mold growing on my salami in colors other than white?
Three common causes: no white mold starter culture used (no competitor protection), humidity sustained above 85 percent (favors bad molds), or chamber surfaces contaminated with spores from previous batches. Fix all three for the next batch and bad mold becomes rare.
How long until white mold appears on home-cured salami?
5 to 7 days at 55 degrees F and 75 percent humidity if you used a starter culture (Bactoferm Mold-600). Without starter culture, white mold may take 10 to 14 days and may never establish before competing dark molds. The starter culture is the difference between reliable and lottery.
Should I scrape off all mold before slicing salami?
Optional. White mold is safe to eat and adds flavor. Most commercial salami is sold with white mold intact. If you prefer the cleaner appearance, brush or wipe with a damp cloth before slicing. For black mold, always wipe with vinegar before slicing as a precaution.
Related Articles
- Home Salami Making: The Complete Guide
- Penicillium Cultures for Salami
- How to Make Genoa Salami Step by Step
- Salami Fermentation Chemistry: pH Drop and LAB Science
- Black Mold on Charcuterie: Dangerous or Just Ugly?