Curing Chamber Humidity Control: Adapting Hydroponic Reservoir Tech for Salami
May 4, 2026

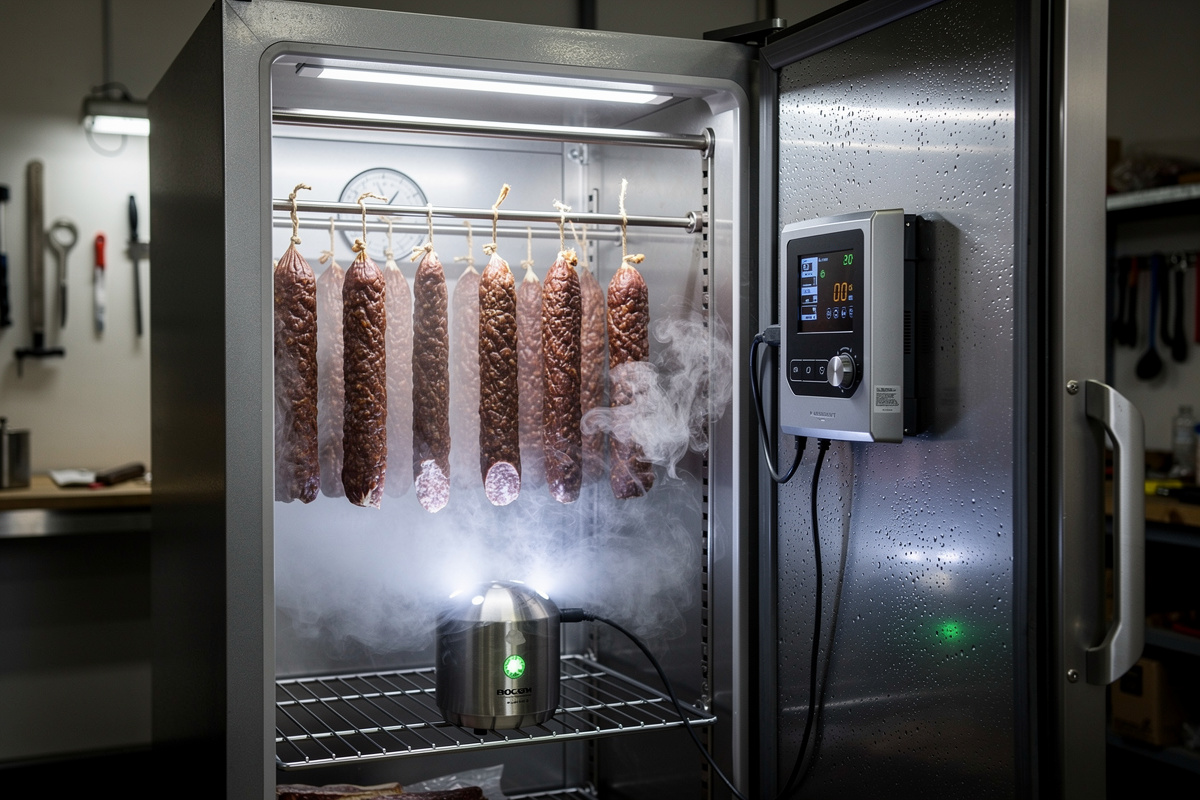
I borrowed the auto-fill reservoir trick from my hydroponic lettuce setup three years ago — a 5-liter food-grade jug, a $9 float valve, a 24 V ultrasonic fogger (the 24 V Mistking-clone unit from any hydroponic shop is what I run) from a grow shop, and a 4-foot length of silicone tube into the chamber humidifier well.
As an Amazon Associate I earn from qualifying purchases.
Total spend was $84 and the chamber has held 75% RH ±2.5% for 14 months without me topping up the reservoir more than once a fortnight. Holding 70-80% relative humidity at 55°F inside a curing chamber for 30-90 days requires the same hardware that hydroponic growers have been using for decades to control nutrient reservoir misting and grow tent humidity: a 24V ultrasonic fogger, a small distilled-water reservoir, a digital humidistat with hysteresis control, and a handful of food-safe silicone tubing. The full setup costs $80-180 — far less than the $400-700 dedicated curing-chamber humidity systems sold to home charcuterie hobbyists. Reservoir auto-fill is one piece of the humidity layer; the four-layer framework is in curing chamber climate control: the complete guide.
This guide walks through which hydroponic mister types work in a food chamber and which ones don’t, the food-safety considerations specific to using grow-equipment in a meat-aging environment, and the controller setup that maintains a 5% RH band without overshoot or oscillation.
Why Curing Chamber and Hydroponic Humidity Are the Same Problem
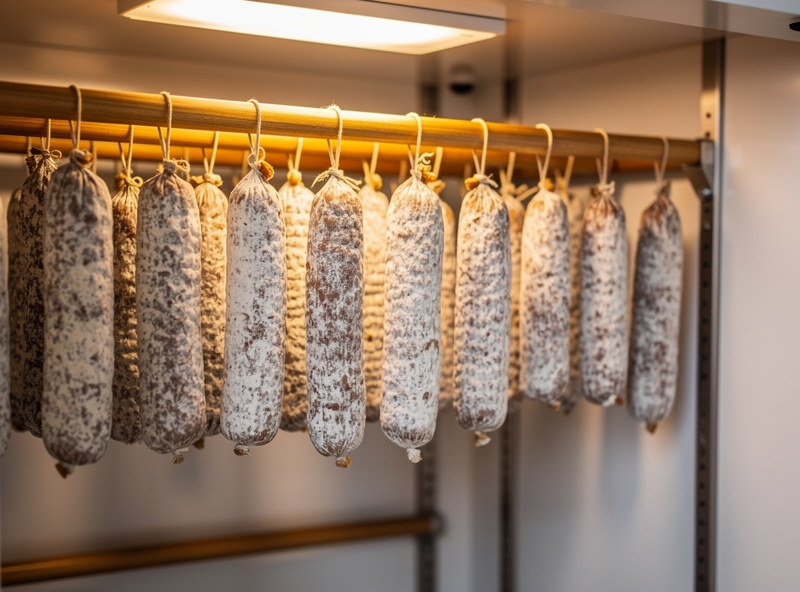
Both applications need to maintain a tight humidity range against a load that constantly removes moisture from the air. A grow tent with active plants pulls 1-3 liters of water out of the reservoir per day through transpiration; a curing chamber with hanging salami absorbs 100-300 ml per day into the casings during the moisture-loss phase. Both setups need a misting/fogging mechanism that adds moisture in controlled bursts, plus a humidistat with hysteresis to prevent the system from cycling rapidly.
The mechanical and electronic side of solving this in a 12-cubic-foot space is identical. Hydroponic growers have been refining the parts catalog for 25 years. Curing chamber builders have only recently caught up.
The Three Misting Technologies and What They Do in a Chamber
Ultrasonic Fogger (recommended)
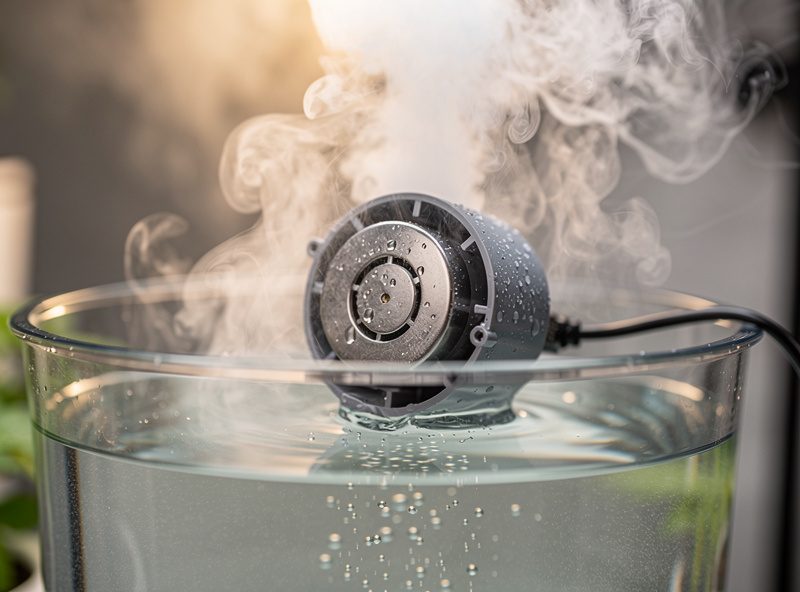
A piezoelectric disc vibrates at 1.7 MHz, atomizing water into 1-5 micron droplets that evaporate before reaching surfaces. This is the gold standard for both hydroponics and curing chambers. The 24V single-disc units (sold as “pond foggers” or “hydroponic foggers”) deliver 250-400 ml/hour and cost $25-60. Five-disc commercial units deliver 2-3 liters/hour and cost $150-300.
The food-safety advantage: ultrasonic atomization produces droplets too small to wet the meat surface, eliminating any risk of liquid water making direct contact with curing casings — which would invite undesirable mold strains.
Misting Nozzle (NOT recommended for food chambers)
High-pressure misting nozzles (the kind used on patios) push water through tiny orifices at 60+ PSI. Droplet size is 20-100 microns — large enough to coat surfaces. Acceptable in hydroponic grow tents where surface wetting doesn’t matter, but causes problems in curing chambers because direct water contact with casings creates conditions for slime mold and “slime stickiness” defects.
Steam Generator (acceptable, more complex)
A small kettle-type steam generator (the kind sold for sourdough bread proofing boxes) introduces water vapor at 100°C, which then cools and humidifies. Works but adds 2-5°C to chamber temperature on each cycle, which is undesirable for a 55°F target. Steam generators work better in larger chambers where the temperature spike is diluted.
The Hydroponic Parts Catalog That Maps Directly to Charcuterie
The specific parts list that adapts cleanly:
- Ultrasonic fogger: Mistmaker single-disc 24V (250 ml/h, $25-40) or three-disc 36V ($60-100). The same units sold by hydroponic retailers like Hydrobuilder, GrowGeneration, and HTG Supply.
- Reservoir tank: Any food-grade plastic container that holds 2-4 liters and accepts the fogger disc. Hydroponic deep-water culture buckets work; so do simple food-storage containers.
- Distilled water source: Tap water leaves mineral deposits on the fogger disc and creates white dust in the chamber. Use distilled or RO water exclusively.
- Inkbird IHC-200 or Auber Instruments humidistat: The same controllers hydroponic growers use. Set 75% RH ON / 78% RH OFF for a 3% hysteresis band that prevents short-cycling.
- Small computer fan (60-80 mm): Mounted near the fogger to spread the humid air evenly through the chamber. The hydroponic version is a “duct booster fan.”
- Float switch (optional): Auto-shuts the fogger off when the reservoir drops below a safe level. Same part hydroponic growers use to prevent reservoir pumps from running dry.
For the broader hydroponic-equipment landscape that this parts list draws from, our partner site has the complete hydroponic equipment buying guide, which covers the full ecosystem of misters, fans, controllers, and reservoirs in deeper detail than fits here.
The Controller Setup That Actually Holds a Tight Range
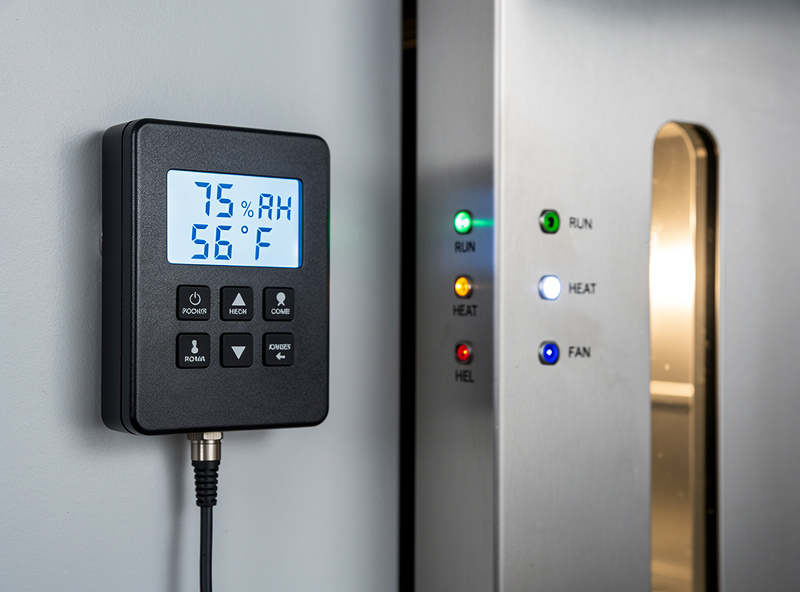
The single most important setting is hysteresis — the gap between “turn ON” and “turn OFF” trigger points. Without hysteresis, a humidistat short-cycles every 30-60 seconds as humidity oscillates around the setpoint. Cycling that fast burns out fogger discs in weeks and makes the readings on the display impossible to interpret.
The right setup for a 12-cubic-foot curing chamber:
- Setpoint: 75% RH for the bulk of the curing window. Higher (78-82%) for the first week of salami casing inoculation. Lower (70-72%) for cheese aging.
- Hysteresis: 3% band. Turn fogger ON at 73%, OFF at 76%. Most controllers expose this as “differential” or “delta.”
- Minimum on-time: 30 seconds. Prevents the fogger from briefly clicking on and off as humidity passes through the setpoint zone.
- Sensor placement: Mid-chamber, away from both the fogger output and the wall. Position the sensor where the meat hangs to measure what the meat experiences.
- Temperature compensation: Most digital humidistats compensate automatically. Verify yours does, especially if your chamber temperature varies more than 5°F across the day.
Comparison: Curing Chamber Humidity Setups
| Setup | Hardware | Approx Cost | RH Range | Maintenance | Best for |
|---|---|---|---|---|---|
| Bowl of water (passive) | Just a bowl | $0 | Highly variable, 60-85% | None — but worthless | Cheese aging at 50-60% RH only |
| Wet sponge in fan stream | Sponge + fan | $20 | Marginally better, still drifts | Re-wet daily | Short cures under 30 days |
| Single-disc ultrasonic + Inkbird | Mistmaker + IHC-200 | $80-130 | Tight 73-77% with hysteresis | Refill reservoir 1x/week | Standard recommendation — DIY salami / charcuterie |
| Three-disc ultrasonic + Auber | Mistmaker 3-disc + auber controller | $180-260 | Tight 73-77% in larger chambers | Refill 1x/week | Larger 20+ cubic foot chambers |
| Govee H5104 + smart plug | Govee hygrometer + Sonoff smart plug + ultrasonic | $120-180 | Smartphone alerts on drift | Same as Inkbird + integration | Want phone notifications |
| Auber WSD-1500 + commercial mister | Premium controller + 5-disc mister | $400-650 | Tightest control, multiple zones | Refill 2x/week | Multiple chambers / commercial volume |
Food Safety Considerations Specific to Repurposed Hydroponic Gear
Hydroponic equipment is rarely sold as food-grade, so a few precautions apply when adapting it to a curing chamber:
- Use only food-grade silicone tubing. Standard hydroponic vinyl tubing leaches plasticizers; food-grade silicone (sold for brewery use) is identical in form factor and costs marginally more.
- Clean fogger disc weekly. Mineral buildup from any water source (even distilled) eventually forms on the piezo disc. A vinegar-soaked cloth wipe weekly extends disc life from months to years.
- Replace water reservoir monthly. Bacterial buildup is invisible but real. Drain and rinse the reservoir with food-safe sanitizer (Star San is the standard) every 30 days.
- Verify food-safe plastic. Standard hydroponic buckets are food-grade HDPE; cheap repurposed containers may not be. Look for “BPA-free” and “food contact safe” stamps on the container.
Building Your First Chamber Humidity System
- Day 1: Assemble parts. Inkbird IHC-200 ($45), single-disc ultrasonic fogger ($30), 4-liter food-grade reservoir ($15), 60mm USB fan ($10), distilled water ($5). Total: $105.
- Day 2: Mount the fogger reservoir at the bottom of the chamber. Plumb the fogger output through a short food-grade silicone duct toward the upper chamber. Position the small fan to circulate humid air.
- Day 3: Wire the IHC-200 to switch the fogger via its outlet. Set 75% setpoint with 3% hysteresis. Verify the sensor reads room humidity correctly before installing.
- Day 4-7: Run the empty chamber for 3-7 days to verify it holds the setpoint within 2% across day-night temperature variation.
- Day 8+: Hang first product. Monitor chamber humidity hourly for the first week.
For the broader curing chamber build context — refrigerator conversion, temperature control, ventilation — see our convert fridge to curing chamber guide, the off-grid curing chamber power guide, and the smart sensors for curing chambers. The case hardening troubleshooting guide covers the most common humidity-related defects and what they tell you about your control setup.
For the food-microbiology background, Pork Information Gateway’s dry/semi-dry sausage validation guidance is the source I keep coming back to for drying-room RH and temperature targets — semi-dry product at 65-75% RH, dry sausage at a slightly higher 68-72% RH, both well inside the range this fogger setup holds. For the DIY chamber-build side of the equation, Two Guys and a Cooler is the hobbyist build-and-troubleshoot resource I point people to for the parts-level detail this guide doesn’t cover.
Frequently Asked Questions
Why use hydroponic equipment in a curing chamber?
Hydroponic ultrasonic foggers solve the same humidity-control problem charcuterie chambers face: maintaining a tight 70-80 percent RH range against constant moisture loss. The hardware costs $80-130 versus $400-700 for dedicated curing-chamber humidity systems, and uses the same mechanism with the same precision.
Are ultrasonic foggers food-safe?
Yes, when paired with food-grade reservoirs and silicone tubing. Ultrasonic atomization produces droplets too small to wet the meat surface, so the food never contacts liquid water from the fogger. Use distilled or RO water and clean the disc weekly to maintain food safety standards.
What humidity setting do I use for salami?
75 percent RH for the bulk of the cure with a 3 percent hysteresis band (turn ON at 73 percent, OFF at 76 percent). For the first week of casing inoculation, 78-82 percent supports mold establishment. Lower values (70-72 percent) work for cheese aging. Setpoint depends on product type and ambient conditions.
Why does hysteresis matter for a curing chamber?
Without hysteresis, a humidistat cycles every 30-60 seconds as humidity drifts around the setpoint. This rapid cycling destroys ultrasonic fogger discs in weeks and produces unstable readings. A 3 percent hysteresis band keeps cycle times in the 5-15 minute range, which is what fogger hardware is designed for.
Can I use tap water in the fogger reservoir?
No — tap water leaves calcium and mineral deposits on the piezo fogger disc within days, reducing output and eventually killing the disc. The minerals also create a white dust that coats the inside of the chamber. Use distilled or RO water exclusively. The cost is roughly $5 per month for a small chamber.
How often do I refill the fogger reservoir?
A standard 4-liter reservoir running a single-disc fogger lasts 7-14 days at 75 percent RH setpoint. Larger 3-disc systems use proportionally more water. The Inkbird IHC-200 displays cumulative on-time, which combined with the fogger’s rated output gives a precise refill schedule.
Can I integrate this with a smart home for alerts?
Yes — pair an Inkbird IHC-200 with a Govee H5104 wireless hygrometer or a Tuya-compatible humidistat that publishes to MQTT. Home Assistant or SmartThings can then alert you when humidity drifts outside your defined range. The smart integration costs an additional $40-60 over the basic Inkbird setup.