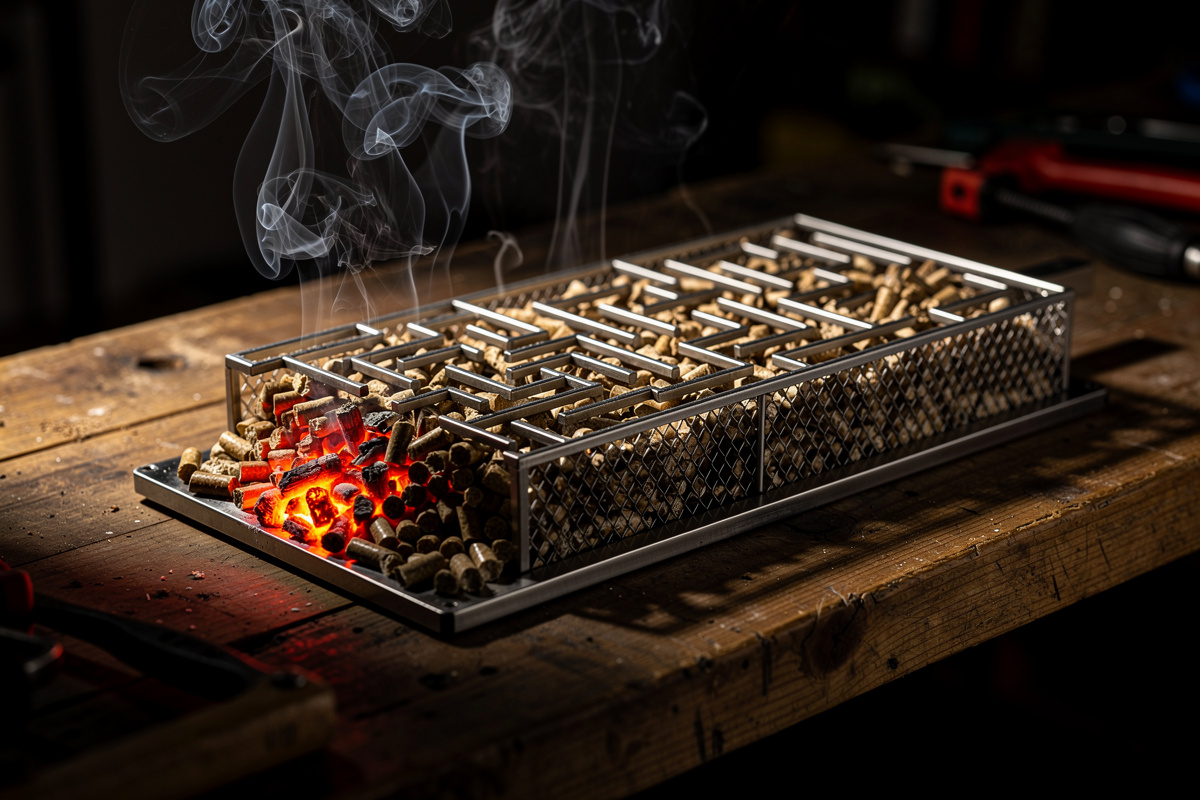

I built my first DIY maze generator from a $9 piece of 1/4-inch stainless mesh and a $14 bag of Bear Mountain (which is what I run for charcuterie — apple-cherry blend gives a milder profile than oak) apple pellets, and the first burn ran 8 hours and 35 minutes from a single fill.
The current version sits in a small steel pan outside my chamber with the smoke piped in through a 1-inch silicone hose so the heat stays out of the cure space. Build a DIY cold smoke maze generator from stainless steel mesh by cutting a 12 by 12-inch piece of 1/4-inch stainless mesh, folding it into an S-shaped maze pattern with three parallel channels, filling the channels with food-grade wood pellets (buy pellets sold specifically for grilling/smoking — 100% hardwood, no fillers or binders — rather than pellet-stove heating fuel, which is a different product designed to burn hot and can contain glue and additives not meant for food contact; the Pellet Fuels Institute standards program is the independent quality-mark most heating-pellet bags carry, which is exactly why it’s a useful negative signal — smoking pellets marketed to grillers don’t carry it and don’t need to), lighting one end with a torch, and placing it in your smoke cabinet. Total cost is $15-25 in materials, build time is 30-45 minutes, and one pellet load produces 8-10 hours of cold smoke at temperatures below 90°F. The full workflow — temperature targets, wood choice, food schedules, rest periods — is in cold smoking at home: the complete guide.
Cold smoking adds smoke flavor without cooking the food — essential for charcuterie, cheese, salt, and other items that should not be hot-smoked. Commercial cold smoke generators run $80-200 retail; the DIY maze version produces equivalent smoke at one-tenth the cost. The technology is simple: pellets smolder rather than burn when packed in a thin maze, releasing 8-10 hours of low-temperature smoke from one fill. One thing the maze does not do: make raw meat safe. Smoke on its own is not a substitute for the nitrite cure — the antimicrobial action against Clostridium botulinum comes from the cure salt, not the smoke, a point confirmed in the meat-science literature on nitrite/nitrate function. Every piece that goes in front of this maze has already been salted and cured to a safe point first.
As an Amazon Associate I earn from qualifying purchases.
Why Maze Generators Beat Other Cold Smoke Methods
The maze design forces wood pellets to smolder progressively along a thin trail rather than burning quickly. The result is consistent low-temperature smoke at 60-90°F (versus 200-350°F from a burning fire). Maze generators run unattended for 8-10 hours from one pellet load — far longer than chip-tray methods (1-2 hours) or cold-smoke add-ons that require constant monitoring.
Method comparison:
- Maze generator (DIY or commercial): 8-10 hours unattended, 60-90°F smoke, $15-150 cost. The hobbyist standard.
- Pellet tube smoker: 4-5 hours, 80-100°F smoke, $20-30. Smaller capacity than maze; good for compact smokers.
- Chip tray with electric heating element: 1-2 hours, but cleaner ash. Higher cost ($60-120) and needs power.
- Smoke generator with air pump: Continuous operation, very low temperature, $200-400. Premium overkill for hobby use.
- Cold smoking attachment for an existing smoker: Variable. Brands like A-MAZE-N and Smoke Daddy retail $30-100.
- Skipping cold smoke entirely: Some charcuterie traditions (Italian) skip smoking. Acceptable but limits flavor profile.
The DIY maze version performs identically to the A-MAZE-N commercial maze (which retails $35-50) at about a third the cost. Read about cold smoking application in our cold smoking salami: when to add smoke guide.
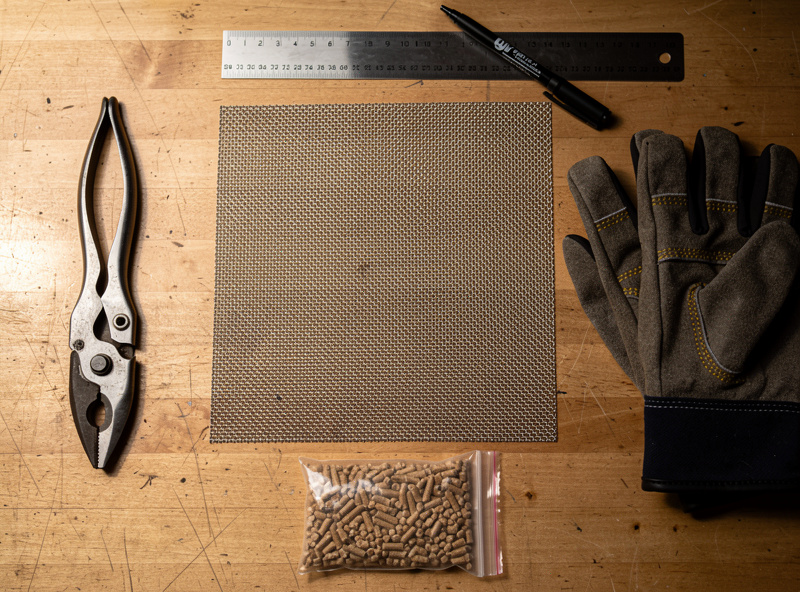
Materials List for the DIY Maze Build
Build materials total $15-25: a 12 by 12-inch piece of 1/4-inch stainless steel hardware cloth or mesh ($10-15 at hardware stores), tin snips for cutting ($8-15 if not already owned), needle-nose pliers for bending and shaping (existing tool), and a torch lighter ($8-15) or propane torch for lighting the pellets. Plus food-grade wood pellets ($12-18 per 5-pound bag).
Specific component sources:
- Stainless steel hardware cloth, 1/4-inch grid: Home Depot or Lowes by-the-foot ($3-5 per square foot). 12 by 12 inches is sufficient for one maze. Buy 18 by 18 inches to allow material for revisions.
- Tin snips: Standard tin snips at any hardware store; $8-15. Aviation snips with red, yellow, or green markings work for left, straight, or right cutting curves.
- Needle-nose pliers: For bending the mesh into the maze pattern. Standard tool; most workshops already have these.
- Wire ties or stainless steel wire (optional): Reinforce the maze structure if it tries to unfold during use.
- Food-grade wood pellets: Apple, hickory, maple, mesquite, cherry, oak — choose based on flavor preference. 5-pound bags ($12-18) last for 30-50 maze fills.
- Torch lighter or butane crème brûlée torch: 30-60 seconds of direct flame to start the pellets smoldering. Avoid lighter fluid which contaminates flavor.
- Heat-resistant gloves: For handling the lit maze. Welding or grilling gloves work.
The total cost is far below commercial alternatives, and the materials produce 30-50 cold-smoking sessions before any maintenance is needed. The mesh holds up indefinitely with normal handling; the pellets are the recurring consumable. Read about wood pellet selection in our cold smoking salami guide.
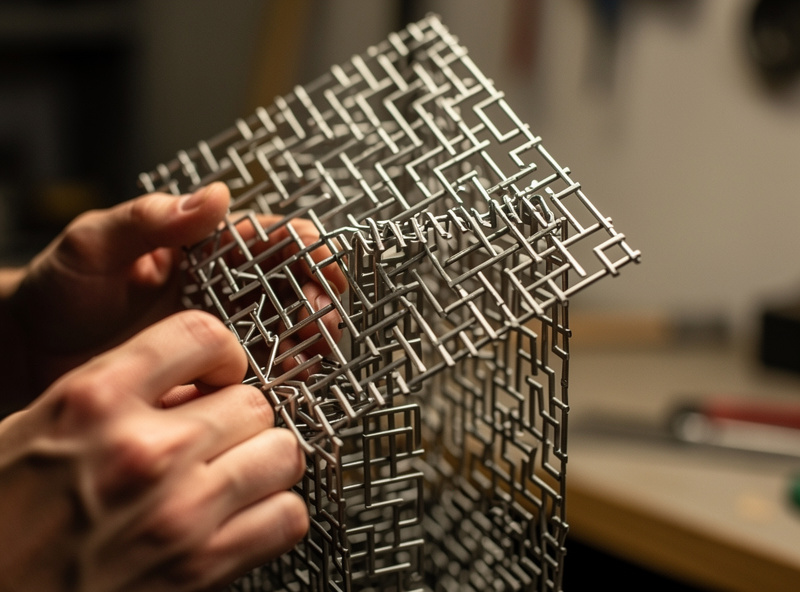
Step-by-Step Build Procedure
Build the maze by cutting the stainless mesh to 12 by 12 inches, marking three parallel fold lines at 3, 6, and 9 inches, folding the mesh into a series of zigzag channels using needle-nose pliers, securing the structure with bent corners or wire ties, then test-loading and lighting the pellets to verify smoldering performance. Total active time is 30-45 minutes.
Full build steps:
- Cut mesh to 12 by 12 inches: Use tin snips. Wear gloves; cut edges are sharp.
- Mark three parallel fold lines: At 3, 6, and 9 inches from one edge. Use a permanent marker.
- Fold the first crease at 3 inches: Bend the mesh 180 degrees backward along the line. Crease firmly with a hammer or mallet on a flat surface.
- Fold second crease at 6 inches: Bend forward 180 degrees, creating a U-shape that opens toward the front.
- Fold third crease at 9 inches: Bend backward 180 degrees again, creating an S-shape with three parallel channels.
- Set the maze upright on a flat surface: The S-shape should stand on its edges, creating three trough-like channels each about 3 inches wide.
- Bend the open ends shut: Use needle-nose pliers to bend the mesh closed at each end, preventing pellets from spilling out.
- Connect the troughs: Where each trough meets the next at the fold, ensure pellets can flow freely through the connection. Bend any restricting mesh open.
- Fill all three channels with pellets: Pack tightly enough that pellets stay in place but loose enough that air can flow.
- Light one end with a torch: Apply direct flame for 30-60 seconds until pellets begin to smolder. Some users let the maze sit for 5-10 minutes after extinguishing the flame to verify continued smoldering.
- Place inside smoke cabinet: Position with the lit end positioned to receive air flow that pushes smoke toward the food.
The maze pattern is the key innovation — pellets in a thin trail smolder rather than burn. A maze 30 inches of total path length (across the three folded sections) produces 8-10 hours of smoke. Longer paths produce more smoke time but require more mesh to construct. Read about specific smoking applications in our companion piece on cold smoking salami at what temperature.
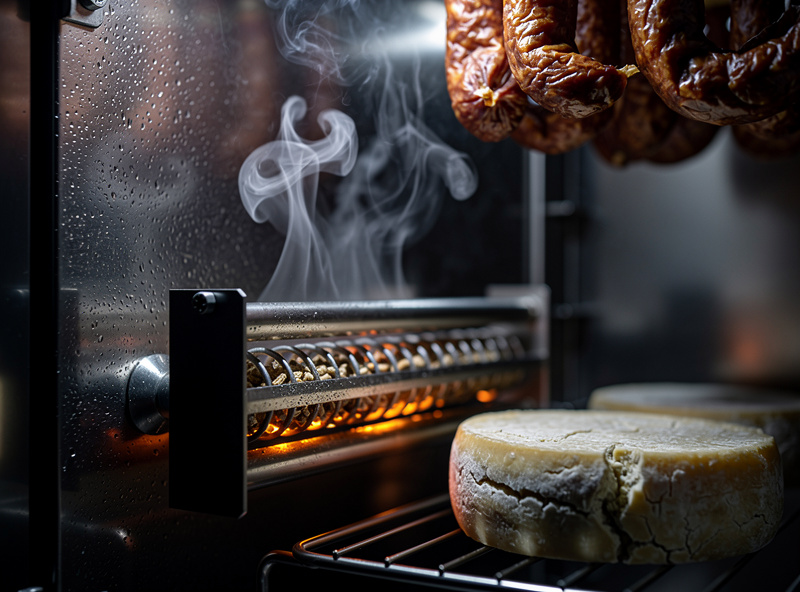
Operating the Maze for Cold Smoking
Operate the maze by placing it in the bottom of a smoke cabinet (an old offset smoker, a converted refrigerator, or a dedicated cold-smoke chamber), lighting one end, allowing 5-10 minutes of “burn-in” before adding food, then adding food on racks above the maze. Maintain ambient air temperature below 85°F for cheese and below 80°F for cured meat. One pellet load produces 8-10 hours of useful smoke time.
Operating procedure:
- Choose a smoking enclosure: Old offset smoker, beer cooler with rack, converted refrigerator, or dedicated cold-smoke cabinet. Almost any sealed cabinet with rack space works.
- Light the maze 5-10 minutes before adding food: The “burn-in” period stabilizes smoke output and burns off any unwanted compounds.
- Verify temperature is below your target: Cheese cold-smokes at 60-85°F maximum; meat at 60-80°F maximum. Above these temperatures the food cooks instead of smoking.
- Position food on racks above the maze: Indirect smoke path produces best flavor. Direct smoke path can produce uneven coverage.
- Run for 6-12 hours: Most cheese needs 4-6 hours; salami 8-12 hours over 2-3 separate sessions; nuts and salts 1-2 hours.
- Refill pellets as needed: Check at 6 hours; refill if pellets in the lit channel have burned out and the next channel hasn’t started yet.
- Allow rest period after smoking: Smoked products benefit from 24-48 hours of rest at refrigerator temperature to allow smoke flavors to penetrate and mellow.
- Store pellets in airtight containers: Moisture in pellets prevents proper smoldering. Keep them dry in sealed bags or buckets.
The smoke output of a properly burning maze is light gray-blue and almost invisible at distance. White or thick yellow smoke means the pellets are burning hot rather than smoldering — usually due to too-tightly-packed pellets or excessive airflow. Read about smoke flavor specifics for cured meats in our cold smoking salami: when to add smoke and at what temperature guide.
Common Maze Generator Mistakes
Five mistakes show up in nearly every first-time maze build: pellets too tightly packed (cannot smolder), pellets too loosely packed (burns out fast), insufficient airflow in the smoking cabinet (smoke does not circulate), wet or moisture-contaminated pellets (refuses to smolder), and using non-food-grade pellets (heating pellets contain binders). Each one ruins a session.
Mistakes and corrections:
- Pellets too tightly packed: Air cannot reach the smoldering edge. Pellets either go out within 30 minutes or fail to light. Pack lightly enough that the maze rattles slightly when shaken.
- Pellets too loosely packed: Air flows too freely; pellets burn rather than smolder. Should be packed firm but not compressed.
- No air circulation in cabinet: Smoke pools at one corner of the cabinet. Add small vents or position the cabinet for natural draft. Some smokers use small computer fans for circulation.
- Wet pellets: Moisture content above 8-10% prevents smoldering. Store pellets in airtight containers; check before use.
- Heating pellets (not food-grade): Heating pellets for stoves contain binders and additives unsuitable for food. Always buy food-grade pellets specifically (Traeger, Lumberjack, Bear Mountain brands).
- Lighting fluid or accelerants: Contaminate the smoke flavor. Always use a torch or direct flame only.
- Maze placement too close to food: Heat from the maze (even cold smoke is warmer than ambient) can cook food. Keep at least 12 inches between the maze and the food.
- Skipping the burn-in period: The first 5-10 minutes of smoke contain compounds that produce off-flavors. Light the maze, wait, then add food.
The reliable practice is to test-fire the maze in the empty smoke cabinet before adding food on the first build. This reveals smoldering performance, smoke output, and any structural issues. Most first-time builders find at least one fix to make on the first session, and the test-fire reveals it before food is at risk. Read about cold-smoking applications more broadly in our cold smoking salami guide.
Frequently Asked Questions
How long does a DIY cold smoke maze run on one pellet load?
8-10 hours for a 12-inch maze with three folded channels of 30 inches total path. Longer paths run longer; smaller mazes run 4-6 hours. Most home users size the maze for 8-hour overnight cold-smoking sessions.
What pellets work best for cold smoking?
Apple, cherry, maple, hickory, oak, and mesquite are all available as food-grade pellets. Apple and cherry produce mild smoke that works for cheese; hickory and oak produce stronger smoke for cured meats. Mesquite is the strongest and best for limited application — short sessions only.
Can I use the maze generator inside a regular grill?
Yes — propane and charcoal grills with a closed lid work well as cold-smoke cabinets when the burner is off. Position the maze on the cool side of the grill; food on the opposite side. Maintain temperature below 90°F throughout the session.
How much does the DIY maze save vs commercial generators?
DIY costs 15-25 dollars in materials; commercial mazes cost 35-50 dollars (A-MAZE-N), pellet tubes 20-30 dollars, dedicated cold smoke generators 80-200 dollars. The DIY save is meaningful but not dramatic versus a commercial maze. Choose DIY for the satisfaction of the build; choose commercial for time savings.
Why is my maze pellets going out instead of smoldering?
Three causes: pellets packed too tightly (no air can reach), pellets too damp from storage moisture, or insufficient initial flame application (under 30 seconds). Solution: light for 60-90 seconds, repack pellets less tightly, store pellets in sealed bags away from humidity.
Is cold smoke from a maze safe?
Yes — food-grade pellets produce safe smoke for cured products that have been properly cured first. Cold smoke does not cook or kill bacteria; the safety comes from the salt cure or fermentation that preceded the smoking. Never cold-smoke uncured raw meat.
Related Articles
- Cold Smoking Salami: When to Add Smoke and Temperature
- How to Make Genoa Salami
- Best Cheese to Age at Home for Beginners
- How to Calculate Salt Percentage for EQ Curing
- Convert a Fridge Into a Curing Chamber