
How to Drill a Curing Chamber Without Breaking Refrigerant Lines
May 12, 2026

Drill through the fridge door — never the back wall — and map any side-panel route with a cornstarch-and-alcohol slurry before you pick up a step bit. The refrigerant lines run in the back wall, both side walls near the rear corners, and sometimes the top, always within 2 inches of the outer skin. Hit one of them and the sealed system vents in seconds; the fridge becomes a 90-pound paperweight.
As an Amazon Associate I earn from qualifying purchases.
Every curing chamber needs at least three penetrations: a probe wire for the temperature sensor, a probe wire for the humidity sensor, and a power cord for the circulation fan. If you run an external humidifier with a tube, add a fourth hole for the humidity inlet. The first chamber I converted taught me the hard way that the back wall is a minefield — I drilled blind and hit the evaporator plate, not a refrigerant line thank goodness, but the resulting pinhole in the cold plate still needed epoxy repair and cost me a week of downtime. If you are starting from scratch, picking the right fridge makes the drilling job easier — some models give you wide door panels and clean side walls, others leave you with only risky options. Since then I have mapped lines on five fridges and have a method that takes twenty minutes and removes the guessing.
Where Refrigerant Lines Actually Run in a Mini Fridge
A compact fridge uses a sealed refrigeration loop: compressor at the bottom back pushes refrigerant through a condenser coil, which snakes through the outer skin of the fridge, then into the evaporator plate inside the cabinet, and back to the compressor. The lines that matter for drilling are the condenser lines — thin copper or aluminum tubing embedded in the foam insulation between the outer metal skin and the inner plastic liner.
On a standard 4.5-cubic-foot mini fridge, the condenser tubing runs in three predictable zones. The back wall carries the condenser grid — you can see it as a black metal grid attached to the outside of the back panel, but on newer units it is hidden inside the skin. The side walls near the back corners carry the vertical riser lines connecting the compressor to the condenser grid. The top edge sometimes carries a horizontal loop, particularly on models where the freezer compartment sits at the top.
The front and bottom panels are almost always line-free. The door is always line-free — there is no refrigerant circuit in the door, only insulation foam. This makes the door the safest drilling target if you can accept the wire routing. On my current curing chamber build, all four penetrations go through the door, with probe wires entering at the upper hinge side and the fan power cord entering at the lower hinge side.
The danger zone is the back 2-3 inches of each side wall and the entire back wall. If you must drill a side wall, stay in the front half of the side panel — more than 5 inches from the rear corner of a 20-inch-deep fridge is usually safe, but never assume without mapping. The top panel above the freezer compartment is another hazard — many models route the capillary tube through the top foam.
The Cornstarch-and-Alcohol Method: Mapping Lines Before You Drill
The mapping method exploits the fact that the condenser lines are warmer than the surrounding foam insulation when the fridge is running. Plug the fridge in, set the thermostat to cold, and let it run for thirty minutes with the door closed. The compressor heats the condenser, the condenser heats the lines in the skin, and those warm lines create a temperature differential in the metal outer skin.
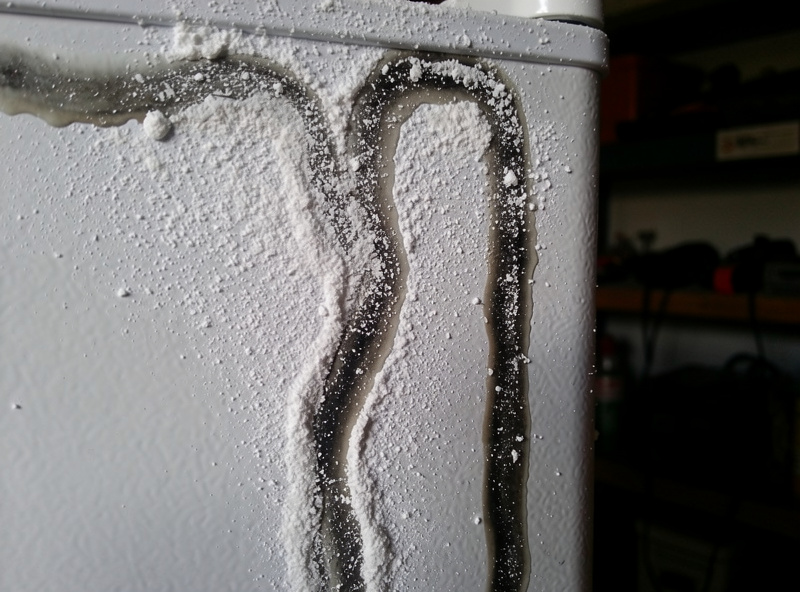
Mix cornstarch and rubbing alcohol into a thin slurry — about one tablespoon cornstarch to three tablespoons of 70% isopropyl alcohol. Paint this slurry onto the area you intend to drill with a foam brush or your finger. The alcohol evaporates faster where the skin is warmer, leaving the cornstarch as a white residue. The cooler areas stay wet longer, so the slurry dries in a pattern that traces the warm lines as dark wet streaks against a dry white background.
I run this test on every new-to-me fridge even if I plan to drill the door. Knowing where the lines are buys peace of mind if you ever need to add a second probe port or move the fan power entry. Mark the safe zones with painter’s tape and take a photo for future reference — six months later you will not remember which 3-inch square was safe.
Where to Drill: Door, Side Panel, or Drain Hole
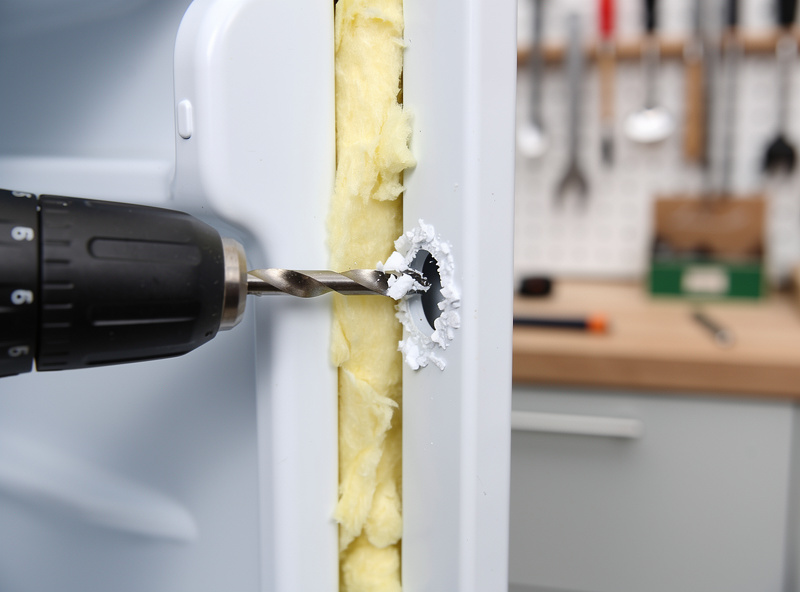
The door is the stress-free option. On most mini fridges the door is 1.5 to 2 inches thick with a plastic inner liner, foam core, and a thin metal or plastic outer skin. Drill from the inside out with a step bit — the inner liner cuts cleanly and the foam drills like butter. The outer skin is the only part that requires care, and it is 0.5 to 1 millimeter thick sheet metal. Use a 3/8-inch or 1/2-inch step bit, go slow, and stop as soon as the tip breaks through.
The side panel is the second choice, limited to the front half of the panel. After mapping lines, confirm your drill points are at least 3 inches forward of the rear corner and at least 2 inches below the top edge. The foam insulation in side panels is 1 to 1.5 inches thick, and there is no plastic inner liner on some models — the side panel is the liner, which means your hole goes directly into the chamber interior. On other models the inner liner and outer skin are separate, and you are drilling through two layers of injection-molded plastic separated by foam — a pilot hole from inside first helps align the drill.
The drain hole is the zero-drill option and worth checking before you pick up a drill. Most mini fridges have a condensation drain at the back of the interior floor — a small rubber plug in a 1/4-inch hole that drains to an evaporation pan under the unit. A 3/16-inch temperature probe wire slides through this drain with room to spare. If you only need one probe inside and can accept the wire exiting through the drain, you have avoided drilling entirely. The downside is the drain route puts the probe at floor level, which is not the ideal sensing location for temperature or humidity. For accurate climate readings, the sensors should be at meat level, roughly centered vertically in the chamber.
Tools and Technique: Step Bits, Not Hole Saws
A step drill bit is the right tool for fridge skin — it cuts cleanly without grabbing, works on metal and plastic in the same hole, and lets you stop at an exact diameter instead of drilling a fixed-size hole you might later regret. I use an Irwin Unibit 10231 ($18 at any home center), which covers 1/4 to 3/4 inch in nine steps and has stayed sharp across four chambers. The no-name step bits from Amazon walk on smooth fridge skin and dull after two or three holes.
Hole saws are dangerous on fridge cabinets. The pilot bit drills ahead of the saw, so if the pilot hits a refrigerant line, the damage is done before the saw touches. Hole saws also grab the thin sheet-metal skin and tear it rather than cutting it, leaving a jagged edge that cracks the paint and starts rust at the rim of the hole. A step bit cuts a smooth, round hole with no tearing.
The technique: mark your hole center with a center punch — the metal outer skin is painted and slick, and a drill bit will wander. Drill a 1/8-inch pilot hole first, checking the depth every half-inch. I run a DeWalt DCD777 cordless drill on the lower clutch setting at maybe 350 RPM — slow enough that you feel the bit grab if it hits anything denser than foam. Anything over 600 RPM and the step bit chatters across the painted skin and starts the paint cracking. If you hear a metallic ping or the bit stops dead, stop immediately — you have found a line. Pick up 1 inch left or right and try again.
After drilling through the outer skin and foam, the inner liner is the last layer. On most fridges the inner liner is a thin ABS plastic sheet. Drill from the outside through all layers, then finish by cleaning the rim with a deburring tool or a few twists of a larger drill bit run backward by hand. A sharp plastic burr on the inner liner will snag meat when you reach past it.
Sealing the Holes: Grommets, Silicone, and Cable Management
Every penetration needs a seal that blocks air exchange. An unsealed 1/2-inch hole lets room air in and chamber air out, which destabilizes both temperature and humidity and creates a condensation point where warm room air meets cold chamber air. The condensation drips down the inside wall and pools on the floor, creating a mold-friendly puddle.
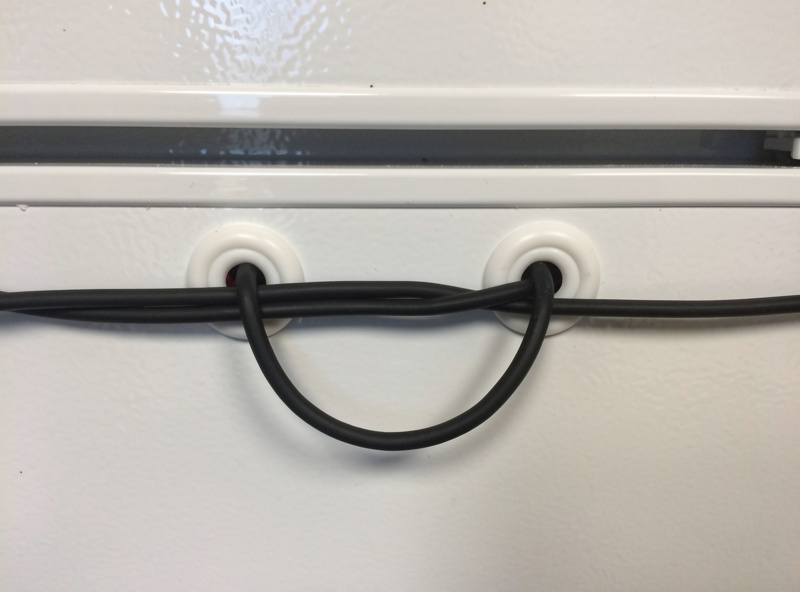
Rubber grommets sized to the hole are the cleanest seal. A 3/8-inch grommet in a 3/8-inch hole with a 1/4-inch probe wire through it makes an airtight friction fit. The wire slides through when you need to reposition a sensor, and the grommet stays put. For larger cable bundles — like a fan power cord plus two probe wires through a single hole — a split grommet lets you wrap the grommet around the bundle instead of threading it through.
Food-grade silicone caulk is the backup seal and works on irregular shapes where grommets will not. I use Sil-Bond 4500, an FDA CFR 177.2600 / USDA-approved / NSF 51-certified RTV silicone in the 2.8-ounce tube — runs $10-15 and cures in 24 hours with no odor in the chamber. Permatex’s automotive RTV lines are not food-grade, so skip anything from the hardware-store gasket-maker aisle even if the tube says “food safe” on a sticker — check for the actual NSF/FDA/USDA marks on the label. Apply a bead around the wire on both the inside and outside of the hole, tool it smooth with a wet finger, and let it cure for 24 hours before powering on the chamber. The silicone must be food-grade — standard bathroom silicone outgasses acetic acid during cure, and that vinegar smell will permeate a salami casing for the duration of a six-week cure.
For the door penetration specifically, the wire bundle needs a service loop. Leave 6 to 8 inches of slack inside the door so the probes can reach mid-chamber without tension when the door is open. Outside the door, route the wires along the hinge side and secure them with adhesive cable clips. A wire that flexes every time the door opens will fatigue at the grommet and fail after a few hundred cycles — the service loop moves the flex point away from the seal. A broken probe wire mid-cure is one of the most common chamber failures because the controller reads open-circuit as -40°F and runs the compressor nonstop.
What Not to Do: The Three Drilling Mistakes That Kill Fridges
Drilling the back wall is the most common fatal mistake. The evaporator plate is mounted to the inside of the back wall with the refrigerant lines entering directly behind it. Any hole in the back wall is within an inch of a line, and the lines are small — 1/8-inch copper capillary tubing that a drill bit will sever instantly. Most fridges built after 2018 use R-600a (isobutane), approved for domestic refrigerators under the EPA SNAP program — the U.S. charge limit was actually raised from an older 57-gram cap to 150 grams in September 2018 under a UL 60335-2-24 standard update, so a compact fridge’s actual charge is usually well under that ceiling. Small as that sounds, isobutane is classed A3 (flammable) under ASHRAE Standard 34, and venting it into a basement is exactly the situation the charge limit was set to avoid. If you need a rear penetration, drill through the back panel from the outside only if you have removed the inner evaporator assembly first, which effectively totals the fridge as a refrigerator and turns it into a cabinet with a hole.
Drilling from the outside without mapping is the second mistake. The outer metal skin hides everything, and the foam insulation gives no feedback until the bit is through. Map first. Every time. The twenty minutes it takes is cheap insurance against a $150 fridge replacement and the four days it takes to strip a new fridge, bleach it, and get it ready for meat. On the full cost breakdown, a ruined fridge doubles your build budget overnight — the $12 step bit and twenty minutes of cornstarch mapping cost less than a single takeout dinner.
Using a hammer drill or impact driver is the third mistake. Impact drivers drive fasteners — they do not drill clean holes in thin sheet metal. The hammering action dents the skin before the bit cuts, and the dent propagates as a crack from the hole edge. Standard cordless drill, low speed, light pressure. Let the step bit do the cutting.
| Drill Location | Safety Rating | Line Risk | Best For |
|---|---|---|---|
| Door (anywhere) | Safest | Zero — no refrigerant in door | Probe wires, fan power, multiple penetrations |
| Side panel, front half | Safe after mapping | Low if >3 inches from rear corner | Single probe wire, humidity inlet tube |
| Side panel, rear half | Risky | High — condenser riser lines | Not recommended without mapping |
| Top panel | Risky | Moderate — capillary tube routing | Avoid unless fridge model is documented line-free |
| Back wall | Dangerous | Certain — evaporator assembly | Never |
| Drain hole (existing) | Safest | Zero — factory opening | Single probe wire at floor level |
How I Drill My Chambers Now
After five mapped fridges and one that taught me the back wall is off limits, my drilling routine for a new chamber runs about an hour start to finish: thirty minutes of cornstarch mapping while I clean the interior with vinegar, four holes through the door with the Irwin Unibit, grommets and Sil-Bond food-grade silicone on each penetration, and a service loop secured with adhesive cable clips so the wires never flex at the seal. If I were starting today and the budget allowed, I would buy a new mini fridge specifically to skip the line-mapping step on a used one — the drilling is faster on a fridge whose schematic is still online. The next step is the climate control wiring, where the probes go through the upper holes and the fan power through the lower.
Frequently Asked Questions
Can I drill through the door of a mini fridge without hitting anything?
The door of every mini fridge is refrigerant-free — it contains only foam insulation between the inner liner and outer skin. Drill slowly with a step bit from the inside out, stop when the tip breaks through the outer skin, and you will not hit anything except foam.
How do I find refrigerant lines before drilling?
Run the fridge for 30 minutes, then paint a cornstarch-and-alcohol slurry on the drill area. The alcohol evaporates faster over warm condenser lines, leaving a visible pattern of dry cornstarch against wet slurry. The warm lines trace out as dark streaks in the white paste.
What size hole do I need for curing chamber probe wires?
A 3/8-inch hole fits a single temperature or humidity probe wire with a rubber grommet for an airtight seal. A 1/2-inch hole fits two probe wires plus a fan power cord bundled together. A step drill bit lets you stop at exactly the right diameter.
Do I need to seal the hole after drilling?
Every penetration needs an airtight seal. An unsealed hole exchanges room air with chamber air, destabilizing temperature and humidity and creating condensation that pools on the floor. Rubber grommets give a clean friction seal; food-grade silicone works for irregular shapes.
Can I use the existing drain hole instead of drilling?
Most mini fridges have a 1/4-inch drain hole at the back of the interior floor that fits a single probe wire. The downside is the sensor sits at floor level instead of meat level, which is not ideal for temperature and humidity accuracy. For one-probe builds, it avoids drilling entirely.
What happens if I hit a refrigerant line while drilling?
The sealed refrigeration system vents its charge — typically 2-4 ounces of R-600a or R-134a refrigerant — and the fridge stops cooling permanently. The system cannot be repaired cost-effectively on a budget mini fridge. The fridge is junk. Drill the door or map the lines first.
Related Articles
- How to Build a Curing Chamber: The Complete Guide
- Best Refrigerator for a Curing Chamber Conversion: Size, Type, Door Orientation
- How to Convert a Fridge Into a Curing Chamber: Step-by-Step Guide
- Curing Chamber Climate Control: Temperature, Humidity, and Airflow Science
- Curing Chamber Build Cost: What I Spent on My $200 Setup