Used Fridge Curing Chamber Inspection: What to Check Before Buying on Marketplace
May 12, 2026

Before handing over $40 to $80 for a used fridge on Marketplace, check three things in this order: plug it in and confirm the compressor kicks on and the interior drops to 40°F or below within thirty minutes, run the dollar-bill test around the entire door gasket with the fridge unplugged and cold, and open the door and smell the interior — if you catch vinegar, rotten produce, or cigarette smoke, the plastic liner has absorbed those odors and they will transfer to your salami for the life of the chamber.
A used fridge is the best value in a curing chamber build — the difference between a $130 budget setup and a $350-plus premium one — but the fridge is also the one component you cannot easily swap out mid-cure. A failed Inkbird controller gets overnighted from Amazon. A failed fridge means you are hauling 15 pounds of half-cured meat to a friend’s spare fridge at midnight and hoping the chamber climate transfers. I have bought three used fridges for chamber builds and walked away from five more at the seller’s doorstep because they failed one of the checks below. This is the inspection checklist I use, in order, with the pass-fail criteria that each check needs.
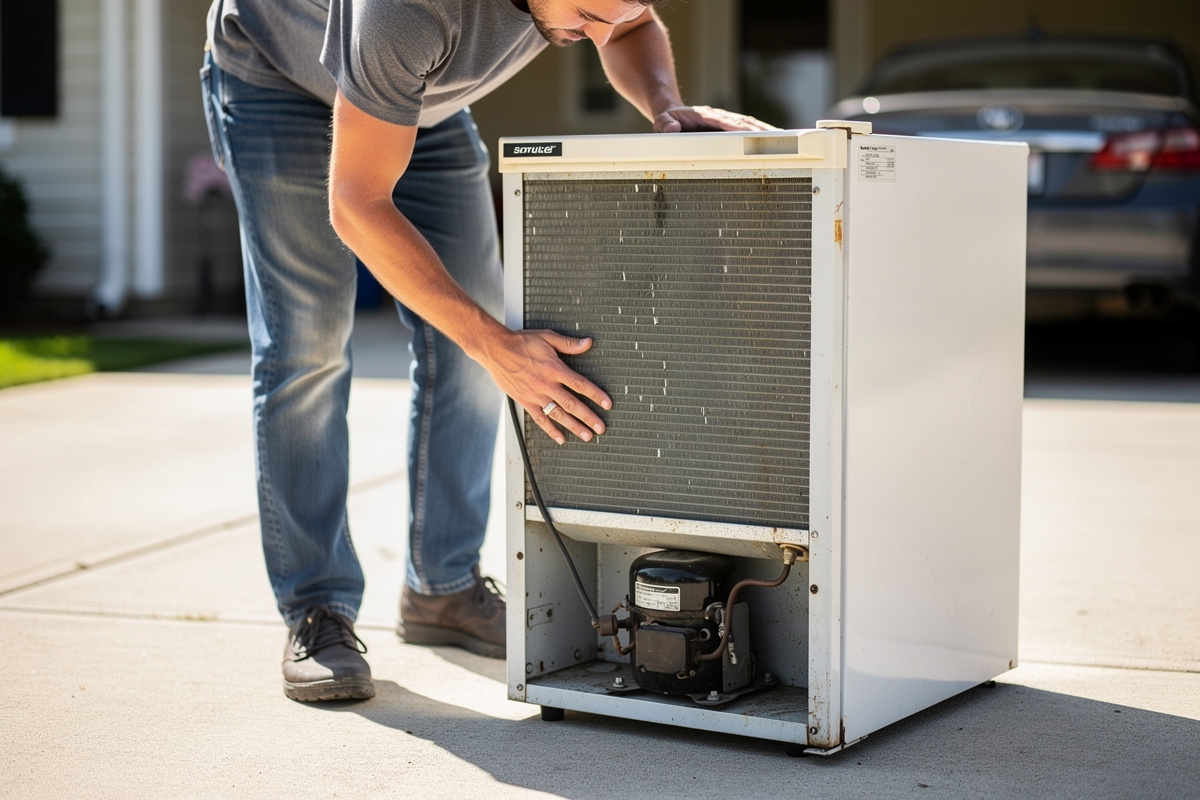
Check 1: The Thirty-Minute Compressor Test
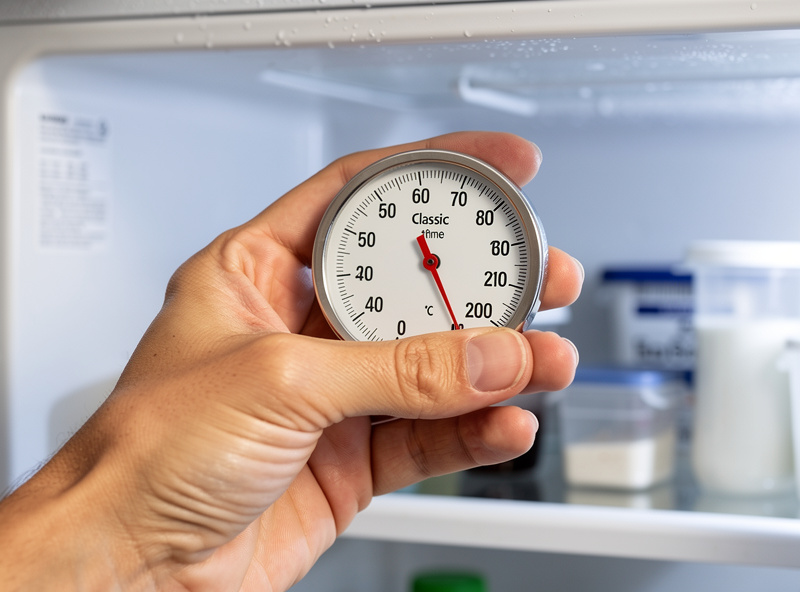
Arrive with a fridge thermometer — a $10 analog dial thermometer is fine because you only need to confirm the temperature drops, not read tenths of a degree. Plug the fridge in, turn the thermostat to its coldest setting, and wait. Within five minutes you should hear a low hum from the compressor at the back-bottom of the unit and feel a slight vibration at the top of the cabinet. Within ten minutes the evaporator plate or the back wall inside the fridge should feel cold to the touch. Within thirty minutes the interior temperature should read 40°F or below on the thermometer sitting on the middle shelf.
If the compressor hums but the interior does not get cold, the refrigerant charge has leaked out — common on fridges older than eight years. If the compressor clicks on and off every thirty seconds — short-cycling — the compressor overload protector is tripping, which means the compressor is failing or the start relay is bad. Either way, walk away. A fridge that short-cycles on the seller’s driveway will short-cycle in your basement, and a short-cycling compressor cannot hold a steady 55°F for the 30-40% duty cycle a curing chamber needs. If the compressor passes but you later run into temperature problems mid-cure, the troubleshooting guide covers diagnosing compressor duty-cycle issues versus controller misconfiguration.
If the fridge is unplugged when you arrive and the seller offers to plug it in for you, let them — but feel the compressor housing first. A warm compressor means the fridge was running before you arrived and the seller unplugged it to hide a starting problem. A cold-start test is the only honest test. If the compressor is warm when you arrive, ask to come back in three hours when the unit has cooled down, or negotiate the price down to the value of the shelves and door gasket because you are buying a cabinet, not a working fridge.
Check 2: Door Gasket and Interior Condition
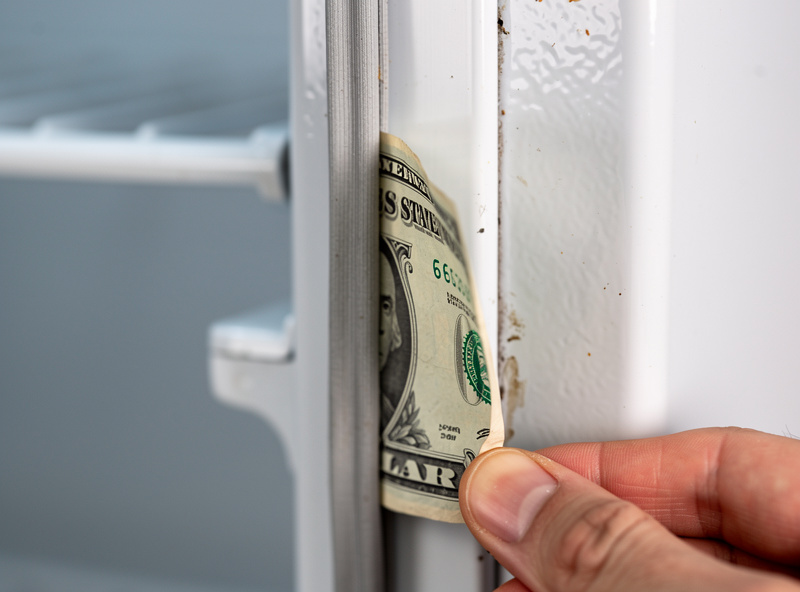
Unplug the fridge after the compressor test — you need the interior cold for the smell test, but the gasket inspection happens with the door free to open and close without fighting the magnetic seal’s vacuum effect. Run the dollar-bill test at eight points around the perimeter: top center, both top corners, mid-hinge side, mid-handle side, both bottom corners, bottom center. A single failed point is repairable — the door seal guide covers gasket replacement and latch shimming. Three or more failed points means the gasket has hardened across the entire perimeter, and a replacement gasket for a used fridge model might not be available if the model was discontinued.
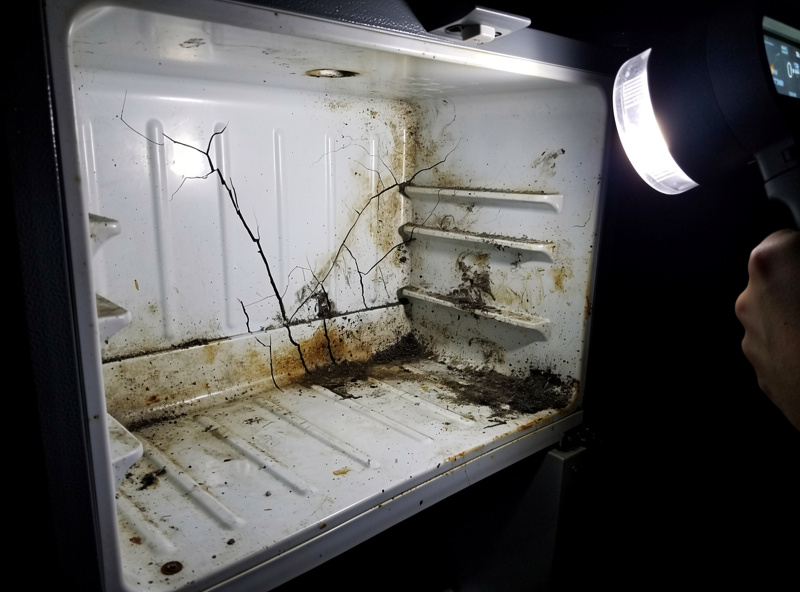
Open the door and inspect the interior plastic liner. Look for cracks longer than 1 inch in the liner walls or floor. A crack in the liner is a condensation trap — moisture wicks into the foam insulation behind the liner through the crack, molds inside the wall cavity where you cannot see or clean it, and releases spores back into the chamber whenever humidity drops and the mold dries out. A cracked liner is a dealbreaker unless you plan to line the entire interior with food-grade silicone sheeting, which adds $30 and four hours of cutting and sealing.
Check the door shelves and internal glass shelves — these are coming out anyway, so the only thing that matters is whether the plastic mounting tabs are intact or cracked. Broken tabs leave sharp plastic edges inside the chamber that will catch your arm when you reach past them. If the tabs are broken, negotiate $10 off the price because you will need to cut them flush with a utility knife.
Inspect the drain hole at the back of the interior floor. It should be a clean 1/4-inch hole with a removable rubber plug. If the hole is clogged with debris or the plug is missing and the hole rim is cracked, the drain path into the evaporation pan under the unit is compromised. A clogged drain that cannot be cleared means water pools on the chamber floor during cures — and the meat on the lowest shelf sits in a puddle.
Check 3: The Smell Test
Close the fridge door for two minutes with the unit unplugged, then open it and smell. The interior of a cold, empty fridge should smell faintly of plastic and nothing else. A vinegar smell means the previous owner stored open containers of pickled food and the acetic acid has permeated the liner. A rotten-produce smell means the fridge sat unplugged with food inside and the decomposition odor is embedded. A cigarette smoke smell means the fridge lived in a smoker’s home and the tar residue is in the plastic.
None of these odors washes out completely. Baking soda absorbs surface odors over one to two weeks of sitting in a closed fridge, but the odor molecules that have diffused into the plastic liner itself will outgas slowly for years. The same mechanism is why the FDA 21 CFR 177.1520 rules on food-contact olefin polymers set extraction-limit testing on the polymer itself rather than just surface cleaning — once an absorbed contaminant is in the resin, it migrates back out into food contact over the lifetime of the part. At 55°F the outgassing is slow enough that you might not notice it. At 75% humidity, the water in the air carries the odor molecules onto the surface of your meat, where they stick to the fat and the casing. A salami that cured in a vinegar-smelling fridge picks up a faint acetic tang that overpowers the spice profile.
If the fridge passes the compressor test and the gasket test but fails the smell test, the fix is replacing the fridge. There is no effective method for deodorizing a plastic liner that has been saturated with organic odors. Bleach solution, enzymatic cleaner, ozone generator — I have tried all three on a used fridge that smelled faintly of garlic and onions, and six months later the salami still carried a ghost of it. The $40 you save buying the smelly fridge costs you $60 in ruined meat on the first batch.
Check 4: Model Number and Parts Availability
Find the model number sticker — usually inside the fridge on the left wall or on the back panel near the compressor. Search the model number on your phone before you hand over cash. You are checking two things: whether a replacement door gasket is available for this model, and whether the fridge uses R-600a (isobutane) or R-134a refrigerant. Both are fine for a chamber. Full-size R-600a fridges only became common after September 2018, when the EPA raised the allowable isobutane charge for new units from 57g to 150g — but small mini fridges like the ones used for chambers have carried the smaller pre-2018 charge for longer, since their refrigerant load already fit under the old limit, so fridge age alone isn’t a reliable way to guess the refrigerant type. Check the compressor data plate instead. R-134a fridges older than ten years often have discontinued gaskets and obsolete thermostats. The commercial-refrigerator equivalent of this inspection is documented in NSF/ANSI 7 — same checks (compressor cooling capacity, gasket integrity, parts availability), just on equipment that has to pass an audit instead of a Marketplace meetup.
If the model number sticker is missing or worn illegible, treat the fridge as having zero parts support and price accordingly — $20 to $30, because you are buying a cabinet with a compressor that might last two years or might last two months. The fridge selection guide covers which specific models have the best parts availability and reversible doors.
Check 5: Transport and Orientation Rules
A fridge must stay upright during transport or the compressor oil drains out of the compressor sump and into the refrigerant lines. If the fridge has been transported on its side — common when someone is moving and the fridge rides in the back seat — it needs to sit upright for at least 24 hours before plugging in. The oil needs time to drain back into the compressor sump, or the compressor starts dry and seizes. Ask the seller how they moved the fridge. If they say “on its side in the car,” the fridge has been on its side — tell them to wait 24 hours before plugging it in for your test, or negotiate the price down because you are taking the risk that the compressor already ran dry.
Transporting a fridge yourself: upright in the back of an SUV or pickup bed, secured with ratchet straps, with a blanket between the fridge and anything hard. If the only way to move it is on its side, mark the side that was down with painter’s tape, set it upright at home, and do not plug it in for 24 hours. The 24-hour rule is non-negotiable — skipping it has killed more used fridges than compressor age ever has.
| Check | Pass Criteria | Fail Criteria | Action if Failed |
|---|---|---|---|
| Compressor test (30 min) | Interior below 40°F, steady hum | No cooling, short-cycling, warm compressor on arrival | Walk away or price as cabinet only |
| Door gasket (8-point dollar bill) | 0-2 failed points | 3+ failed points | Check gasket availability online; replace if available |
| Interior liner condition | No cracks over 1 inch, intact shelf tabs optional | Cracked liner walls or floor | Walk away or add $30 for silicone liner |
| Drain hole | Clean 1/4-inch hole with plug | Clogged or cracked | Try clearing; if cracked, walk away |
| Smell test | Faint plastic odor only | Vinegar, rot, smoke, or strong food odors | Walk away — smells do not wash out |
| Model number | Readable, gasket available online | Missing or discontinued gasket | Price as parts-unsupported ($20-$30) |
| Transport history | Upright transport or 24-hr rest if on side | Plugged in immediately after side transport | Negotiate price down for compressor risk |
If you have not built your chamber yet, the guide to convert a fridge into a curing chamber covers the full conversion step by step.
Frequently Asked Questions
How do I test a used fridge compressor before buying?
Plug the fridge in, set the thermostat to coldest, and wait 30 minutes with a thermometer inside. The compressor should hum steadily and the interior should drop below 40°F. If the compressor clicks on and off every few seconds, the overload protector is tripping — walk away.
Can I remove food smells from a used fridge for curing?
No effective method removes organic odors that have permeated the plastic liner. Baking soda, bleach, enzymatic cleaners, and ozone generators reduce surface odors but the odor molecules embedded in the liner plastic continue outgassing for years. At 75% humidity, those odors transfer to curing meat and taint the flavor.
What should I check on a used fridge door gasket?
Run the dollar-bill test at eight points around the perimeter. One or two failed points are repairable with gasket replacement or latch shimming. Three or more failed points means the gasket has hardened across the entire perimeter and a replacement may not be available for older models.
Is a cracked plastic liner a dealbreaker for a curing chamber?
A crack in the interior liner wicks moisture into the foam insulation where mold grows hidden and releases spores back into the chamber. A cracked liner requires lining the entire interior with food-grade silicone sheeting, which adds $30 and four hours of work. Unless you plan to do that, walk away.
How should I transport a used fridge without damaging it?
Keep the fridge upright during transport so compressor oil stays in the sump. If the fridge must go on its side, let it sit upright for 24 hours before plugging in so the oil drains back into the compressor. Plugging in a fridge immediately after side transport causes the compressor to start dry and seize.
What model of used fridge is best for a curing chamber?
A 4.4-4.7 cubic foot Magic Chef or Danby mini fridge from 2018 or newer, in white with a flat-back evaporator plate and no freezer compartment. Check the model number sticker before buying — if gasket replacements are available online for under $30, the fridge has long-term support.
Related Articles
- How to Build a Curing Chamber: The Complete Guide
- Best Refrigerator for a Curing Chamber Conversion: Size, Type, Door Orientation
- How to Seal a Curing Chamber Door: Gaskets, Latches, and Odor Control
- Budget Curing Chamber vs Premium Build: What Extra $200 Gets You
- Curing Chamber Build Cost: What I Spent on My $200 Setup