Curing Chamber Door Seal: How to Test Gaskets, Replace Latches, and Stop Odor Leaks
May 12, 2026

A curing chamber door seal fails quietly — the gasket loses its spring at one corner, room air slips in, and three days later your humidity setpoint is unreachable because the dehumidifier is fighting a quarter-inch gap that costs you 10% RH every hour. The dollar-bill test catches a failing gasket in thirty seconds, and a replacement gasket costs $15 to $30 and takes twenty minutes to install.
Door sealing is the step in a curing chamber build that gets ten seconds of attention during the initial conversion and then never gets checked again — until the humidity numbers stop making sense. On my first chamber, the door gasket looked fine from the outside but had a flat spot at the lower hinge corner where the fridge had spent years leaning against something. That flat spot bled humidity for six weeks before I traced the problem. Since then I test the seal on every chamber before every batch, and I keep a spare gasket for the fridge model I run. This guide covers how to test, fix, upgrade, and odor-proof a curing chamber door.
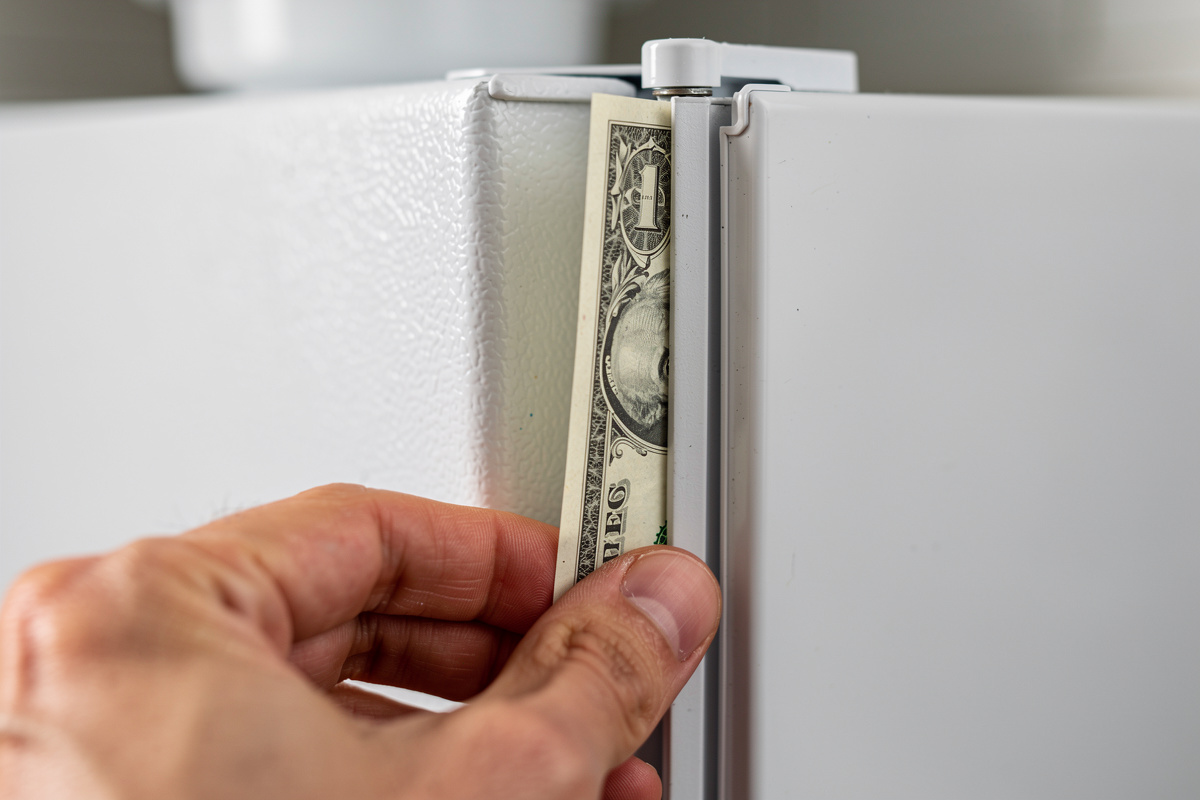
The Dollar Bill Test: Thirty Seconds That Saves a Batch
The test is simple and unforgiving. Close the chamber door on a dollar bill — or any piece of paper — so the bill is pinched between the gasket and the door frame. Pull the bill out slowly. If you feel resistance and the bill drags, the gasket is sealing at that spot. If the bill slides out with no resistance, you have a leak. Repeat the test at six to eight points around the door perimeter: top center, top hinge corner, top handle corner, mid-hinge side, mid-handle side, bottom hinge corner, bottom handle corner, bottom center. It is the same quick check refrigeration service techs use on any gasketed door, home or commercial — a hobbyist’s version of the same close-fitting-gasket requirement that NSF/ANSI 7 formally mandates for commercial walk-in coolers and freezers.
A leak at a corner means the gasket has lost compression set — the rubber or vinyl has taken a permanent flat shape instead of its original bulb profile. A leak along a straight edge usually means the door hinge has sagged or the latch is not pulling the door tight enough. Both problems are fixable without replacing the fridge.
Run the dollar-bill test before loading the first batch after a new build, and repeat it whenever the humidity numbers drift from expectations. The climate control system assumes a sealed box — if the box is not sealed, the controllers chase numbers that the hardware cannot hold, and the compressor and humidifier cycle constantly trying to catch up.
Gasket Replacement: When the Old Seal Is Done
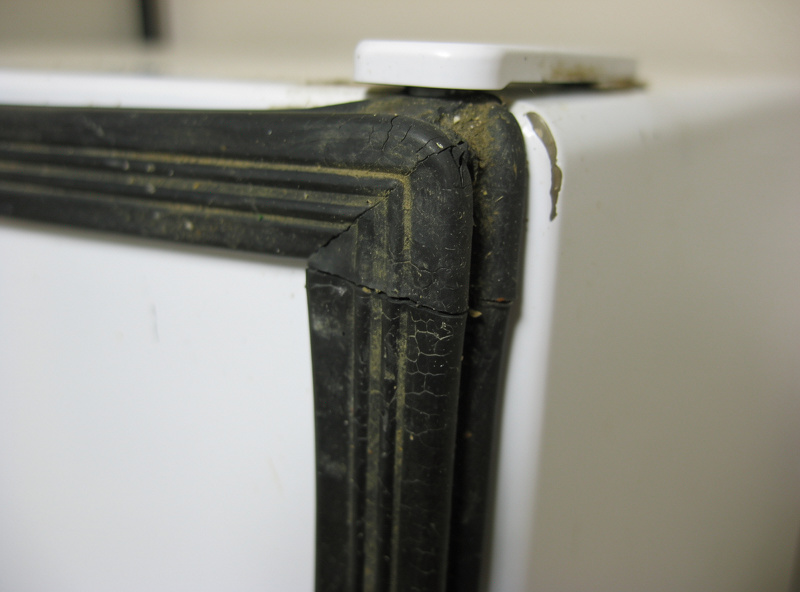
A fridge door gasket is a flexible magnetic strip encased in PVC or rubber that sits in a channel around the inside edge of the door. The magnet holds the gasket against the steel door frame, and the flexible bulb compresses to fill any gap. Over time the magnet strip weakens, the PVC hardens, and the bulb profile flattens — all of which reduce the seal.
Signs the gasket needs replacement: the dollar bill pulls free at three or more test points, the gasket feels stiff instead of pliable when you press it with a finger, or visible cracks or tears appear in the surface. A gasket with even one tear will wick moisture into the door cavity, where it molds and smells and eventually rusts the door frame from the inside.
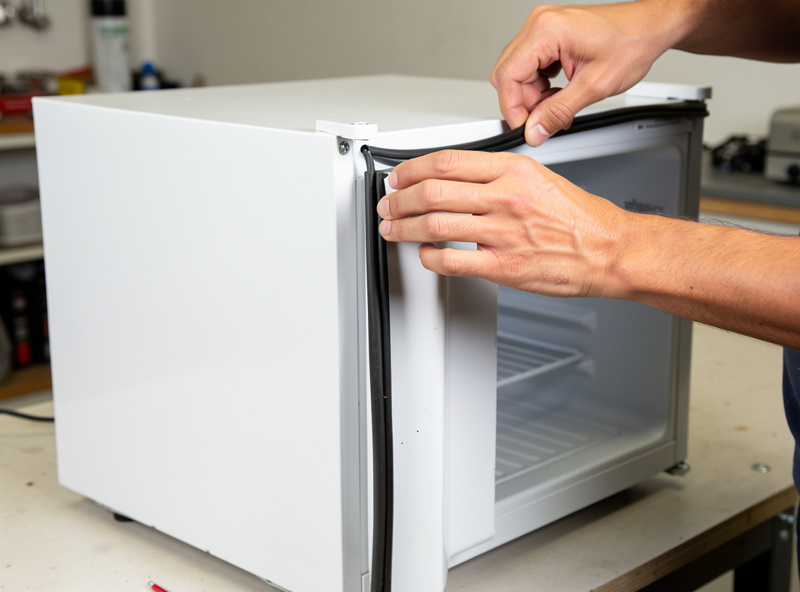
Replacement gaskets are model-specific — you need the exact brand and model number of the fridge. The model tag is usually on a sticker inside the fridge or on the back panel near the compressor. Search for “[fridge model] door gasket” and expect to pay $15 to $30 for a mini fridge, $40 to $70 for a full-size unit. I have had good luck with Frigidaire / Magic Chef OEM gaskets from PartsDr.com and AppliancePartsPros — both ship the actual factory rubber, not the cheap aftermarket vinyl strips on Amazon that flatten within a year. The gasket arrives folded in a box and needs 24 hours laid flat at room temperature to relax the shipping creases before installation. Replacement gaskets are made from food-contact-safe TPE or silicone per FDA 21 CFR 177.2600 (“Rubber articles intended for repeated use”), which is the same rubber-article standard restaurant equipment manufacturers certify to — buying the OEM part keeps you inside that compliance envelope.
Installing a new gasket takes twenty minutes. Pull the old gasket out of the door channel — it is a friction fit, no adhesive. I clean the channel with an OXO Good Grips bottle brush and warm soapy water — the soft bristles pull mold and debris out of the rubber profile without scratching the inner liner the way a stiff wire brush does. Start the new gasket at the top center, press it into the channel working outward toward the corners, and finish at the bottom. The gasket will not seat perfectly on the first pass — close the door for ten minutes to let the magnet settle against the frame, then re-press any sections that lifted. Run the dollar-bill test after installation to confirm every point seals.
Latch Tension and Door Alignment
A fridge door that does not close firmly is a slow leak even with a perfect gasket. The latch mechanism on most mini fridges is a simple plastic catch at the top of the door that hooks into a slot in the cabinet. Over years of use, the catch wears down and the door sits 1-2 millimeters farther from the frame than it should. That millimeter gap is enough to bleed humidity at 3-5% RH per hour.
The fix depends on the latch type. For a worn plastic catch, a thin adhesive-backed felt pad placed behind the catch housing shims the door 1-2 millimeters tighter against the frame. For a door that sags because the hinge screws have loosened in the plastic liner, remove the screws, fill the stripped holes with two-part epoxy putty, drill new pilot holes, and re-seat the screws. For a door that misaligns because the fridge is not level — and many mini fridges have short leveling feet that get ignored — shim the front feet so the fridge tilts backward by 1-2 degrees. Gravity then pulls the door closed instead of hanging open.
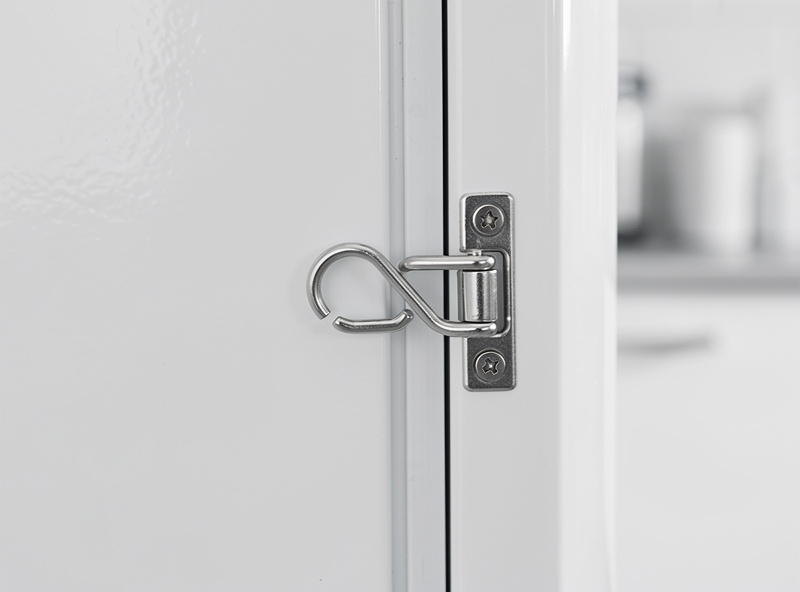
An add-on latch is the belt-and-suspenders solution. A simple hook-and-eye latch or a childproof cabinet latch mounted to the side of the fridge and door frame pulls the door tight regardless of the original latch condition. The add-on latch goes on the handle side, not the hinge side, and the mounting screws go into the door frame and cabinet side — both are refrigerant-free zones if you stay within the front half of the side panel, as covered in the drilling guide.
Odor Control: Keeping the Chamber Smell Inside the Chamber
A curing chamber smells like cured meat — pleasant in small doses, overwhelming when it escapes into a basement or apartment. The smell comes from volatile organic compounds released during fermentation and fat oxidation, and it travels through any gap that lets air through. A door gasket that passes the dollar-bill test for humidity might still pass odor molecules because they are smaller than the water vapor the gasket blocks.
A secondary odor barrier on the inside of the door frame solves the molecular leak. I run M-D Building Products closed-cell foam weatherstripping, 1/4-inch wide by 1/4-inch thick — about $4 a roll at Lowe’s — applied to the door frame so it meets the inner edge of the magnetic gasket when the door closes. The thicker EPDM foam from 3M lasts a few months longer in 75% humidity, but I prefer the M-D price point because I am replacing the strip once a year anyway. This creates a double seal — the magnetic gasket on the outer edge and the foam strip on the inner edge.
For chambers that develop strong odors — particularly during the first week of salami fermentation when pH drops rapidly — a small activated carbon filter inside the chamber absorbs the volatile compounds before they reach the door. A 4-inch by 4-inch sheet of activated carbon filter media clipped to the inside of the door with a binder clip handles a 4.5-cubic-foot chamber for about six months before it saturates. Replace it when the basement starts smelling like a salumeria even with the door closed.
Common Leak Points Beyond the Door
The door gasket is not the only seal in a curing chamber. Every penetration — probe wires, fan power cord, humidity tube — is a potential leak. The rubber grommets that seal the drilled holes compress over time and need a push-check at the start of every batch. Press the grommet with a finger — if it moves in the hole, it has loosened. A dab of food-grade silicone on the outside surface reseats it.
The drain hole is the most overlooked leak. If you are using the factory drain hole for probe wires, the gap around the wire is an open path to room air. A blob of plumber’s putty or food-grade silicone around the wire where it exits the drain seals the gap while still allowing the wire to slide through for repositioning.
The thermostat capillary tube — the thin metal tube that runs from the original fridge thermostat to the evaporator plate — usually enters the cabinet through a hole in the back wall with a loose rubber grommet. If you have disconnected the original thermostat and are running an external controller, that grommet is now an unsealed hole. Pull the capillary tube out, fill the hole with silicone, and let it cure.
| Leak Point | Detection Method | Fix | Cost |
|---|---|---|---|
| Door gasket (worn) | Dollar bill test at 8 points | Replace gasket ($15-$30) | $15-$30 |
| Door gasket (flat spot) | Visual inspection for compressed bulb | Hair dryer heat + massage to restore shape | $0 |
| Door hinge sag | Dollar bill fails on hinge side only | Shim hinge or fill stripped screw holes | $0-$5 |
| Worn latch catch | Door sits 1-2mm from frame | Felt pad shim behind catch or add-on latch | $2-$8 |
| Probe wire penetration | Feel for cold draft at grommet | Food-grade silicone reseat | $0 |
| Drain hole gap | Visible gap around wire | Plumber’s putty or silicone plug | $0-$3 |
How I Reseal a Chamber on a Schedule
My current routine is to run the dollar-bill test before every new batch and once a month on long cures, replace the gasket once a year on cabinet-front fridges and every 18 months on chamber fridges that live in a cool basement, and swap the M-D foam strip and the activated carbon sheet on the same calendar reminder. Total cost runs about $60 a year for two chambers and maybe twenty minutes of fiddling. The payoff is that I have not lost a batch to a humidity bleed in two years — every drop in RH that the data logger flags traces back to a probe wire or a power cord, not the door. The next deeper check is the wall-side penetration audit covered in the drilling and sealing guide.
Frequently Asked Questions
How do I test if my curing chamber door is sealing properly?
Close the door on a dollar bill at multiple points around the perimeter and pull. If the bill slides out with no resistance, the gasket is not sealing at that spot. Test at 6-8 points: top, sides, corners, and bottom. Any point that fails needs gasket replacement or door realignment.
How often should I replace the door gasket on a curing chamber?
Replace the gasket when the dollar bill test fails at three or more points, when the gasket feels stiff instead of pliable, or when visible cracks appear. On a used fridge, expect to replace the gasket within the first year. A new gasket costs $15-$30 and takes twenty minutes to install.
Can I add a secondary latch to a curing chamber door?
A hook-and-eye latch or childproof cabinet latch mounted to the handle side of the fridge pulls the door tight regardless of the original latch condition. Mount screws into the door frame and cabinet side — both are refrigerant-free if you stay in the front half of the side panel.
How do I stop curing chamber odors from escaping?
Add a 1/4-inch strip of closed-cell foam weatherstripping to the door frame as a secondary seal inside the magnetic gasket. Place a small activated carbon filter inside the chamber to absorb volatile compounds before they reach the door. Replace the carbon sheet every six months.
Why is my humidity dropping even though the door looks closed?
A worn gasket, sagging hinge, or loose probe wire grommet creates small gaps that leak 3-10% RH per hour. Check all penetration points and run the dollar bill test around the entire door perimeter. A quarter-inch gap at one corner is enough to destabilize the whole chamber.
Can I use weatherstripping to fix a failing door gasket?
Closed-cell foam weatherstripping works as a supplemental inner seal but should not replace the magnetic door gasket. Foam strips degrade faster in 75% humidity and lose adhesion within 12 months. Use foam as a secondary odor barrier, not as the primary humidity seal.
Related Articles
- How to Build a Curing Chamber: The Complete Guide
- How to Drill a Curing Chamber Without Breaking Refrigerant Lines
- Curing Chamber Climate Control: Temperature, Humidity, and Airflow Science
- Curing Chamber Troubleshooting: The Complete Guide
- How to Convert a Fridge Into a Curing Chamber: Step-by-Step Guide